Sharpening Manual
1 /14Pages

Sharpening Manual
1 /14Pages
Catalog excerpts
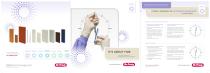
Keep this one page instructional shortcut near your sharpening area in your office for quick reference! i • • • • • • • L • • • • • •V •• •• • • V* • • • • SICKLE SCALERS & UNIVERSAL CURETTES 1. Position instrument vertically with blade to be sharpened at the bottom. 2. Stabilize entire length of instrument with a firm grasp. 3. Brace upper terminal shank with your thumb to counter-balance the pressure of grinding the blade at the bottom. 4. Point tip or toe of blade toward you to sharpen right cutting edge. Point tip or toe away from you to sharpen opposite cutting edge. 5. Keep terminal shank at 12:00. 6. Place surface of stone against right lateral surface of the blade. 7. Tilt top of stone to 3 minutes after 12:00. 8. Using continuous up and down motions, move along the blade starting at the heel third, middle third and finally the toe third. 9. To round the toe of curettes, direct the toe toward 3:00. 10. Place the stone under the blade at 2:00. 11. Use continuous and overlapping up-and-down motions to "round" the toe. GRACEY CURETTES For more information about Hu-Friedy's Total Solutions visit HU-FRIEDY.COM ULTRASONIC SCALING IT'S ABOUT TIME A CLASSIC APPROACH TO SHARPENING SCALERS & CURETTES 1. Position instrument vertically with blade to be sharpened at the bottom. 2. Check the blade identification number: > Aim the toe of all ODD-numbered Graceys toward you. > Direct the toe of all EVEN-numbered Graceys away from you. 3. Stabilize entire length of instrument with a firm grasp. 4. Counterbalance the top shank with your thumb. 5. Tilt terminal shank to 3 minutes before 12:00. 6. Hold stone against right lateral surface and tilt to 3 minutes past 12:00. 7. Using continuous up and down motions, move along the blade starting at the heel third, middle third and finally the toe third. 8. To round the toe of curettes, direct the toe toward 3:00. 9. Place the stone under the blade at 2:00. 10. Use continuous and overlapping up-and-down motions to "round" the toe. Hu-Friedy Mfg. Co., LLC: 3232 N. Rockwell St. | Chicago, IL 60618 | USA Telephone: 1-800-Hu-Friedy (1-773-975-6100) | Website: Hu-Friedy.com How the best perform Visit us online at Hu-Friedy.com ©2017 Hu-Friedy Mfg. Co., LLC. All rights reserved. How the best perform ©2017 Hu-Friedy Mfg. Co., LLC. All rights reserved.
Open the catalog to page 1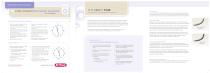
Keep this one page instructional shortcut near your sharpening area in your office for quick reference! L A TIMELY APPROACH TO INSTRUMENT SHARPENING A Classic Appoach to Sharpening Scalers & Curettes This manual describes a classic approach to sharpening periodontal scalers and curettes. Traditional sharpening techniques have relied upon “degrees of angulation” to achieve the correct position of the stone in relation to the blade while sharpening. This alternative method utilizes the simple visual imagery of the hands of the clock to establish the correct positions while holding the instrument...
Open the catalog to page 2
STONE GRITS & LUBRICATION There are many sharpening stone grits available. Be sure to use the proper grit for sharpening dental instruments. • v*! Selecting the appropriate stone will make the sharpening procedure more efficient. TYPE Arkansas Stone The Arkansas Stone is a natural stone with a fine grit. Oil lubrication is recommended when using this stone. The oil serves as a vehicle to float the metal particles as they are ground away from the blade and prevents those shavings from becoming embedded in the stone. The buildup of these shavings in the oil is referred to as "sludge.” Ceramic Stone...
Open the catalog to page 3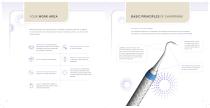
YOUR WORK AREA BASIC PRINCIPLES OF SHARPENING Before beginning the sharpening process, assemble the required materials. In addition to the instruments to be sharpened and the proper sharpening stones, you will need the following items: Safety Glasses: required when sharpening, should cover the eyes completely and have side panels for maximum protection Magnifying Glass or Loupes: to view the blade Gloves: should fit comfortably Plastic or Acrylic Test Stick: to test the cutting edge for sharpness Cotton Tipped Applicators: to spread oil or water lubrication Clock Diagram: to determine the proper...
Open the catalog to page 4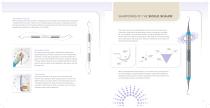
TERMINAL SHANK SHARPENING OF THE SICKLE SCALER CUTTING EDGE INSTRUMENT LABELING When the design name and number are stamped along the length of the handle, each working end is identified by the number closest to it. If the design name and number are stamped around the instrument handle, the first number identifies the working end at the top and the second number identifies the working end at the bottom of the handle. BACK LATERAL SURFACE The sickle scaler has two cutting edges which are formed by the junction of the facial surface with the two lateral surfaces converging to a pointed TERMINAL...
Open the catalog to page 5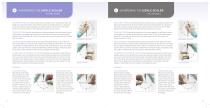
SHARPENING THE SICKLE SCALER SHARPENING THE SICKLE SCALER INSTRUMENT POSITION: Hold the instrument vertically in your nondominant hand. The blade to be sharpened will be at the bottom with the tip pointed toward you. Brace the top shank with your thumb and place your elbow directly in front of you on the table. Position the terminal shank of the blade being sharpened at 12 o’clock. INSTRUMENT POSITION: Hold the instrument vertically in your nondominant hand. The blade to be sharpened will be at the bottom with the tip pointed toward you. Brace the top shank with your thumb and place your elbow...
Open the catalog to page 6
TERMINAL SHANK TESTING THE SHARPNESS OF THE SICKLE SCALER BLADE CUTTING EDGE LATERAL SURFACE TEST STICK POSITION To test the cutting edge, grasp the bottom third of the test stick in your non-dominant hand between your thumb and index finger. Hold the test stick upright at 12 o’clock. TERMINAL The Universal Curette blade has two parallel cutting edges that meet at a rounded SHANK toe. The cutting edges of the curette are formed at the junction of the lateral CUTTING EDGE surfaces with the facial surface. The facial surface of the blade is positioned TERMINAL to SHANK FACE form a 90° angle with...
Open the catalog to page 7All Hu-Friedy catalogs and technical brochures
 WORRIED ABOUT DENTAL AEROSOL
10 Pages
 Sidekick Sharpener
2 Pages
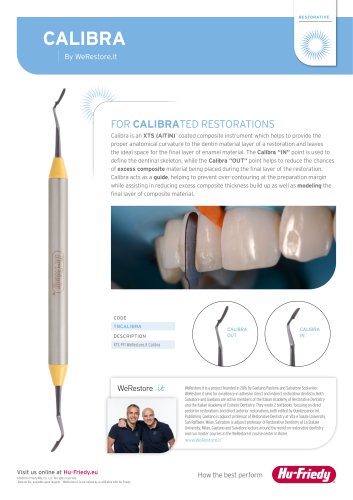 Calibra
2 Pages
 IMS Catalogue
40 Pages
 Akro-Flex
1 Page
 Atlas Forces
3 Pages
 HD Black Line Mirrors
2 Pages
 Black Line Rubber Dam Clamps
2 Pages
 EverEdge 2.0
4 Pages
 General Catalogue
510 Pages

- Surgery forceps
- Syringe
- Dental surgery instrument kit
- Human scissors
- Stainless steel forceps
- Straight forceps
- Retractor
- Surgical scissors
- Surgical retractor
- M gloves
- Needle holder
- Surgical needle holder
- Sealing forceps
- Bent forceps
- Dental extraction forceps
- Dental implant surgery instrument kit
- Sterilization container
- Dental forceps
- Cleansing wipes