Inion® ACL Instrument Set

Inion® ACL Instrument Set
The Inion® ACL Instrument Set is designed for anterior cruciate ligament (ACL) reconstruction, combining necessary instruments and a graft preparation station in a single autoclavable case. It supports both interference screw and button-type fixation methods.
1. Graft Preparation
- Harvest semitendinosus and gracilis tendons using the Tendon stripper (INS-9335).
- Remove residual muscle and prepare the graft using soft tissue clamps (INS-9352) and the Graft preparation station base (INS-9351).
- Suture both ends of the graft and ensure proper tension.
- Measure graft diameter with the Graft sizer (INS-9341) to ensure a moderate fit.
2. Drilling Tibial Tunnel
- Assemble the Drill guide pin sleeve (INS-9332), Tibial pin marking hook (INS-9333), and Drill guide arm (INS-9331).
- Adjust the Tibial pin marking hook to 55 degrees and position it at the ACL footprint.
- Drill through the tibia using the Drill guide pin w/o eyelet (INS-9336) and create the tunnel with a Cannulated drill bit (INS-9301–9305) matching the graft diameter.
3. Drilling Femoral Tunnel
- Select the appropriate Femoral drill guide (INS-9321–9323) ensuring at least 2 mm of posterior cortex remains.
- Position the Femoral drill guide at the over-the-top position and drill using the Drill guide pin w/ eyelet (INS-9337).
- Create the femoral tunnel with a Cannulated headed reamer (INS-9306–9310), typically 25-30 mm.
4. Introducing the Graft
- Use the Jacobs chuck handle (INS-9339) to pull the suture through the femoral tunnel.
- Introduce the graft into the femoral tunnel and leave the other end in the tibial tunnel.
5. Inserting the Interference Screws
- Notch the tunnel entrance with the Inion Hexalon™ RapidNotcher (INS-9207) before screw insertion.
- Insert the Inion Hexalon™ screw using the Inion Hexalon™ screwdriver (INS-9200) over the guide wire to both femoral and tibial sides.
- Ensure the screw diameter matches the graft diameter and the screw is fully inserted.
Ordering Information
The document lists various instruments and their descriptions, including drill bits, reamers, drill guides, and other components necessary for ACL reconstruction.
Contact Information
Inion Oy and Inion Inc contact details are provided for further inquiries.
Catalog excerpts

Inion® ACL Instrumentation Surgical Technique
Open the catalog to page 1
Introduction The Inion® ACL instrument set is a compact and easy-to-use system for ACL reconstruction. The system combines the instruments and the Graft preparation station in one autoclavable case. The Inion® ACL instrument set offers instruments required for both interference screw and button-type of fixation. 1.1 Harvest the semitendinosus and gracilis tendons using the Tendon stripper (INS-9335). 1.2 Residual muscle is removed on a plastic cutting board. 1.3 Assemble 2 soft tissue clamps (INS-9352) and the Graft preparation station base (INS-9351) together. 1.4 Suture both ends of the graft,...
Open the catalog to page 2
2. Drilling tibial tunnel 2.1 Assemble the Drill guide pin sleeve (INS-9332), Tibial pin marking hook (INS-9333) and Drill guide arm (INS9331). 2.2 Adjust the Tibial pin marking hook to the position of 55o. 2.3 Place the tip of the Tibial pin marking hook in the center of ACL footprint.
Open the catalog to page 3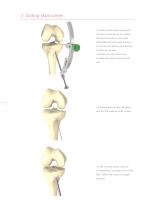
2. Drilling tibial tunnel 2.4 Push the Drill guide pin sleeve to the bone surface and fix the position. Use the Drill guide pin w/o eyelet (INS-9336) and drill though the tibia, monitor the drill pin tip not to damage the femoral cartilage. To achieve a longer tibial tunnel, increase the angle of the Drill guide arm. 2.5 Disassemble the tibial drill guide, only the Drill guide pin is left in place. 2.6 Drill the tibial tunnel using the corresponding Cannulated drill bit (INS9301–9305) that matches the graft diameter.
Open the catalog to page 4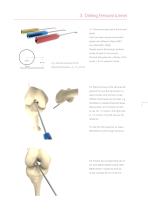
3. Drilling femoral tunnel 3.1 Choose the right size of the femoral guide. Inion® provides various Femoral drill guides with different offsets (5/6/7 mm) (INS-9321–9323). Always ensure that enough posterior cortex (at least 2 mm) re ains. m Femoral drill guide size = Radius of the 4 mm 2 mm tunnel + 2 mm posterior cortex. Femoral drill guide = 4 + 2 = 6 mm 3.2 Place the hook of the Femoral drill guide at the over-the-top position, in direct contact with the bony cortex. Different techniques can be used, e.g. transtibial or medial portal techniques. Ideal position is the footprint of ACL, or...
Open the catalog to page 5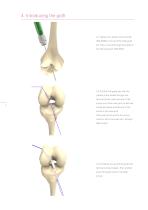
4.1 Tighten the Jacobs chuck handle (INS-9339) in the tip of the Drill guide pin. Pass a suture through the eyelet of the Drill guide pin (INS-9337). 4.2 Pull the Drill guide pin with the Jacobs chuck handle through the femoral tunnel, pass one end of the 6 suture out of the knee joint via femoral tunnel and leave another end of the suture in the knee joint. Then pull out the end of the suture, which is left in the knee joint, through tibial tunnel. 4.3 Introduce one end of the graft into femoral tunnel properly. Then another end of the graft is left in the tibial tunnel.
Open the catalog to page 6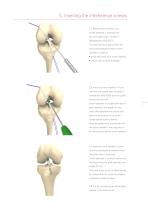
5. Inserting the interference screws 5.1 Before screw insertion, the tunnel entrance is notched with the cannulated Inion Hexalon™ RapidNotcher (INS-9207). It is important to properly notch the bone tunnel entrance before screw insertion in order to: • avoid difficulties with screw insertion • reduce risk of screw breakage 5.2 Insert the Inion Hexalon™ screw with the cannulated Inion Hexalon™ screwdriver (INS-9200) over the guide wire to femoral side. Screw diameter is usually same as the graft diameter, and length 25 mm. Insert the screwdriver tip all the way down to the bottom of the screw...
Open the catalog to page 7
Ordering Information INS 932fi Cannulated headed reamer, 4.5 mm INS-9306 Cannulated headed reamer, 6 mm NS 930/ Cannulated headed reamer, 7 mm INS-9308 Cannulated headed reamer, 8 mm INS-9309 Cannulated headed reamer, 9 mm INS-9310 Cannulated headed reamer, 10 mm NS-9321 Femoral drill guide, 5 mm offset NS-9322 Femoral drill guide, 6 mm offset NS-9323 Femoral drill guide, 7 mm offset INS-9332 Drill guide pin sleeve INS-9333 Tibial pin marking hook, 55° INS-9327 Femoral depth gauge INS-9351 Graft preparation station base INS-9352 Soft tissue clamp, adjustable (2pcs) NS-9339 Jacobs chuck handle...
Open the catalog to page 8All Inion catalogs and technical brochures
 Inion Freedom™ Drill Taps
4 Pages
 Inion BioRestore™ Syringe
2 Pages
 Inion GTR™ Tack
2 Pages
 Inion S-2™ Surgical
18 Pages
 Inion OTPS™ Plating Sytem
8 Pages
 Inion FreedomPin™
4 Pages
 Inion S-1™ System
10 Pages
 Inion FreedomSystem
11 Pages


Archived catalogs
 Inion BioRestore™
8 Pages
- Bone plate
- Compression plate
- Distal compression plate
- Orthopedic surgery instrument kit
- Compression bone screw
- Bone substitute
- Forearm compression plate
- General purpose compression bone screw
- Cannulated compression bone screw
- Radius compression plate
- Arthrodesis plate
- Orthopedic surgery bone substitute
- Non-locking compression plate
- Suture anchor
- Synthetic bone substitute
- Granules bone substitute
- Foot compression bone screw
- Headless compression bone screw
- Rotator cuff suture anchor