- Catalogs
- Inteware Co., Ltd
- EZCAD 2022
EZCAD 2022
1 /73Pages
EZCAD 2022
1 /73Pages
Catalog excerpts

Taiwan Soft Power EZCAD 2022User Guide Version 1.0
Open the catalog to page 1
Copyright © by 2022 Inteware Co., Ltd. All rights reserved. EZCAD User Guide v1.0 English language version. (Updated 24 November, 2022) No part of this manual may be reproduced, photocopied, stored in a retrieval system, or transmitted in any manner (electronic or mechanical) for any purpose other than the customer’s normal usage, without the prior written permission of Inteware Co., Ltd. This manual is subject to change without prior notice. For further inquiries, contact your sales representative or customer service.
Open the catalog to page 2
Taiwan Soft Power
Open the catalog to page 4
Taiwan Soft Power EZCAD is computer-aided design software that allows dental technicians to quickly and efficiently design copings, crowns and bridges, as well as abutments in a virtual environment. Many of its automated functions enable the users to conduct quick design according to actual needs. The following table lists the required computer specifications for the use of EZCAD software. To avoid problems or limitations during software usage, it is necessary to set User Account control. 1. Click Start menu and search by "User Account". Then, select Change User Account Control settings. Alternatively,...
Open the catalog to page 5
Taiwan Soft Power 1.3 NVIDIA Settings For the computer with NVIDIA graphics card, it is suggested setting the dedicated NVIDIA graphics card for the software use after installing the software. 1. Right-click on the desktop and select NVIDIA Control Panel. 2. Select Manage 3D Settings under 3D Settings task lists. 3. Click Program Settings tab, and click Add button to browse to the below path: Computer> Drive (C)> InteWareInc> EZCAD> 2022> Bin. Then, select EZCAD and click OK. 5. Click Apply button.
Open the catalog to page 6
1.4 DPI Settings To ensure the correct display of EZCAD, it is recommended adjusting DPI settings before software usage. 1. Right-click on the software shotcut icon in the file folder. 2. Select Properties in the right-click menu. 3. Select Compatibility tab, and tick "Run this program as an administrator." 4. Click Change high DPI settings button. Tick "Override high DPI scaling behavior." Then, select System in the scaling performance drop-down list. Click OK button. 5. Click Apply button.
Open the catalog to page 7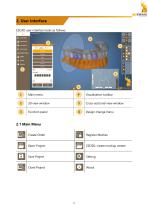
2.1 Main Menu Register Meshes EZDSD: create mockup veneer
Open the catalog to page 8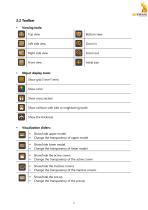
Viewing tools: Top view Bottom view Left side view Right side view Front view Initial size Object display tools: Show grid (1mm*1mm) Show color Show cross section Show collision with bite or neighboring tooth Show the thickness Show/hide upper model Change the transparency of upper model Show/hide lower model Change the transparency of lower model Show/hide the active crown Change the transparency of the active crown Show/hide the inactive crowns Change the transparency of the inactive crowns Show/hide the pre.op Change the transp
Open the catalog to page 9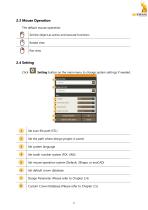
Taiwan Soft Power 2.3 Mouse Operation The default mouse operation:
Open the catalog to page 10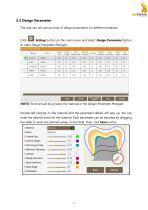
2.5 Design Parameter The user can set various kinds of design parameters for different materials. Setting button on the main menu and select Design Parameter button to open Design Parameter Manager. NOTE: There should be at least one material in the Design Parameter Manager. Double left-clicking on the material and the parameter details will pop up. You can enter the desired name for the material. Each parameter can be adjusted by dragging the slider or enter the desired values on the field. Then, click Save button.
Open the catalog to page 11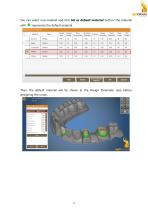
Taiwan Soft Power Design Parameter Manager Cement Cement Extra Minimum Margin Slope Slope Drill Gap Height Cement Gap Thickness Extension Extension Angle Radius Add I Delete I Setai^ult I OK I Cancel
Open the catalog to page 12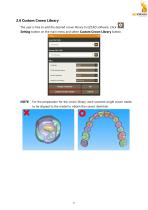
2.6 Custom Crown Library The user is free to add the desired crown library to EZCAD software. Click Setting button on the main menu and select Custom Crown Library button. NOTE: For the preparation for the crown library, each scanned single crown needs to be aligned to the model to obtain the correct dentition.
Open the catalog to page 13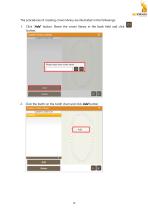
The procedures of creating crown library are illustrated in the followings: 1. Click “Add” button. Name the crown library in the bank field and click button. Click the tooth on the tooth chart and click Add button.
Open the catalog to page 14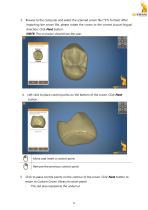
Browse to the computer and select the scanned crown file (*STL format). After importing the crown file, please rotate the crown to the correct buccal-lingual direction. Click Next button. NOTE: The occlusion should face the user. Left-click to place control points on the bottom of the crown. Click Next button. Move and insert a control point. Remove the previous control point. 5. Click to place control points on the contour of the crown. Click Next button to return to Custom Crown Library function panel. - The red area represents the undercut.
Open the catalog to page 15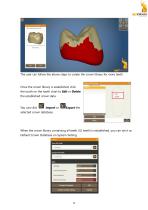
The user can follow the above steps to create the crown library for more teeth. Once the crown library is established, click the tooth on the tooth chart to Edit or Delete the established crown data. selected crown database. When the crown library containing all teeth (32 teeth) is established, you can set it as Default Crown Database on System Setting.
Open the catalog to page 16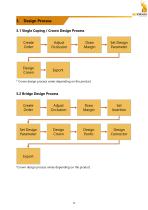
Design Process 3.1 Single Coping / Crown Design Process * Crown design process varies depending on the product 3.2 Bridge Design Process *Crown design process varies depending on the product
Open the catalog to page 17
3.3 Digital Model Design Process (for IntraOral Scanner) 3.4 Provisional Crown Design Process 3.5 Inlay/Onlay Design Process
Open the catalog to page 18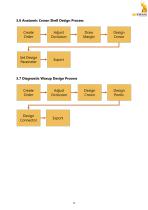
3.6 Anatomic Crown Shell Design Process 3.7 Diagnostic Waxup Design Process
Open the catalog to page 19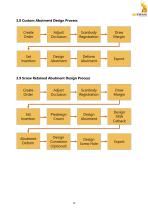
3.8 Custom Abutment Design Process 3.9 Screw Retained Abutment Design Process
Open the catalog to page 20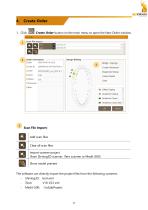
Create Order Create Order button on the main menu to open the New Order window. Scan File Import: Add scan files Clear all scan files Import scanner project (from Shining3D scanner, iTero scanner or Medit i500) Show model preview The software can directly import the project files from the following scanners. -
Open the catalog to page 21
Taiwan Soft Power When the scan file name contains "Upper" or "Lower", the program will automatically detect the scan file type. If the file name does not contain "Upper" or "Lower", the user needs to select the scan file type from the drop-down list. When the die scan file is the independent scan file, the user can also select "Upper.Die" or "Lower.Die", and the software will automatically integrate with "Upper" or "Lower" scan file. Input order information if needed. Select the teeth and the product type. While selecting the teeth, the shortcut keys are available to select multiple teeth quickly....
Open the catalog to page 22All Inteware Co., Ltd catalogs and technical brochures
 OrthoAnalysis
88 Pages
 Implant Planning
71 Pages
 Air Dental
20 Pages
- Analysis software
- Planning software
- Dental software
- 3D printer
- Treatment software
- Capture software
- Curing light
- AI-assisted software
- Artificial intelligence software
- Simulation software
- Dental 3D printer
- Import software
- 3D software
- Desktop 3D printer
- Vat photopolymerization 3D printer
- Teeth software
- Treatment planning software
- DLP 3D printer
- Model trimmer
- Mouth software