- Catalogs
- Inteware Co., Ltd
- Implant Planning
Implant Planning
1 /71Pages

Implant Planning
1 /71Pages
Catalog excerpts

Taiwan Soft Power Implant PlanningUser Guide Version 2.1
Open the catalog to page 1
Copyright © by 2022 Inteware Co., Ltd. All rights reserved. Implant Planning User Guide v2.1. English language version. (Updated 29 December, 2021) No part of this manual may be reproduced, photocopied, stored in a retrieval system, or transmitted in any manner (electronic or mechanical) for any purpose other than the customer’s normal usage, without the prior written permission of Inteware Co., Ltd. This manual is subject to change without prior notice. For further inquiries, contact your sales representative or customer service.
Open the catalog to page 2
Taiwan Soft Power
Open the catalog to page 3
Taiwan Soft Power
Open the catalog to page 4
1. About Implant Planning 1.1 Introduction Intended Use/ Indications for Use Implant Planning is a software package specifically designed and developed to enable dentists to plan and perform virtual implant surgery prior to actual surgery. Implant Planning supports surgical planning for fully or partially edentulous patient’s case. Software Device Performance Implant Planning is a software designed to enable dentists to plan and perform virtual implant surgery prior to actual surgery. Dentists are able to obtain precise information about where implant fixtures are to be placed through 3D models...
Open the catalog to page 5
Warnings and Precautions Implant Planning shall be used only by dentists or related medical personnel in virtual implant planning or surgical evaluation. Please ensure the user have appropriate education and training before using the software. Improper implant planning could result in damaging vital anatomical structures of the patient. Note: The measurement accuracy error on distance is within 0.1 mm, and measurement accuracy error on angle is within 1 deg. Please respectively install Implant Planning exe file and EZCAD guide software exe file. Hint: If software terminates or is abnormal during...
Open the catalog to page 6
1.3 User Account Control Settings In order to avoid problems or limitations during software usage, it is necessary to set User Account control. 1. Click Start menu and search by "User Account". Then, select Change User Account Control settings. Alternatively, follow the path: Control Panel > System and Security > System and Maintenance > Change User Account Control settings. 2. Move the slider to the bottom at "Never notify" and click OK button Choose when to be notified about changes to your computer User Account Control helps prevent potentially harmful programs from making changes to your...
Open the catalog to page 7
1.4 NVIDA Settings For the computer with NVIDIA graphics card, setting the dedicated NVIDIA graphics card after installing the software is recommended. 1. Right-click on the desktop and select NVIDIA Control Panel. Select Manage 3D Settings under 3D Settings task lists. Select the Program Settings tab, and click Add button to browse to the below path: Computer > Drive (C) > IntewareInc> ImplantPlanning. Then, select ImplantPlanning. Select High-performance NVIDIA processor in the preferred graphics processor drop-down list. Click Apply button.
Open the catalog to page 8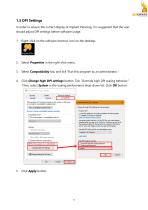
1.5 DPI Settings In order to ensure the correct display of Implant Planning, it is suggested that the user should adjust DPI settings before software usage. 1. Right-click on the software shortcut icon on the desktop. Select Properties in the right-click menu. Select Compatibility tab, and tick “Run this program as an administrator.” Click Change high DPI settings button. Tick “Override high DPI scaling behavior.” Then, select System in the scaling performance drop-down list. Click OK button. Click Apply butto
Open the catalog to page 9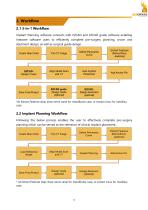
2. Workflow 2.1 3-in-1 Workflow Implant Planning software connects with EZCAD and EZCAD guide software enabling Inteware software users to efficiently complete pre-surgery planning, crown and abutment design, as well as surgical guide design. *At Extract Features step, draw nerve canal for mandibular case, or extract sinus for maxillary case. 2.2 Implant Planning Workflow Following the below process enables the user to effectively complete pre-surgery planning which can be served as the reference of clinical implant placement. * At Extract Features step, draw nerve canal for mandibular case,...
Open the catalog to page 10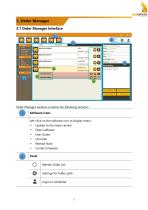
3. Order Manager 3.1 Order Manager Interface Order Manager window contains the following sections: Software icons Left-click on the software icon to display menu: Update to the latest version Open software User Guide Release Note Contact Inteware Tools Refresh Order List Settings for folder path Login to Air
Open the catalog to page 11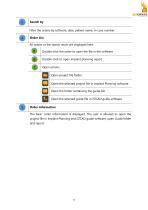
Search by Filter the orders by software, date, patient name, or case number. Order List All orders or the search result are displayed here. Double-click the order to open the file in the software Double-click to open implant planning report Open actions Open project file folder Open the selected project file in Implant Planning software Open the folder containing the guide file Open the selected guide file in EZCAD guide software Order Information The basic order information is displayed. The user is allowed to open the project file in Implant Planning and EZCAD guide software, open Guide folder...
Open the catalog to page 12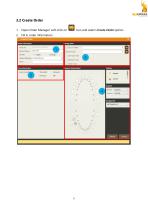
Open Order Manager. Left-click on Fill in order information. icon and select Create Order option.
Open the catalog to page 13
Taiwan Soft Power
Open the catalog to page 14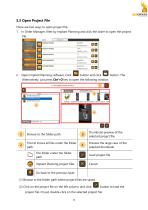
3.3 Open Project File There are two ways to open project file: 1. In Order Manager, filter by Implant Planning and click the order to open the project file. Open Implant Planning software. Click Alternatively, just press Ctrl+O key to open the following window. Browse to the folder path. Thumbnail preview of the selected project file. The list shows all files under the folder path. Preview the large view of the selected thumbnail. The folder under the folder path Load project file. Implant Planning project files Go back to the previous layer (1) Browse to the folder path where project files are...
Open the catalog to page 15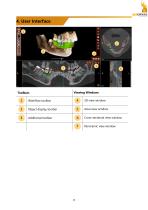
4. User Interface Toolbars
Open the catalog to page 16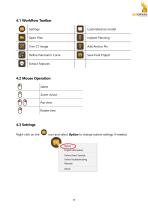
To iwan Soft Power icon and select Option to change system settings if needed. Online Video Tutorials Online Troubleshooting Manuals
Open the catalog to page 17
Set the displaying language in the software. Set the default drill kit system, such as the specification and height of metal sleeve. Temp Crown Path Set the path for EZCAD software which will be automatically opened. Auto Implant Set the default implant brand and system for automatic implant placement. button to execute the change.
Open the catalog to page 18All Inteware Co., Ltd catalogs and technical brochures
 EZCAD 2022
73 Pages
 OrthoAnalysis
88 Pages
 Air Dental
20 Pages
- Analysis software
- Dental software
- 3D printer
- Treatment software
- Capture software
- Curing light
- AI-assisted software
- Artificial intelligence software
- Simulation software
- Dental 3D printer
- Import software
- 3D software
- Desktop 3D printer
- Vat photopolymerization 3D printer
- Teeth software
- Treatment planning software
- DLP 3D printer
- Model trimmer
- Mouth software