ISOLOCKPatellaProcedure
ISOLOCKPatellaProcedure
- Initial Steps: Insert a 1.2 mm K wire through the femoral condyles, drill at the isometric point, and ensure the wire is perpendicular to the bone.
- Drilling and Tapping: Use a 2.8 mm reamer to drill through the opposite condyle, remove the reamer and K wire, and tap the hole with the appropriate tap.
- Wire Insertion: Insert a K wire at a 45° angle, drill through the opposite cortex, and ensure the wire exits the medial condyle.
- Suture Insertion: Insert the ISOLOCK needle through the K wire, slide the suture through the hole, and ensure the unused suture remains in the protection sleeve.
- Tendon Handling: Use a K wire to guide the needle through the patellar tendon, pull the suture through, and ensure the button sits flush to the medial condyle.
- Tension Adjustment: Pull the suture to achieve desired tension, insert an interference screw, and cut the suture on the medial side.
- Implants: Various Iso-Lock sizes and interference screws are available, each with specific color codes and dimensions.
- Instruments: Includes K-Wire Drill Guides, Reamers, Suture Forks, and Screwdrivers, each with specific dimensions and uses.
Catalog excerpts

Patella luxation
Open the catalog to page 1
Dates and images Intrauma S.p.A. reserves the right to modify the design and finishing of the products shown and described in the present catalogue without any notice. The images are informative and only regarded as examples. The information provided is purely indicative of the products displayed. Such information does not constitute an accurate description of the characteristics on the part of the manufacturer. We therefore invite our clients to always contact Intrauma S.p.A. to obtain full details on our product’s specifications.
Open the catalog to page 2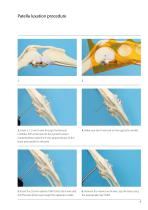
3. Insert a 1.2 mm K wire through the femural 4. Make sure the K wire exit on the opposite condile. condiles; drill at the level of the isometric point marked before, keep the K wire perpendicular to the bone and parallel to the joint. 5. Insert the 2.8 mm reamer (VS407) into the K wire and 6. Remove the reamer and K wire; tap the hole using drill the hole all the way trough the opposite condile. the appropriate tap VS405.
Open the catalog to page 3
7. Insert a 1.2 mm K wire through the same hole insert 8. Insert the 2.8 mm reamer (VS407) into the K wire and at 45° angle. drill the hole all the way trough the opposite cortex. 9. Insert the 1.2 mm K wire in the perpendicular hole; make sure the K wire exit the medial condile; take the 1.5 mm ISOLOCK and insert the needle trough the K wire from medial to lateral direction. 10. Remove the K wire and grab the needle with a needle holder. 11. Slide the suture trough the hole; avoid to pass the whole suture trough the hole and make sure that the unused suture on the medial side remains inside...
Open the catalog to page 4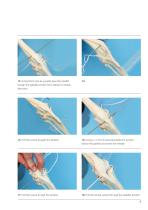
13. Using the K wire as a guide, pass the needle trough the patellar tendon from lateral to medial direction. 15. Pull the suture trought the tendon. 16. Using a 1.2 mm K wire penetrate the tendon below the patella and insert the needle. 17. Pull the suture trough the tendon. 18. Pull the whole suture through the patellar tendon. 5
Open the catalog to page 5
Patella luxation procedure 19. Make sure that the button is sitting flush to the medial condile. 20. Pull the suture completely through the tendon to test the desired tension. 21. Pass a 1.2 mm K wire trough the 45° hole. 22. Guide the needle trough the wire. 23. Pull the suture to achieve the desired tension. 24. Pinch the suture on the medial condile to mantain tension.
Open the catalog to page 6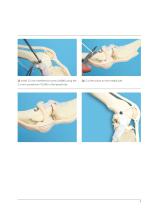
25 Insert 5.5 mm interference screw (V4006) using the 2.5 mm screwdriver (VS340) in the lateral hole. 26. Cut the suture on the medial side.
Open the catalog to page 7
Ordering information Implants Ref. Description Color Code Ref. Composition Color Code VK4104 Iso-Lock 0 1 + Interference Screw 0 3.0 mm + Reamer 0 2.2 + 2x K-Wires 01.5 L. 80 •
Open the catalog to page 8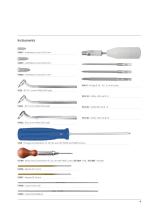
VS418 - Kit Tap Ø 3.0 - 4.0 - 5.5 mm Screw VS26 - Ø 1.0-1.2 mm K-Wire Drill Guide VS4110 - K-Wire 100 mm Ø 1.2 VS401 - Ø 1.5 mm K-Wire Drill Guide VS4130 - K-Wire 100 mm Ø 2.0 VS402 - Ø 2.0 mm K-Wire Drill Guide S340 - Hexagonal Screwdriver 2.5 mm (to use with V4005 and V4006 screws) VS188 - Micro Series Screwdriver HL5 to use with V4007 screw (VS188A - Rod / VS188B - Handle) VS408 - Suture Fork Small
Open the catalog to page 9
Intrauma S.p.A. www.intrauma.com – Tel. +39.011.953.94.96 - [email protected] USA Office: Intrauma America LLC www.intrauma.com – P. (201) 420.0110 – orders@intrauma
Open the catalog to page 12All Intrauma catalogs and technical brochures
 CBLO
CBLO4 Pages
 TPLO
TPLO16 Pages
 DPO
DPO8 Pages
 MicroCatalog
8 Pages
 ELOS
ELOS20 Pages
 FixinCatalog
44 Pages
 ISOLOCK
12 Pages
 Isolock CrCL Procedure
8 Pages
 Elafix
16 Pages
 PFF
PFF8 Pages
 Anteversa
12 Pages
 KITE
KITE8 Pages
- Bone plate
- Compression plate
- Metallic compression plate
- Locking compression plate
- Distal compression plate
- Orthopedic surgery instrument kit
- Proximal compression plate
- Drill bit
- Forearm compression plate
- Lateral compression plate
- Medial compression plate
- Humerus compression plate
- Radius compression plate
- Sterile instrument kit
- Femur compression plate
- Veterinary instrument kit
- Single-use instrument kit
- Veterinary bone compression plate
- Compression veterinary orthopedic screw
- Cortical bone veterinary orthopedic screw