


CLS

CLS
Catalog excerpts
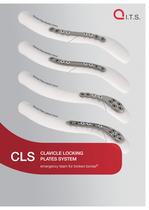
Cl av icl e Cl av icl e Cl av icl e Cl av icl e CLS Pla te M edia l 2.5 mm Pla te M edia l 3.5 mm Pla te L ater al 2. 5mm Pla te L ater al 3. 5mm CLAVICLE LOCKING PLATES SYSTEM emergency team for broken bones®
Open the catalog to page 1
CONTENTS Preface 3 Screws 4 Properties 5 Indications & Contraindications 6 Time of operation 6 Positioning of the patient 7 Access 8 Exposure 8 Reduction Surgical Technique Preface 9 Plate insertion Placement of the screws 11 Postoperative Treatment 16 Explantation 16 Summary Information 10 16 Locking 17 Dotize® 17 Order list 18 Sterilization guidelines 20 Notes 22
Open the catalog to page 2
Preface Preface: Locking Clavicle Plate System is a tried and tested osteosynthesis system for various clavicle fractures. The special feature of this implant is the free choice of screw placement. So the user is able to set every desired screw in every hole (either locking or non-locking screw). The free choice of screw angulation (+/- 15°, see page 17) provides an advantage in fracture treatment, especially in the case of complex fractures. 03
Open the catalog to page 3
Clavicle Locking Plates System Special advantages: • All three screw types can be used in each plate hole • Four different plate variants allow surgical treatment for numerous types of clavicle fractures • For taking over forces - direct contact between plate and bone is not necessary (principle of Fixateur Interne) 37351-xx-N Cortical Screw, locking, D=3.5mm, SH 31773-ÌOO Spiral Drill, D=2.7mm, L=100mm, AO Connector Self-holding sleeve 31273 100 Spiral Drill, D=2.7mm, L=100mm, AO Connector self-holding sleeve 37352-xx-N Cancellous Screw, locking, D=3.5tnm, SH 31203-100 Spiral Drill, D=2.0mm,...
Open the catalog to page 4
Properties Properties of the material: Properties of the implant: • • • • • • • Multidirectional locking • Anatomically plate design Plate material: Titanium Material of screws: TiAl6V4 ELI Easier removal of implant after fracture has healed Improved fatigue strength of implant Reduced risk of cold welding Reduced risk of inflammation and allergy Clavicle Plate: Clavicle Plate Lateral: • Turn 180° for right and left version • Plate lengths: 6, 8, 10-hole • Plate strength: 2.5mm and 3.5mm • Version left/right • Plate length: 4-hole, Plate strength: 2.5mm • Plate length: 6-hole, Plate strength:...
Open the catalog to page 5
Indications, Contraindications & Time of operatioi • All fractures of the clavicle in metaphyseal and diaphyseal areas • Hygienisation of pseudoarthroses with or without spongiosa graft • Corrective osteotomy • Open and closed fractures • Existing infections in the fracture zone and operation area • Common situations that do not allow osteosynthesis ■ Lack of patient compliance • Immediately after trauma or delayed
Open the catalog to page 6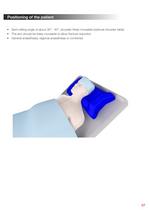
Positioning of the patient • Semi-sitting angle of about 30° - 40°, shoulder freely moveable (optional shoulder table) • The arm should be freely moveable to allow fracture reduction • General anaesthesia, regional anaesthesia or combined 07
Open the catalog to page 7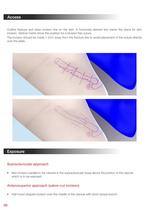
Access Outline fracture and draw incision line on the skin. A horizontal dashed line marks the place for skin incision. Vertical marks show the position for a tension free suture. The incision should be made 1-2cm away from the fracture line to avoid placement of the suture directly over the plate. Exposure Supraclavicular approach • Skin incision parallel to the clavicle in the supraclavicular fossa above the portion of the clavicle which is to be exposed Anterosuperior approach (sabre-cut incision) • Half-moon shaped incision over the middle of the clavicle with short dorsal branch 08
Open the catalog to page 8
Reduction • Temporary fixation of the fracture parts using forceps • Seek compression of the fracture • Control under image converter Medial Clavicle Plate Lateral Clavicle Plate 09
Open the catalog to page 9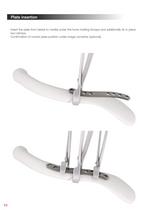
Plate insertion Insert the plate from lateral to medial under the bone holding forceps and additionally fix in place two clamps. Confirmation of correct plate position under image converter (optional). 10
Open the catalog to page 10
Placement of the screws Use the drill guide, D=2.7/2.0mm (62202) to bore holes with the spiral drill D=2.7mm, L=100mm, AO Connector (61273-100) into the two plate holes close to fracture. Attention: To avoid disruption of soft tissue, nerves and/or blood vessels place a Hohmann retractor under the clavicle during drilling (or drill oscillating). Do not use locking screws close to fracture. Use the screwdriver, WS 2.5, self-holding sleeve (56252) to insert D=3.5mm cortical screws (32351-XX) of appropriate lengths determined previously with the depth gauge, solid small fragment screws (59022)....
Open the catalog to page 11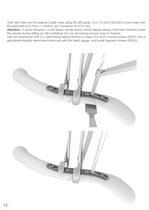
Then drill holes Into the adjacent plate holes using the drill guide, D=2.7/2.0mm (62202) to bore holes with the spiral drill D=2.7mm, L=100mm, AO Connector (61273-100). Attention: To avoid disruption of soft tissue, nerves and/or blood vessels place a Hohmann retractor under the clavicle during drilling (or drill oscillating). Do not use locking screws close to fracture. Use the screwdriver, WS 2.5, self-holding sleeve (56252) to insert D=3.5mm cortical screws {32351 -XX) of appropriate lengths determined previously with the depth gauge, solid small fragment screws (59022).
Open the catalog to page 12
Medial Clavicle Plate Lateral Clavicle Plate 13
Open the catalog to page 13
Subsequently, place either D=3.5mm locking cortical or cancellous screws (37351-XX-N/37352-XX-N) in plate holes far to fracture. Use the drill guide, D=2.7/2.0mm (62202) to bore holes with the spiral drill D=2.0mm or D=2.7mm, L=100mm, AO Connector (61203-100/61273-100) Into plate holes far to fracture. Attention: To avoid disruption of soft tissue, nerves and/or blood vessels place a Hohmann retractor under the clavicle during drilling (or drill oscillating). Do not use locking screws close to fracture. Use the screwdriver, WS 2.5, self-holding sleeve (56252) to insert D=3.5mm locking cortical...
Open the catalog to page 14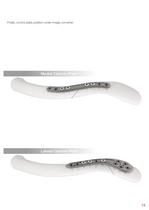
Finally, control plate position under image converter. Medial Clavicle Plate Lateral Clavicle Plate 15
Open the catalog to page 15All I.T.S. catalogs and technical brochures
 CTN - Cannulated Tibia Nail
28 Pages
 ufs
ufs1 Page
 DHL
DHL2 Pages
 ITS
ITS2 Pages
 SCL
SCL32 Pages
 SLS
SLS24 Pages
 OL - Olecranon Locking Plate
24 Pages
 PHL
PHL24 Pages
 PHLs
PHLs20 Pages
 CLS
CLS28 Pages
 ACLS
ACLS20 Pages
 CFN
CFN32 Pages
 OLS
OLS24 Pages
 SR Sacral Rods
20 Pages
 HCS
HCS24 Pages
 TOS Twist-Off Screw
20 Pages
 TLS
TLS20 Pages
 PRS-RX
32 Pages
 HLS
HLS20 Pages
 ES
ES20 Pages
 SR
SR20 Pages
 FL
FL24 Pages
 PL - Pilon Locking Plate small
12 Pages
 FLS
FLS24 Pages
 PFL
PFL20 Pages
 DTL
DTL24 Pages
 HTO
HTO24 Pages
 PTL
PTL32 Pages
 DFL
DFL32 Pages
 CAS
CAS40 Pages
 FCN
FCN20 Pages
 HOL
HOL24 Pages
 CAL
CAL20 Pages
 DUL
DUL24 Pages


Archived catalogs


- Bone plate
- Compression plate
- Metallic compression plate
- Locking compression plate
- Titanium compression plate
- Distal compression plate
- Compression bone screw
- Metallic compression bone screw
- Proximal compression plate
- Arthrodesis nail
- Forearm compression plate
- Lateral compression plate
- Medial compression plate
- Tibia compression plate
- General purpose compression bone screw
- Metallic intramedullary nail
- Humerus compression plate
- Radius compression plate
- Cannulated compression bone screw
- Arthrodesis plate