HOL

HOL
The Hallux Osteotomy Locking Plate is designed for distal metatarsal osteotomies, providing stability and allowing weightbearing. It features a self-locking mechanism with multi-directional locking and is made from titanium to reduce inflammation and allergy risks.
The implant comes in three sizes (8, 9, 10mm) with cancellous stabilization screws. The plate is titanium, and screws are TiAl6V4 ELI, offering improved fatigue strength and easier removal post-healing.
Key instruments include the AO Handle, Depth Gauge, and Insertion/Removal Instrumentation for accurate measurement and placement.
Indicated for Hallux Valgus corrections up to 25°. Contraindications include infections, advanced osteoporosis, and obesity.
Involves pre-operative preparation, medial access, osteotomy, plate size determination, and insertion. Postoperative treatment includes elevation and mobilization with a forefoot relief shoe.
Involves elevation and edema prevention. Explantation is possible after bone healing due to the absence of cold welding.
Dotize® is a surface treatment enhancing fatigue resistance and reducing inflammation risk through anodization, improving wear and friction characteristics.
Includes various sizes of the Hallux Osteotomy Plate, screws, and necessary surgical instruments.
Guidelines for cleaning and sterilizing reusable instruments emphasize steam sterilization and avoiding abrasive materials.
Implants are single-use only, and regular postoperative follow-ups are necessary. Combining implants from different manufacturers is prohibited.
Cleaning and Disinfection: Instruments should be opened for water flow and connected to rinsing nozzles. Automatic cleaning is preferred. Manual cleaning supports automatic processes for heavily soiled instruments.
Recommended Equipment: Use authorized cleaning agents with a pH of 9-11, nylon brushes, and running water. Avoid highly alkaline or acidic additives.
Ultrasound Treatment: Conducted for 5 minutes followed by a 15-minute soak.
Rinsing and Drying: Rinse thoroughly with tap water, use purified water for final rinsing, and dry immediately.
Manual Disinfection: Separate disinfection is required if cleaning agents lack disinfectant properties.
Inspect instruments for dirt, lubricate movable mechanisms, and ensure reassembled instruments fit together easily.
Packaging is for transport only. Sterilization should follow EN 285 or EN 13060 standards using a fractionated pre-vacuum procedure at 134°C for 5 to 18 minutes.
Follow hospital guidelines for disposal. Instruments returned to I.T.S. GmbH must be cleaned, disinfected, inspected, and sterilized.
Instructions are validated for reconditioning medical devices. Reconditioners must ensure processes achieve desired results through validation and inspections.
Patients should be informed about post-implantation behavior and the importance of reporting any negative changes.
Symbols indicate prescription, single use, sterilization methods, and compliance with standards like ISO 13485 and ISO 17664.
I.T.S. USA, 1778 Park Avenue N, Suite 200, Maitland, FL 32751. Tel: 877-971-8054, Fax: 877-971-8056, Email: [email protected], Website: www.its-implantusa.com
Catalog excerpts

Implants trauma Hallux Osteotomy Locking Plate
Open the catalog to page 1
CAUTION: Federal Law (USA) restricts this device to sale by or on the order of a board certified physician. WARNING: If there is no sufficient bone healing, wrong or incomplete postoperative care, plate might break. All ITS plates are preformed anatomically as a matter of principle. If adjustment of the plate to the shape of the bone is required, this is possible by carefully bending gently in one direction once. Particular care is required when bending in the region of a plate hole, as deformation of the plate may lead to a failure of the locking mechanism. The plate must not be buckled or bent...
Open the catalog to page 2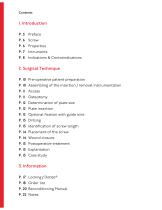
1. Introduction P. 5 Preface P. 6 Screw P. 6 Properties P. 7 Intruments P. 8 Indications & Contraindications 2. Surgical Technique P. 10 Pre-operative patient preparation P. 10 Assembling of the insertion / removal instrumentation P. 11 Access P. 11 Osteotomy P. 12 Determination of plate size P. 12 Plate insertion P. 12 Optional fixation with guide wire P. 13 Drilling P. 13 Identification of screw length P. 14 Placement of the screw P. 14 Wound closure P. 15 Postoperative treatment P. 15 Explantation P. 15 Case study 3. Information P. 17 Locking / Dotize® P. 18 Order list P. 20 Reconditioning...
Open the catalog to page 3
Preface The Hallux Osteotomy Locking Plate from ITS. is an intramedullary self-locking plate for distal metatarsal osteotomies. When the screw is inserted the 2 flanks are splayed out, and the implant acquires a firm intramedullary hold. The special feature of this implant is the ability to choose your preferred osteotomy technique, the simple and brief surgical procedure, the stable implant position and weightbearing.
Open the catalog to page 5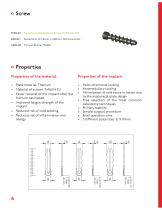
Cancellous Stabilization Screw, D=3.0mm, RH Spiral Drill, D=1.8mm, L=100mm, AO Connector Properties Properties of the material: • Plate material: Titanium • Material of screws: TiAl6V4 ELI • Easier removal of the implant after the fracture has healed • Improved fatigue strength of the implant • Reduced risk of cold welding • Reduced risk of inflammation and allergy • Multi-directional locking • Intramedullary locking • Minimization of soft tissue irritation due to the anatomical plate design • Free selection of the most common osteotomy techniques • Primary stability • Simple surgical procedure...
Open the catalog to page 6
Depth Gauge: • One-hand design • Ability to measure through the insertion / removal instrumentation Insertion / removal instrumentation: Implant Depth Gauge: • AO Connector • Plateau for simple insertion & removal • Ability to insert the screw through the insertion / removal instrumentation • 3-star implant depth gauge to measure the correct plate size
Open the catalog to page 7
Indications, Contraindications Indications: • Intramedullary self-locking plate for distal metatarsal osteotomies • For Hallux Valgus up to a corrective angle of 25° Existing bone or soft tissue infections at the surgical site Common situations that do not allow osteosynthesis With advanced osteoporosis Skin and soft-tissue problems which prevent a tension-free closure of the skin Obesity Lack of patient compliance
Open the catalog to page 8
Surgical Technique
Open the catalog to page 9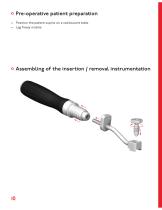
Pre-operative patient preparation • Position the patient supine on a radiolucent table • Leg freely mobile Assembling of the insertion / removal instrumentation
Open the catalog to page 10
Access Medial access • Access is on the medial side of the first metatarsal bone subcapitally (osteotomy height) to distal of the base of the joint of the first metatarsal bone. • Dependent on the hospital, execution of a lateral capsulotomy and tenetomy. • Horizontal capsular incision and removal of the thickened capsular lobe from the extosis (potential fusiform capsular resection). Osteotomy • Leveling of the plate bed or removal of the pseudoextosis with a finely oscillating saw. Not to exceed the level of the shaft diaphysis. The smoothened surface acts as a bed for the plate head. • Selection...
Open the catalog to page 11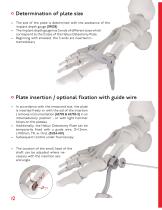
Determination of plate size • The size of the plate is determined with the assistance of the implant depth gauge (59028). • The implant depth gauge has 3 ends of different sizes which correspond to the 3 sizes of the Hallux Osteotomy Plate • Beginning with smallest, the 3 ends are inserted intramedullary Plate insertion / optional fixation with guide wire • In accordance with the measured size, the plate is inserted freely or with the aid of the insertion / removal instrumentation (62702 & 62702-5) in an intramedullary position - or with light hammer blows on the plateau. • Additionally, the...
Open the catalog to page 12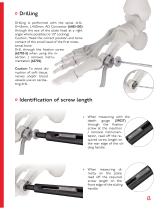
Drilling Drilling is performed with the spiral drill, D=1.8mm, L=100mm, AO Connector (61183-100) through the eye of the plate head at a right angle where possible (+/- 15° Locking). Caution: Heed the correct position and bone contact of the small head of the first metatarsal bone. Drill through the fixation screw (62702-5) when using the insertion / removal instrumentation (62702). Caution: To avoid disruption of soft tissue, nerves and/or blood vessels use an oscillating drill. Identification of screw length • When measuring with the depth gauge (59027) through the fixation screw at the insertion...
Open the catalog to page 13
Placement of the screw • In accordance with the measured length, a cancellous stabilization screw, D=3.0mm, RH (37303-XX) is now inserted with the Torque-Shank, T9x100 (54095-100). • The screw can be inserted by the insertion / removal instrumentation (62702) or freely after removal of the fixation screw. • Final control under fluoroscopy. Caution: When inserting the screw ensure that the screw head is flush with the plate. Wound closure • • • • Suture the capsule with absorbable sutures Drainage is usually not necessary Suture the skin Apply the appropriate dressing
Open the catalog to page 14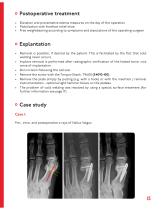
Postoperative treatment • Elevation and preventative edema measures on the day of the operation • Mobilization with forefoot relief shoe • Free weightbearing according to symptoms and stipulations of the operating surgeon Explantation • Removal is possible, if desired by the patient. This is facilitated by the fact that cold welding never occurs. • Implant removal is performed after radiographic verification of the healed bone, vice versa of implantation • Skin incision following the old scar • Remove the screw with the Torque-Shank, T9x100 (54095-100) • Remove the plate simply by pulling (e.g....
Open the catalog to page 15All I.T.S. catalogs and technical brochures
 CTN - Cannulated Tibia Nail
28 Pages
 ufs
ufs1 Page
 DHL
DHL2 Pages
 ITS
ITS2 Pages
 SCL
SCL32 Pages
 SLS
SLS24 Pages
 OL - Olecranon Locking Plate
24 Pages
 PHL
PHL24 Pages
 PHLs
PHLs20 Pages
 CLS
CLS28 Pages
 ACLS
ACLS20 Pages
 CFN
CFN32 Pages
 OLS
OLS24 Pages
 SR Sacral Rods
20 Pages
 HCS
HCS24 Pages
 TOS Twist-Off Screw
20 Pages
 TLS
TLS20 Pages
 PRS-RX
32 Pages
 HLS
HLS20 Pages
 ES
ES20 Pages
 SR
SR20 Pages
 FL
FL24 Pages
 PL - Pilon Locking Plate small
12 Pages
 FLS
FLS24 Pages
 PFL
PFL20 Pages
 DTL
DTL24 Pages
 HTO
HTO24 Pages
 PTL
PTL32 Pages
 DFL
DFL32 Pages
 CAS
CAS40 Pages
 FCN
FCN20 Pages
 CAL
CAL20 Pages
 DUL
DUL24 Pages


Archived catalogs


- Bone plate
- Compression plate
- Metallic compression plate
- Locking compression plate
- Distal compression plate
- Compression bone screw
- Metallic compression bone screw
- Proximal compression plate
- Arthrodesis nail
- Forearm compression plate
- Lateral compression plate
- Medial compression plate
- Tibia compression plate
- General purpose compression bone screw
- Metallic intramedullary nail
- Humerus compression plate
- Cannulated compression bone screw
- Radius compression plate
- Arthrodesis plate
- Proximal fixation intramedullary nail