SR Sacral Rods

SR Sacral Rods
This document addresses the management of pelvic ring disruptions, focusing on the significance of pelvic anatomy and biomechanics. It highlights Sacral Rods as an effective method for stabilizing posterior pelvic ring instability, particularly in cases of sacral fractures and SI joint detachments. Titanium plates are noted for their compatibility with postoperative imaging.
Properties
Sacral Rods are constructed from TiAl6V4 ELI material, which offers enhanced fatigue strength and a lower risk of inflammation. The implant includes threaded rods with washers and locknuts, designed for straightforward and safe surgical techniques with minimal risk of neural injury.
Indications & Contraindications
Indications for use include dorsal stabilization for unstable pelvic ring injuries, especially sacral fractures and SI joint instabilities. Contraindications include certain fractures, infections, obesity, and non-compliance by the patient.
Surgical Technique
The surgical procedure involves both ventral and dorsal stabilization, with detailed steps for preparation, reduction, and the use of guiding instruments. Correct anatomical placement and postoperative checks are emphasized.
Postoperative Treatment
Recommendations vary based on fracture type, with specific guidelines for stress application and implant removal after one year.
Information
The document provides details on Dotize® anodization, which improves implant surface properties, and includes an order list for surgical components. A reconditioning manual outlines cleaning, disinfection, and sterilization procedures for reusable instruments, stressing adherence to guidelines to maintain instrument integrity.
- Gentle Treatment: Use lint-free cloths, paper towels, or soft brushes for cleaning.
- Soaking: Fully submerge instruments in a suitable cleaning agent and disinfectant, following manufacturer guidelines on concentration, temperature, and exposure time.
- Cleaning Agent/Disinfectant: Use VAH-listed products, such as Sekusept® Aktiv 2% by ECOLAB. Ensure complete dissolution of powdered products and check material tolerance. Avoid highly alkaline or acidic additives; recommended pH range is 4.5 - 10.5.
- Ultrasound Treatment: Conduct for 5 minutes, followed by a 15-minute soak in the solution.
- Rinsing/Drying: Rinse thoroughly with tap water, focusing on hard-to-reach areas. Use purified water for final rinsing and dry immediately.
- If using a non-disinfectant cleaning agent, perform separate disinfection with authorized products, following manufacturer instructions.
- Inspect each instrument for cleanliness and functionality. Repeat cleaning if necessary. Lubricate movable parts and ensure proper assembly.
- Packaging is for transport only; follow hospital procedures for sterilization. Use fractionated pre-vacuum procedure as per EN standards. Recommended steam sterilization at 134°C for 5 to 18 minutes.
- Follow hospital guidelines for disposal. Ensure instruments are cleaned, disinfected, and sterilized before returning to I.T.S. GmbH.
- Instructions are validated for reconditioning. Reconditioners must ensure effective processes and evaluate any deviations.
- Inform patients about post-implantation care and the importance of reporting any issues.
- Includes symbols for prescription, single use, sterilization methods, and more. Contact I.T.S. GmbH for further assistance.
Catalog excerpts
Implants trauma Sacral Rods
Open the catalog to page 1
1. Introduction P. 5 Preface P. 6 Properties P. 7 Indications & Contraindications 2. Surgical Technique P. 8 Ventral stabilization P. 8 Dorsal stabilization P. 9 Preparation P. 9 Reduction P. 9 Guiding instrument P. 10 Surgical Technique P. 11 Wedge shaped washers P. 12 Surgical Technique P. 12 Check P. 13 Postoperative treatment P. 13 Explantation 3. Information P. 15 Dotize® P. 16 Order list P. 18 Reconditioning Manual
Open the catalog to page 3
Preface The operative management of pelvic ring disruptions has always represented a challenge to the treating surgeon. The sufficient stabilisation of such an injury requires both a profound knowledge of the anatomy and biomechanics of the pelvis and an understanding of the mechanism of fracture. The chosen technique of a posterior stabilisation depends on the one hand on the kind of fracture, and on the other hand on the personal experience of the individual operator. Threaded rods as fixators of posterior pelvic ring instability have been well known and well proven for a long time, especially...
Open the catalog to page 5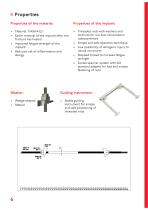
Properties Properties of the material: • Material: TiAl6V4 ELI • Easier removal of the implant after the fracture has healed • Improved fatigue strength of the implant • Reduced risk of inflammation and allergy • Threaded rods with washers and locknuts for ilio-iliac compression osteosynthesis • Simple and safe operative technique • Low possibility of iatrogenic injury to neural structures • Stepped thread to increase fatigue strength • Socket spanner system with AO standard adapter for fast and simple fastening of nuts Guiding instrument: • Wedge-shaped • Ribbed • Stable guiding instrument for...
Open the catalog to page 6
Indications & Contraindications Indications: • Dorsal stabilization on the posterior pelvic ring for unstable pelvic ring injuries type C/AO Especially in the case of: • Unstable sacral fractures in all three zones • Osteo-ligament instabilities of the sacro-iliac joint Contraindications: • Fractures of the ala of the ilium in the posterior area • Fractures of the Os sacrum in the transforaminal area with CT-verified fractured parts and fragments requiring an open revision and decompression • For the case that the relevant anatomy appears to preclude a safe positioning of the rods behind the...
Open the catalog to page 7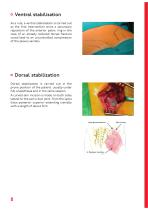
Ventral stabilization As a rule, a ventral stabilisation is carried out as the first intervention since a secondary reposition of the anterior pelvic ring in the case of an already reduced dorsal fracture could lead to an uncontrolled compression of the plexus sacralis. Dorsal stabilization Dorsal stabilisation is carried out in the prone position of the patient, usually under full anaesthesia and in the same session. A curved skin incision is made on both sides lateral to the sacro-iliac joint, from the spina iliaca posterior superior extending cranially with a length of about 5cm. Linea glutea...
Open the catalog to page 8
Preparation • Preparation of the subcutaneous fat tissue and carried down to the fascia of the glutaeus maximus muscle. • Loosen the musculature from the outer surface of the dorsal os ileum. Spina iliaca post. superior Linea glutea posterior Reduction • A possibly necessary reposition of half of the pelvis is carried out by means of a Schanz screw attached to the crista iliaca. • Deployment of the guiding instrument and checking by means of fluoroscopy. Guiding instrument It is strongly advised not to use the enclosed guiding device for reducing bone fragments since it could be damaged in this...
Open the catalog to page 9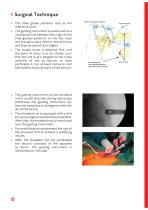
Surgical Technique • The linea glutea posterior acts as the reference point. • The guiding instrument is positioned on a considered line between the origin of the linea glutaea posterior on the iliac crest and the spina iliaca inferior; the drill hole will then lie some 0.5cm higher. • The caudal screw is attached first, and the point of entry is to be chosen such that the rod is at a tangent to the crista centralis of the os sacrum or even perforates it, but at least comes to rest behind the lamina dorsalis of the sacrum. • The guiding instrument can be swivelled in the caudal direction during...
Open the catalog to page 10
• The asymmetric washer, nut and locknut are attached (this is done the most simply by continuing to turn the rod with the drill). • Both nuts must be definitively tightened. • The drill chuck is released, the guiding instrument removed, and the washer is attached as are, successively, both nuts on the second side using the special socket spanner and the soft-part protector. Wedge shaped washers Please note the exact anatomical position shown here to arrive at the best result.
Open the catalog to page 11
Surgical Technique The first nut is tightened until the desired compression of the fracture area is reached (care must be taken not to use excessive compression with transforaminal fractures of the sacrum.) Both nuts must be tightened. Remove the excess end using the bolt cutters. The same procedure is undertaken with the second screw, which is to be positioned some 2cm cranially to the first screw. Socket spanner with soft tissue protection Adapter for socket spanner Check • Final check using fluoroscopy or X-ray • Redon drainage • Subsequent closure of the wound
Open the catalog to page 12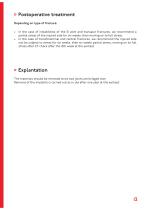
Postoperative treatment Depending on type of fracture: • In the case of instabilities of the SI joint and transalar fractures, we recommend a partial stress of the injured side for six weeks, then moving on to full stress. • In the case of transforaminal and central fractures, we recommend the injured side not be subject to stress for six weeks, then six weeks partial stress, moving on to full stress after CT check after the 12th week at the earliest. Explantation The materials should be removed since two joints are bridged over. Removal of the implants is carried out as a rule after one year...
Open the catalog to page 13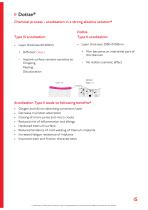
Dotize® Chemical process - anodization in a strong alkaline solution* Dotize Type II anodization • Layer thickness 2000-10 000nm + Film becomes an interstitial part of the titanium + Different colors - Implant surface remains sensitive to: Chipping Peeling Discoloration - No visible cosmetic effect Anodization Type II leads to following benefits* • • • • • • • • Oxygen and silicon absorbing conversion layer Decrease in protein adsorption Closing of micro pores and micro cracks Reduced risk of inflammation and allergy Hardened titanium surface Reduced tendency of cold welding of titanium implants...
Open the catalog to page 15All I.T.S. catalogs and technical brochures
 CTN - Cannulated Tibia Nail
28 Pages
 ufs
ufs1 Page
 DHL
DHL2 Pages
 ITS
ITS2 Pages
 SCL
SCL32 Pages
 SLS
SLS24 Pages
 OL - Olecranon Locking Plate
24 Pages
 PHL
PHL24 Pages
 PHLs
PHLs20 Pages
 CLS
CLS28 Pages
 ACLS
ACLS20 Pages
 CFN
CFN32 Pages
 OLS
OLS24 Pages
 HCS
HCS24 Pages
 TOS Twist-Off Screw
20 Pages
 TLS
TLS20 Pages
 PRS-RX
32 Pages
 HLS
HLS20 Pages
 ES
ES20 Pages
 SR
SR20 Pages
 FL
FL24 Pages
 PL - Pilon Locking Plate small
12 Pages
 FLS
FLS24 Pages
 PFL
PFL20 Pages
 DTL
DTL24 Pages
 HTO
HTO24 Pages
 PTL
PTL32 Pages
 DFL
DFL32 Pages
 CAS
CAS40 Pages
 FCN
FCN20 Pages
 HOL
HOL24 Pages
 CAL
CAL20 Pages
 DUL
DUL24 Pages


Archived catalogs


- Bone plate
- Compression plate
- Metallic compression plate
- Locking compression plate
- Distal compression plate
- Compression bone screw
- Metallic compression bone screw
- Proximal compression plate
- Arthrodesis nail
- Forearm compression plate
- Lateral compression plate
- Medial compression plate
- General purpose compression bone screw
- Tibia compression plate
- Metallic intramedullary nail
- Humerus compression plate
- Cannulated compression bone screw
- Radius compression plate
- Proximal fixation intramedullary nail
- Arthrodesis plate