- Catalogs
- Jeil Medical Corporation
- ARIX WRIST SYSTEM
ARIX WRIST SYSTEM
1 /36Pages

ARIX WRIST SYSTEM
1 /36Pages
Catalog excerpts
WRIST SYSTEM Volar Distal Radius Locking Plate
Open the catalog to page 1
Product Overview Surgical Technique Ordering Information - Volar Distal Radius Locking Plate_Standard - Volar Distal Radius Locking Plate_Volar Rim - Volar Distal Radius Locking Plate_Juxta - Screws
Open the catalog to page 2
The ARIX Wrist System(Radius) is intended for use in forearm fractures, osteotomies and arthrodesis. The ARIX Wrist System(Ulna) is intended for fractures and osteotomies, in particular for the ulna.
Open the catalog to page 3
Product Overview ARIX Wrist System ARIX Wrist System Volar Distal Radius Locking Plate is a locking plate system for volar distal radius fractures, providing optimal fit for all radius bones with anatomically designed low-profile plates. Design based on the actual 3D radius bone scan data, to provide the perfect fit on the radius bone. Screw Specifications Screw Types Outer Diameter Locking Screw Locking Screw Insertion Types Cortical Screw (Non-Locking) Smooth Peg Screw (Optional) Plate Specifications Distal Head Types Large Medium Large Blue STARIX Buttress Type Head Width Left: Green Right:...
Open the catalog to page 4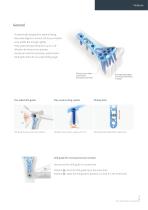
General • Anatomically designed for optimal fitting • Rounded edge for minimal soft tissue irritation • Low profile but enough rigidity • Poly-axial locking mechanism up to ±15° • Window for fracture line position • Guide pin holes for temporary plate fixation • Drill guide block for accurate drilling angle Minimal screw head prominence Rounded screw head Rounded plate edges to minimize soft tissue irritation Poly-axial locking system Two-sided drill guide Oblong hole Variable screw insertion angle up to ±15° Oblong hole for plate position adjustment 15° Drill guide for poly-axial screw insertion...
Open the catalog to page 5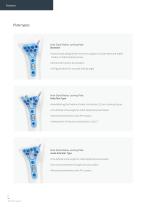
Plate types Volar Distal Radius Locking Plate Standard • Anatomically designed for maximum support of lunate facet and stable fixation of radial styloid process • Window for fracture line position • Drill guide block for accurate drilling angle Volar Distal Radius Locking Plate Volar Rim Type • Bendable lugs for fixation of volar rim fracture (1.5 mm Locking Screw) • Pre-defined screw angle for radial styloid process fixation • Minimized interference with FPL tendon • Indicated for AO fracture classification C1 & C2 Volar Distal Radius Locking Plate Juxta-Articular Type • Pre-defined screw angle...
Open the catalog to page 6
Lunate facet Drill guide block eases proper screw insertion Pre-defined screw insertion angle optimized for fragment purchase Radial styloid process Optimized plate shape for minimal FPL tendon interference Bendable lugs with 1.5 mm locking screw Pre-defined screw angle for radial styloid process purchase Indication: Complete articular fracture (C1, C2) Juxta-Articular Type Radial styloid process Pre-defined screw angle for styloid process fixation Optimized plate shape without joint involvement Volar Distal Radius Locking Plate
Open the catalog to page 7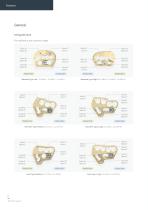
General Drill guide block Pre-defined screw insertion angle Distal 15° Ulnar 2° Radial side Ulnar side Standard Type, Left [111-082-L, 111-083-L, 111-095-L] Radial side Ulnar side Volar Rim Type, Medium [111-227-L, 111-227-R] Radial side Ulnar side Juxta Type, Medium [111-229-L, 111-229-R] ARIX Wrist System Ulnar side Distal 15° Radial 10° Distal 30° Radial 20° Radial side Standard Type, Right [111-082-R, 111-083-R, 111-095-R] Radial side Ulnar side Volar Rim Type, Large [111-228-L, 111-228-R]
Open the catalog to page 8
Surgical Technique Volar Distal Radius Locking Plate
Open the catalog to page 9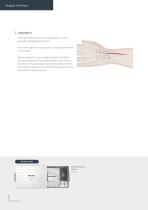
Surgical Technique Set up the operation plan using preoperative x-rays or equivalent radiographic measures. Position the patient in supine position and place the forearm on hand table. Make a longitudinal incision slightly radial to the flexor carpi radialis tendon(FCR). Dissect between the FCR and the radial artery, exposing the pronator quadratus. Detach the pronatorq uadratus from the lateral border of the radius and elevate it toward the ulna. Required Set ARIX Wrist System Full Kit ARIX Wrist System
Open the catalog to page 10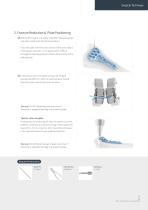
Surgical Technique 2. Fracture Reduction & Plate Positioning 1 Reduce the fracture manually, using the most appropriate reduction method for the fracture pattern. Place the plate over the volar surface of the distal radius. If necessary, insert Ø 1.1 mm guide pin(111-068-2) through the desired guide pin hole to temporarily fix the plate distally. 2 If necessary, bend the plate using a pair of plate benders(26.0240.17). With the plate benders, hold & bend the plate around the center window. Warning: DO NOT bend the plate more than 5°. Excessive or repetitive bending may break the plate. Tips for...
Open the catalog to page 11
Surgical Technique 3. Screw Insertion – Oblong Hole 1 Begin with the oblong hole in the shaft of the plate by drilling with the 2.0 mm drill bit(112-25-701) and drill guide(111-080). Distance between oblong hole markings is 1 mm. 2 Measure the depth of drilled hole with depth gauge (111-075) and choose an appropriate screw oblong hole on the plate shaft with STARIX T8 screw driver(113-HF-613) and screwdriver handle(111-092). Adjust the plate position if necessary and tighten the screw. Required Instruments Drill Bit ARIX Wrist System
Open the catalog to page 12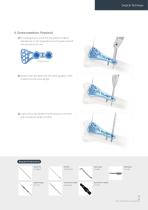
Surgical Technique 4. Screw Insertion- Proximal 1 For locking screws, insert the drill guide(111-080) or drill sleeve(111-101) perpendicular to the plate and drill with the drill bit 2.0 mm. Locking screws 2 Measure the hole depth with the depth gauge(111-075) to determine the screw length. 3 Insert screws with STARIX T8 screw driver(113-HF-613) Required Instruments Guide Pin Drill Guide Depth Gauge Screwdriver Shaft Screwdriver Handle Volar Distal Radius Locking Plate
Open the catalog to page 13
Surgical Technique 4. Screw Insertion- Distal Determine whether screws will be inserted at the prede- fined angle with guide block (a) or at a variable angle (b) . (a) Predefined angle with guide block 1 Select the corresponding guide block and mount guide block to the plate using the attachment screw. Insert the quick drill sleeve with scale into the guide block hole. Ensure that the drill sleeve is firmly seated in the hole. Drill to the desired depth using the 2.0 mm drill bit. Read the screw length directly from the laser mark on the drill bit. 2 Alternatively, measure with a corresponding...
Open the catalog to page 14Archived catalogs
 Cranial - Sterile NS Kit
2 Pages
 Cranial - LeForte Neuro System
16 Pages
 Orthopedic - ARIX Humerus System
20 Pages
 Orthopedic - ARIX Elbow
44 Pages
 Cranial - Speedy Flap System
4 Pages
 ARIX System Product Catalog
62 Pages
 Jeil Customized Implant
12 Pages
 Cranial - Sterile NS System
16 Pages
 ARIX Ulna Osteotomy System
16 Pages
 Orthopedic - Arix Hand System
20 Pages
 OMF - Facial Bandage
2 Pages


- Dental material
- Bone plate
- Compression plate
- Metallic compression plate
- Dental restoration material
- Locking compression plate
- Surgery forceps
- Grasping forceps
- Dental implant
- Titanium dental implant
- Stainless steel forceps
- Titanium compression plate
- Reusable forceps
- Distal compression plate
- Orthopedic clothing
- Interbody fusion cage
- Compression bone screw
- Conical dental implant
- Metallic compression bone screw
- Biocompatible dental material