- Catalogs
- JRI Orthopaedics
- Furlong Evolution Surgical technique
Furlong Evolution Surgical technique
1 /24Pages
Furlong Evolution Surgical technique
1 /24Pages
Catalog excerpts
Furlong Evolution Primary total hip replacement OPERATIVE TECHNIQUE
Open the catalog to page 1
Pre-Operative Planning Femoral Neck Osteotomy Femoral Canal Preparation Broaching the Femur Trial Reduction Calcar Preparation Femoral Component Insertion Femoral Head Impaction Femoral Stem Removal Technical Specification Furlong Evolution® Implant Range Femoral Head Range Furlong Evolution® Instrumentation
Open the catalog to page 2
Pre-Operative Planning Templating for the Furlong Evolution® stem is available on all commonly used 2D software and in accetate. Note: Insufficient bone stock or bone quality to support the prosthesis or to provide adequate fixation is a contraindication. To ensure accurate templating for the Furlong Evolution® stem, Anterior / Posterior and Lateral radiographs will be required with neutral leg alignment and stable pelvic tilt to help determine the implant size, offset, neck length and positioning required to restore the patient’s natural anatomy and hip biomechanics. Step 1 (Acetabulum) Be sure...
Open the catalog to page 3
It is not essential to ensure that the prosthesis makes cortical contact with the lateral aspect of the femur in strong bone. It is important to note the difference between a calcar conforming stem as opposed to a ‘fit and fill’ technique. If in doubt template a size that contacts the lateral cortex and then go down a size. Step 3 (Neck Angle & Head-Neck Length) Special attention should be given pre-operatively to determine leg length discrepancy. Any pre-existing leg length discrepancy can be compensated for by adjusting the actual position of the centre of rotation above or below the centre...
Open the catalog to page 4
The Furlong Evolution® stems are available in two offset options - ‘Standard’: 37mm (based on a 133° neck angle stem with a medium neck length head) and ‘High’: 42mm (based on a 133° neck angle stem with a medium neck length head). For the same stem neck angle and head-neck length, the difference between the standard and high offset is 5mm. Increasing or decreasing head-neck length by 4mm will also increase or decrease the offset by 2.9mm. A measurement of this distance should enable best selection of the offset required. Offset value with varying neck lengths Decreasing neck angle from 133°...
Open the catalog to page 5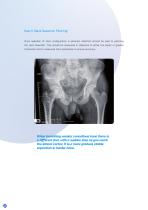
Once selection of stem configuration is planned, attention should be paid to planning the neck resection. This should be measured in reference to either the lesser or greater trochanter and re-measured intra-operatively to ensure accuracy. 10 mm STEM 133° NECK ANGLE When broaching weaker cancellous bone there is a different feel, with a sudden stop as you reach the lateral cortex. It is a more gradual, stable impaction in harder bone.
Open the catalog to page 6
Femoral Neck Osteotomy After dislocation, resect the femoral neck. The femoral neck resection guide (460-01-00) can be used to help ensure the cut is made at the level determined as optimal in the preoperative planning. It can also be used to help determine the inclination angle of the neck resection is based on neutral alignment of the stem. The position of the ‘head centre’ hole will give a guide to the eventual neck angle selection. (Figure 1).
Open the catalog to page 7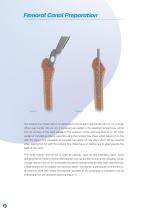
Femoral Canal Preparation The modular box chisel (460-01-01) attaches to the straight rasp handle (460-04-01) or single offset rasp handle (460-04-02). It is placed just medial to the resected cortical bone, within the cut surface of the neck parallel to the posterior cortex and very close to it. An initial wedge of cancellous bone is resected using the modular box chisel whilst keeping it in line with the femur. It is advisable to consider the version of the stem which will be required when making the cut with the modular box chisel (Figure 2), taking care to keep towards the back of the neck....
Open the catalog to page 8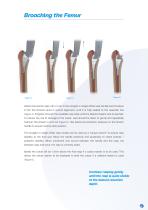
Attach the starter rasp (460-01-04) to the straight or single offset rasp handle and introduce it into the femoral canal in neutral alignment, until it is fully seated to the resection line (Figure 4). Progress through the available rasp sizes until the desired implant size is reached. To reduce the risk of damage to the calcar, care should be taken to gently and repeatedly hammer the broach in and out (Figure 5). Use lateral and posterior pressure on the broach handle to ensure neutral stem position. The straight or single offset rasp handle can be used as a ‘torque wrench’ to ensure rasp stability...
Open the catalog to page 9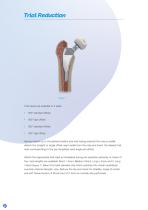
Trial necks are available in 4 sizes: Having rasped up to the desired implant size and having ensured the rasp is stable, detach the straight or single offset rasp handle from the rasp and insert the desired trial neck corresponding to the pre-templated neck angle and offset. Attach the appropriate trial head as templated during pre-operative planning. A choice of four neck lengths are available: Short (-4mm), Medium (0mm), Long (+4mm) and X-Long (+8mm)(Figure 7). Select the head diameter size which matches the chosen acetabular cup/liner internal diameter. size. Reduce the hip and check for...
Open the catalog to page 10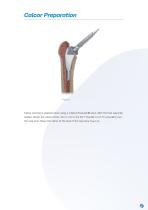
Calcar Preparation Calcar reaming is required when using a collared Evolution® stem. With the final rasp fully seated, attach the calcar cutter (460-01-23) to the AO T-Handle (10-00-51) and place over the rasp post. Ream the calcar to the level of the rasp face (Figure 8).
Open the catalog to page 11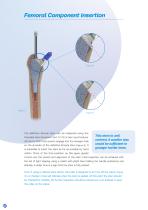
Femoral Component Insertion The definitive femoral stem can be implanted using the threaded stem introducer (450-07-00) or hex cup introducer (86-99-14). Both instruments engage into the hexagon hole on the shoulder of the definitive femoral stem (Figure 9). It is advisable to insert the stem as far as possible by hand This stem is well centred. A smaller size would be sufficient in younger harder bone. (within 10mm of the final position) as this gives greater control over the version and alignment of the stem. Final impaction can be achieved with the aid of light tapping using a mallet with...
Open the catalog to page 12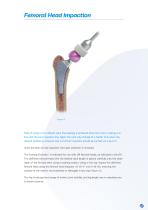
Femoral Head Impaction Note: If using a non-collared stem final seating is achieved when the H-A.C. coating is in line with the neck resection line. Again the note may change to a harder tone when the desired position is achieved and no further impaction should be carried out (Figure 11). Once the stem is fully impacted, the taper protector is removed. The Furlong Evolution® is indicated for use with JRI femoral heads, as indicated in the IFU. The definitive femoral head with the desired neck length is placed carefully onto the clean taper of the femoral stem using a twisting motion. Using a...
Open the catalog to page 13All JRI Orthopaedics catalogs and technical brochures
 ACE Surgical Technique
24 Pages
 Avanteon Surgical Technique
24 Pages
 Product Catalogue
8 Pages
 CSF Plus Surgical Technique
20 Pages
 Securus Surgical Technique
40 Pages
 Furlong H-A.C Surgical technique
24 Pages
 Furlong
20 Pages
- Acetabular prosthesis
- Cementless femoral stem
- Cementless acetabular prosthesis
- Hip prosthesis
- Cemented femoral stem
- Femoral head prosthesis
- Primary hip prosthesis
- Revision femoral stem
- Cementless hip prosthesis
- Shoulder prosthesis
- Revision shoulder prosthesis
- Cemented hip prosthesis
- Minimally invasive femoral stem