- Catalogs
- JRI Orthopaedics
- Furlong H-A.C Surgical technique
Furlong H-A.C Surgical technique
1 /24Pages
Furlong H-A.C Surgical technique
1 /24Pages
Catalog excerpts

Furlong® H-A.CPrimary & Revision Stem OPERATIVE TECHNIQUE
Open the catalog to page 1
Femoral Neck Osteotomy 3 Femoral Canal Preparation 4 Calcar Reaming and Lateral Fin Cutting 6 Femoral Head Trialling 7 Femoral Stem Insertion 9 Femoral Head Impaction 10 Femoral Canal Preparation 12 Femoral Stem Insertion 15 Furlong® H-A.C. Dimension Chart 16 Furlong® H-A.C. Implant Range 17
Open the catalog to page 2
Pre-operative planning for the Furlong® H-A.C. stem is available on all commonly used 2D software and in acetate. Note: Insufficient bone stock or bone quality to support the prosthesis or to provide adequate fixation is a contraindication. To ensure accurate templating, Anterior / Posterior and Lateral radiographs will be required with neutral leg alignment and stable pelvic tilt to help determine the implant size and positioning required to restore the patient’s natural anatomy and hip biomechanics. Be sure that the cup is well centred within the acetabulum and at an abduction angle of approximately...
Open the catalog to page 3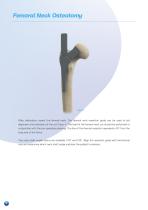
Femoral Neck Osteotomy After dislocation, resect the femoral neck. The femoral neck resection guide can be used to aid alignment and inclination of the cut (Figure 1). The level of the femoral neck cut should be performed in conjunction with the pre-operative planning. The line of the femoral resection represents 40° from the long axis of the femur. Two neck shaft angles stems are available, 140° and 133°. Align the resection guide with the femoral axis and determine which neck shaft angle matches the patient’s anatomy.
Open the catalog to page 4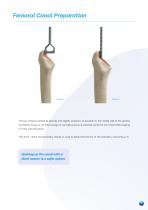
Femoral Canal Preparation The box chisel is placed as laterally and slightly posterior as possible on the medial wall of the greater trochanter (Figure 2). An initial wedge of cancellous bone is resected using the box chisel while keeping it in line with the femur. The 4mm - 8mm intramedullary reamer is used to determine the line of the medullary canal (Figure 3). Opening up the canal with a blunt reamer is a safer option.
Open the catalog to page 5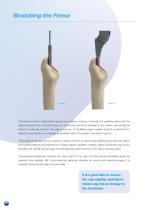
The femoral canal is alternatively reamed and rasped, moving up through the available sizes until the desired implant size is reached (Figure 4). To reduce the risk of damage to the calcar, care should be taken to cautiously hammer the rasp in and out. To facilitate proper implant sizing, it is important to keep the rasp handle in as laterally as possible within the greater trochanter (Figure 5). The handle of the rasp can be used as a ‘torque wrench’ to ensure rasp stabilty at the final size. Move the handle anteriorly and posteriorly to check anterior/posterior stability. When movement only...
Open the catalog to page 6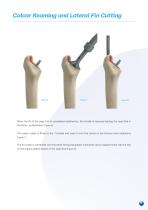
Calcar Reaming and Lateral Fin Cutting When the fit of the rasp/trial is considered satisfactory, the handle is removed leaving the rasp/trial in the femur, as illustrated (Figure 6). The calcar cutter is fitted to the T-handle and used to trim the calcar at the femoral neck osteotomy (Figure 7). The fin cutter is orientated with the teeth facing the greater trochanter and is tapped home into the slot on the supero-lateral aspect of the rasp/trial (Figure 8).
Open the catalog to page 7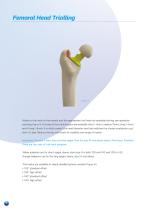
Attach a trial neck to the broach and the appropriate trial head as templated during pre-operative planning (Figure 9). A choice of four neck lengths are available: short (-4mm), medium (0mm), long (+4mm) and X-long (+8mm). It is vital to select the head diameter size that matches the chosen acetabular cup/ liner I.D. size. Reduce the hip and check for stability and range of motion. Important: The size 9 stem has a shorter spigot than the size 10 and above stems (4mm less), therefore there are two sets of trial neck adaptors. Yellow adaptors are for short spigot stems, stem size 9 in both 133...
Open the catalog to page 8
9, 10S (Short spigot stems) HO = High offset (lateral offset +5mm) Furlong® H-A.C 9, and 10S stems have a short spigot Furlong® H-A.C 10 to 16 stems have a spigot +4mm longer
Open the catalog to page 9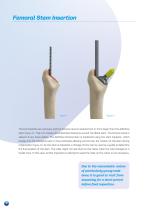
Femoral Stem Insertion The trial implants are removed, and the femoral canal is reamed 1mm or 2mm larger than the definitive stem (Figure 11). This is to create circumferential clearance around the distal stem. The femoral canal is cleared of any loose debris. The definitive femoral stem is implanted using the stem impactor, which locates into the hexagonal slot on the prosthesis allowing control over the rotation of the stem during implantation (Figure 12). As the stem is impacted, a change of tone can be used as a guide to determine the final position of the stem. The collar might not rest...
Open the catalog to page 10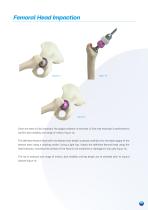
Femoral Head Impaction Once the stem is fully impacted, the spigot protector is removed. A final trial reduction is performed to confirm joint stability and range of motion (Figure 13). The definitive femoral head with the desired neck length is placed carefully onto the clean spigot of the femoral stem using a twisting motion. Using a light tap, impact the definitive femoral head using the head impactor, ensuring the surface of the head is not scratched or damaged in any way (Figure 14). The hip is reduced and range of motion, joint stability and leg length are re-checked prior to wound closure...
Open the catalog to page 11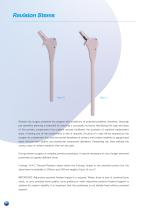
Revision Stems Revision hip surgery presents the surgeon with a plethora of potential problems, therefore, thorough pre-operative planning is essential for ensuring a successful outcome. Identifying the type and sizes of the primary components from patient records facilitates the provision of matched replacement sizes, if leaving one of the components in-situ is required. Scrutiny of x-rays will be required by the surgeon to complement this, and we provide templates of primary and revision implants to gauge head sizes, femoral stem widths, and acetabular component diameters. Templating can then...
Open the catalog to page 12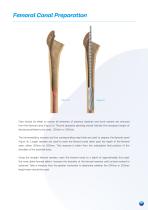
Femoral Canal Preparation Care should be taken to ensure all remnants of previous implants and bone cement are removed from the femoral canal (Figure 18). The pre-operative planning should indicate the necessary length of femoral prosthesis to be used, 200mm or 250mm. The intramedullary reamers and the corresponding rasp/trials are used to prepare the femoral canal (Figure 19). Longer reamers are used to ream the femoral canal down past the depth of the femoral stem, either 200mm or 250mm. This measure is taken from the anticipated final position of the shoulder of the proximal body. Using the...
Open the catalog to page 13All JRI Orthopaedics catalogs and technical brochures
 ACE Surgical Technique
24 Pages
 Avanteon Surgical Technique
24 Pages
 Product Catalogue
8 Pages
 CSF Plus Surgical Technique
20 Pages
 Securus Surgical Technique
40 Pages
 Furlong
20 Pages

- Acetabular prosthesis
- Cementless femoral stem
- Cementless acetabular prosthesis
- Hip prosthesis
- Cemented femoral stem
- Femoral head prosthesis
- Primary hip prosthesis
- Revision femoral stem
- Cementless hip prosthesis
- Shoulder prosthesis
- Revision shoulder prosthesis
- Cemented hip prosthesis
- Minimally invasive femoral stem