- Catalogs
- JRI Orthopaedics
- Securus Surgical Technique
Securus Surgical Technique
1 /40Pages
Securus Surgical Technique
1 /40Pages
Catalog excerpts
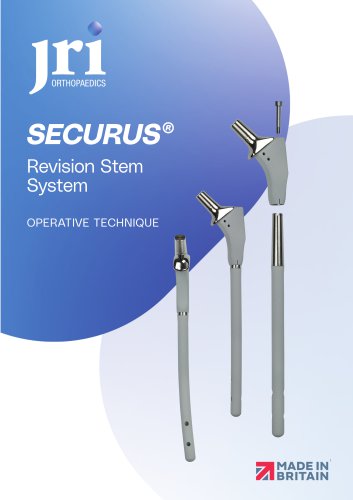
OPERATIVE TECHNIQUE
Open the catalog to page 1
Securus® Design Rationale Pre-Operative Evaluation Femoral Canal Preparation Monobloc Prosthesis Preparation and Insertion Modular Prosthesis Preparation and Insertion Distal Targeting Jig Components Distal Targeting - STEP Technique Monobloc Technical Details Modular Technical Details Securus® Implant Chart Securus® Instrumentation
Open the catalog to page 2
Securus® Design Rationale Revision hip surgery represents a significant challenge to the orthopaedic surgeon and can have a major impact on a hospital’s orthopaedic budget. The Securus® Revision Stem System has been designed to help meet both the clinical and financial challenges. The range of femoral prostheses and the instrumentation to implant these have been designed to provide a versatile, easy to use and cost effective solution appropriate for the majority of femoral stem revisions, trauma and complex primaries. A survey of surgeon opinion indicated that the requirements of an effective...
Open the catalog to page 3
Contra-Indications The device should not be implanted where there is active infection, insufficient bone stock to support the prosthesis or provide adequate fixation. Further contra-indications may be, but are not limited to the following conditions: • Severe deformities Severe osteoporosis Systematic and metabolic disorders Drug addiction Important Information: Where there is loss of proximal bone stock, or poor proximal bone quality, bone grafting or other adjunctive proximal fixation / support is required for implant stability for; Size 11 and 12 monobloc stems, 11mm and 12mm diameter 250mm...
Open the catalog to page 4
Pre-Operative Evaluation Correct surgical procedures and technique are the responsibility of the medical professional. The following guidelines are for information purposes only; each surgeon must evaluate the appropriateness of the procedure, prior to the use of the system, based on individual medical training and experience. Pre-operative planning, including X-ray templating, is strongly recommended for leg length and offset assessment and to provide guidance for accurate bone preparation and appropriate implant selection. A bi-lateral AP X-ray of the proximal femur and pelvis will aid in leg...
Open the catalog to page 5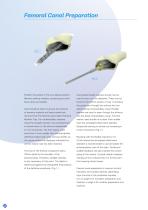
Femoral Canal Preparation Position the patient in the true lateral position. Cannulated flexible reamers should now be Remove existing implants, preserving as much used to ream out the diaphysis. These can be bone stock as possible. found in the bottom section of tray 1. Introduce the guide wire through the isthmus into the Care should be taken to ensure all remnants distal femoral intramedullary canal. Flexible of previous implants and bone cement are reamers are used to ream through the isthmus removed from the femoral canal. Select Femoral into the distal intramedullary canal. The first Revision...
Open the catalog to page 6
Monobloc Prosthesis Preparation & Insertion Assessment of the metaphyseal cavity is now Once the rasp has been fully seated in the conducted, paying particular attention to the femur to the level desired for the definitive bone quality and observing any windows in the implant, gently twist the rasp handle: if the femoral cortex. Weakened or compromised bone rasp is able to move within the femoral canal, may indicate the necessity for distal locking. rasp up to the next size. The correct size has Begin rasping the proximal femur with the been reached when gently twisting the rasp smallest monobloc...
Open the catalog to page 7
Monobloc Prosthesis Preparation & Insertion - Screw the introducer handle from tray 4 Select the appropriate definitive monobloc securely onto the monobloc trial. prosthesis corresponding to the trial prosthesis used ( Fig. 6 ). Note: the introducer handle for the monobloc trial and definitive implant has a different fitting If distal locking is not required, the introducer than the modular trial and definitive implant handle used for the trial insertion, can be introducer handle. used to impact the definitive prosthesis. The prosthesis should be pushed into the femur, Using the introducer handle...
Open the catalog to page 8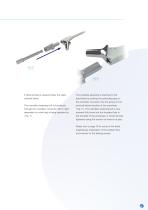
If distal locking is required follow the steps The complete assembly is attached to the outlined below. prosthesis by pushing the protruding peg on the monobloc connector into the groove in the The monobloc fastening bolt is introduced proximal lateral shoulder of the prosthesis through the monobloc connector, left or right, ( Fig. 8 ). The monobloc fastening bolt is now dependant on which leg is being operated on screwed fully home into the threaded hole in the shoulder of the prosthesis. It should be fully tightened using the wrench so there is no play. Please turn to page 13 for setup of the...
Open the catalog to page 9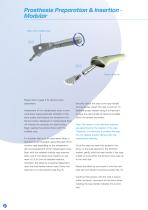
Prosthesis Preparation & Insertion Modular Start with smallest rasp Please refer to page 5 for femoral canal preparation. Securely attach the rasp to the rasp handle and cautiously impact the rasp in and out. To Assessment of the metaphyseal cavity is now facilitate proper implant sizing it is important conducted, paying particular attention to the to keep the rasp handle as lateral as possible bone quality and observe any windows in the within the greater trochanter. femoral cortex. Weakened or compromised bone will indicate the necessity for distal locking. Note: The version of the definitive...
Open the catalog to page 10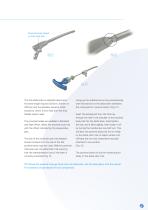
Proximal body based on final rasp size The trial distal stem is selected based upon Lining up the indicator line on the proximal body the stem length required (250mm, 300mm or with the bold line on the distal stem orientates 350mm) and the diameter required, which the components in neutral version ( Fig. 12 ). should be 1.5mm-2.0mm less than the final flexible reamer used. Insert the locking bolt from the trial tray, through the hole in the shoulder of the proximal The proximal bodies are available in Standard body trial into the distal stem, hand tighten and High Offset. Select the proximal...
Open the catalog to page 11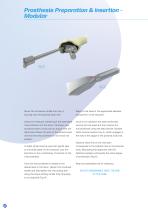
Prosthesis Preparation & Insertion Modular Screw the introducer handle from tray 3 Select a trial head of the appropriate diameter securely onto the proximal body trial. and perform a trial reduction. Using the introducer handle push the assembled Once a trial reduction has been performed, trial prosthesis into the femur. Particular care remove the trial head and then remove the should be taken at this point to ensure that the trial prosthesis using the slap hammer (located distal stem follows the path of the femoral canal within femoral revision tray 4), which engages in and that the trial prosthesis...
Open the catalog to page 12All JRI Orthopaedics catalogs and technical brochures
 ACE Surgical Technique
24 Pages
 Avanteon Surgical Technique
24 Pages
 Product Catalogue
8 Pages
 CSF Plus Surgical Technique
20 Pages
 Furlong H-A.C Surgical technique
24 Pages
 Furlong
20 Pages

- Acetabular prosthesis
- Cementless femoral stem
- Cementless acetabular prosthesis
- Hip prosthesis
- Cemented femoral stem
- Femoral head prosthesis
- Primary hip prosthesis
- Revision femoral stem
- Cementless hip prosthesis
- Shoulder prosthesis
- Revision shoulder prosthesis
- Cemented hip prosthesis
- Minimally invasive femoral stem