LM-043N
1 /14Pages

LM-043N
1 /14Pages
Catalog excerpts

Maternity Model Type II LM-043N Instruction Manual Thank you for purchasing the Maternity Model Type II. Please read this instruction manual carefully to ensure correct use of the product, and store it in a safe place for easy access. KOKEN CO., LTD. 1-4-14 Koraku, Bunkyo-ku, Tokyo 112-0004 JAPAN URL:http://www.kokenmpc.co.jp E-mail:[email protected] © 2014-2020 KOKEN CO.,LTD. C-1-1014-1-01-06
Open the catalog to page 1
Handling and Safety Precautions These precautions should be strictly observed in order to ensure safe, long-term use of the product. The following precautions should be observed particularly strictly: 1. The skin is made of a special silicone with a texture that is similar to human skin, and the abdominal wall piece is made with a special material that is soft to the touch. Please handle these models with the same care that you would exercise when working with a human body. Applying excessive force may damage the model. 2. The material of the abdominal wall piece has a distinct odor. This odor...
Open the catalog to page 3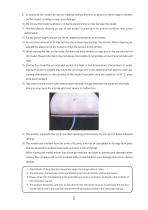
9. In caring for the model, do not use rubbing alcohol, thinners, or benzin or other organic solvents on the model, as doing so may cause damage. 10. Do not use the model outdoors or in damp places; doing so may damage the model. 11. Placing objects directly on top of the model or placing it on uneven surfaces may cause deformation. 12. For the power supply, always use the AC adapter provided as an accessory. 13. An excessive amount of air injected into the amnion may damage the amnion. When injecting air, palpate the abdomen of the model to check the tension in the amnion. 14. When setting the...
Open the catalog to page 4
Table of Contents 1. Outline and Features 2. Components and Configuration 3. Setting up the Model 3-1. Attach the fetus in amnion 3-2. Attach the abdominal wall piece
Open the catalog to page 5
1. Outline and Features Outline The four types of Leopold’s Maneuvers, fetal heartbeat monitoring, and abdominal measurement can be practiced. The abdominal wall piece is made of soft, stretchy material, and the abdomen can be inflated with air as a substitute for amniotic fluid; thus, reproducing a highly realistic sensation. An internal synthesizer reproduces a realistic fetal heartbeat sound. Volume and speed are adjustable. Features 1. The trunk skin and fetus material are made of a special silicone rubber with an appearance and texture that closely simulates human skin, for realistic practice....
Open the catalog to page 6
Abdominal wall piece Two-way stopcock (with Luer fitting) Birth canal pads (1 small, 1 large) Rubber bladder Baby powder Abdominal wall protective sheet Instruction Man
Open the catalog to page 7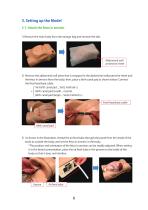
3. Setting up the Model 3-1. Attach the fetus in amnion 1) Remove the main body from the storage bag and remove the skin. Abdominal wall protective sheet Abdominal wall protective sheet Abdominal wall 2) Remove the abdominal wall piece that is wrapped in the abdominal wall protective sheet and protective sheet the fetus in amnion from the body; then, place a birth canal pad as shown below. Connect the fetal heartbeat cable. No birth canal pad ... Seitz method (-) * Birth canal pad (small) ... normal Birth canal pad (large) ... Seitz method (+) Fetal heartbeat cable Fetal heartbeat cable Fetal...
Open the catalog to page 8
4) Attach the amnion indicator to the air feed tube. Then, attach the rubber bladder to the amnion indicator. 3-2. Attach the abdominal wall piece 1) Take the abdominal wall piece out of the abdominal wall protective sheet and place it on the body with the fetus in amnion in place. Place it in the body so that the “Upper part” and Chest side “Lower part” marks on the abdominal wall piece are positioned as shown below. Chest side Chest side Leg side Abdominal wall piece Abdominal wall piece Upper part Upper part Upper part Lower part Lower part Lower part Abdominal wall piece 2) Anchor the abdominal...
Open the catalog to page 9
3-3. Attach the skin 1) After anchoring the abdominal wall piece to the fixation pins, place the skin over the main body. *Do not secure the hook and loop fasteners on the sides at this time. 2) Set the amnion indicator stopcock in the opposite direction of the amnion indicator (the direction shown by the red arrow in the picture). Main body Rubber Main Rubber side body bladder side side bladder side Main body Rubber side bladder side 3) Twist the valve on the rubber bladder clockwise to close it, and fill the rubber bladder with air. When doing so, be careful not to twist the cuff of the amnion...
Open the catalog to page 10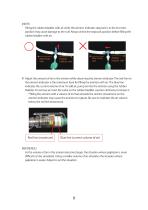
[NOTE] Filling the rubber bladder with air while the amnion indicator stopcock is in the incorrect position may cause damage to the cuff. Always check the stopcock position before filling the rubber bladder with air. Main body side Main Rubberbody side bladder side Rubber Main body bladder side side Main Rubberbody side bladder side Rubber bladder side 4) Adjust the amount of air in the amnion while observing the amnion indicator. The red line on the amnion indicator is the maximum level for filling the amnion with air. The blue line indicates the current volume of air. To add air, pump air into...
Open the catalog to page 11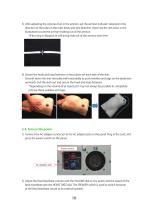
5) After adjusting the volume of air in the amnion, set the amnion indicator stopcock in the direction of the tube on the main body side (the direction shown by the red arrow in the illustration) to prevent air from leaking out of the amnion. *If this step is skipped, air will slowly leak out of the amnion over time. 6) Secure the hook and loop fasteners in four places on each side of the skin. Smooth down the skin vertically and horizontally to push wrinkles and sags on the abdomen outwards. Pull the skin taut and secure the hook and loop fasteners. *Depending on the volume of air injected,...
Open the catalog to page 12
4. Caring for the Model (1) Remove the air from the amnion before storing. To remove the air, turn the amnion indicator stopcock back in the opposite direction of the amnion indicator (the direction shown by the red arrow in the picture), and twist the valve on the rubber bladder counter-clockwise to loosen it. Main body side Rubber bladder side Main body side Rubber bladder side (2) Wrap the abdominal wall piece in the abdominal wall protective sheet provided as an accessory, then place it back on the main body and place the skin over the top to store. *1. The abdominal wall protective sheet...
Open the catalog to page 13All KOKEN catalogs and technical brochures
 +eLM054
6 Pages
 eLM113
14 Pages
 LM-026MGe
6 Pages
 2012LM098e
14 Pages
- Anatomy model
- Training anatomy model
- Teaching anatomical model
- Training medical simulator
- General care simulator
- Cannula
- Upper body simulator
- Cranial anatomical model
- Training manikin
- Surgical phantom
- Transparent anatomical model
- Pad simulator
- Injection simulator
- Body anatomy model
- Intubation cannula
- Portable simulation unit
- Monitoring simulator
- Female simulator
- Silicone anatomical model
- Lower body simulator