- Catalogs
- KwickScreen
- KwickScreen Air User Manual
- Company
- Products
- Catalogs
- News & Trends
- Exhibitions
KwickScreen Air User Manual
1 /16Pages

KwickScreen Air User Manual
1 /16Pages
Catalog excerpts

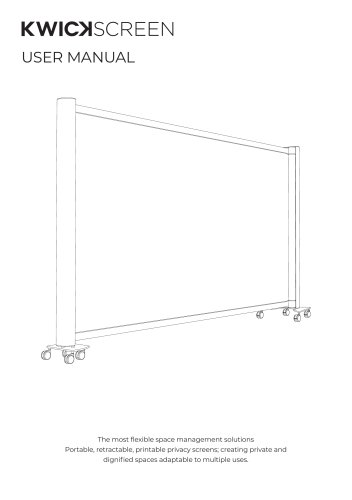
The most flexible space management solutions Portable, retractable, printable privacy screens; creating private and dignified spaces adaptable to multiple uses.
Open the catalog to page 1
Please read all instructions in this user guide prior to installation and operation of your KwickScreen. For personal and operational safety use only parts approved by KwickScreen. Be gentle when pulling the KwickScreen out for use. Before installation ensure all parts are present, complete and without defects. KwickScreens must be allowed to find their “natural position”. If you find the screen difficult to push in or pull out, or you hear a crumpling sound, then reverse your action (push if pulling and pull if pushing). If you believe parts to be missing please contact us. Packaging material...
Open the catalog to page 2
Dear valued customer, Thank you for choosing to purchase from KwickScreen. I hope that your new KwickScreen will help you make better use of your spaces and if you have chosen a printed screen, that you enjoy the benefits which the images can bring to your environment. I am passionate about using technology to improve environments. As a designer and engineer I invented the KwickScreen to help solve space issues. For a room to be used efficiently and appropriately it needs to be flexible both spatially and visually. Every multi-use room, from a hospital ward, to a gym, a private meeting room or...
Open the catalog to page 3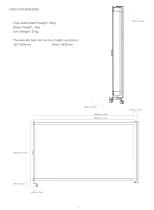
VIEW & DIMENSIONS Fully Assembled Weight: 16kg Bases Weight: 3kg Unit Weight: 13 kg The KwickScreen Air has two height variations: Tall: 1905mm Short: 1600mm
Open the catalog to page 4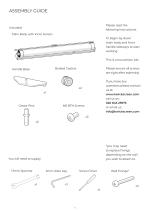
Included: Main Body with Inner Screen Please read the following instructions. To begin lay down main body and front handle sideways to start working. This is a two person job. Handle Base Braked Castors Castor Pins Please ensure all screws are tight after assembly. If you have any questions please contact us at: www.kwickscreen.com call us on: 020 845 25975 or email us: [email protected] You will need to supply: 'you may need to replace fixings depending on the wall you wish to attach to. 13mm Spanner 5mm Allen Key Screw Driver Wall Fixings*
Open the catalog to page 5
MAIN BASE ASSEMBLY Make sure the flat side is against the body x1 Step 2 Tighten very well
Open the catalog to page 6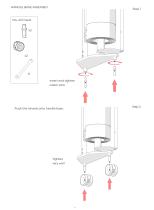
HANDLE BASE ASSEMBLY x1 Insert and tighten castor pins Push the wheels onto handle base. Tighten very well
Open the catalog to page 7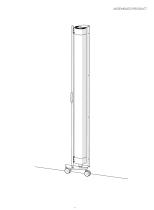
ASSEMBLED PRODUCT
Open the catalog to page 9
ASSEMBLED PRODUCT
Open the catalog to page 10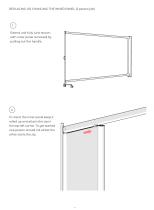
REPLACING OR CHANGING THE INNER PANEL (2 person job) © Extend unit fully (unit shown with inner panel removed) by pulling out the handle. © To insert the inner panel keep it rolled up and attach the zip in the top left corner. To get started one person should roll whilst the other starts the zip.
Open the catalog to page 11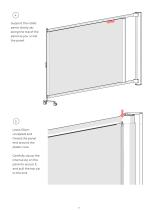
4 Support the rolled panel, slowly zip along the top of the panel as you unroll the panel. 5 Leave 50cm unzipped and thread the panel end around the plastic core. Carefully zip up the internal zip on the panel to secure it, and pull the top zip to the end.
Open the catalog to page 12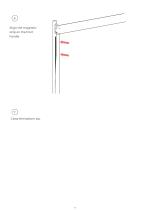
A/ign the magn St,'P on the?9netic hanc/ fr0m the botfom
Open the catalog to page 13
KwickScreens have been designed in line with infection control performance specifications. It's smooth surfaces are easy to clean and designed to withstand regular cleaning. The body is made of anodized aluminium, other metal parts are powder coated steel. The screen panel is made with polyester film. NORMAL CLEANING Surfaces can be cleaned using most healthcare cleaning solutions including quaternary, bleach solutions or sporicidal and virucidal disinfectants. Hyplochlorite may also be used on the screen material. Hypochlorite can be applied at 1000-10000 ppm or a 60% alcohol solution. STUBBORN...
Open the catalog to page 14
OPERATION GENERAL INSTRUCTIONS KwickScreens are designed for use on smooth, horizontal surfaces. Extra care should be taken when using on other surfaces. Push and pull the front handle gently during operation. If the handle needs to be forced please contact us. If there is resistance or you hear a crumpling sound then stop, pull out and push in again gently. Make sure the front handle is vertical and that its two wheels are all in contact with the floor. Do not run when using a KwickScreen.
Open the catalog to page 15
DAMAGE PROCEDURE If you do experience any problems or damage with your screen, please email us (with images if applicable) to [email protected]. If you have any questions please contact us at: www.kwickscreen.com / [email protected] You can call us on: 020 845 25975 Or visit us at: Unit 3, Phoenix Trading Estate, Bilton Road, London. UB6 7DZ Printed on 100% recycled paper.
Open the catalog to page 16All KwickScreen catalogs and technical brochures
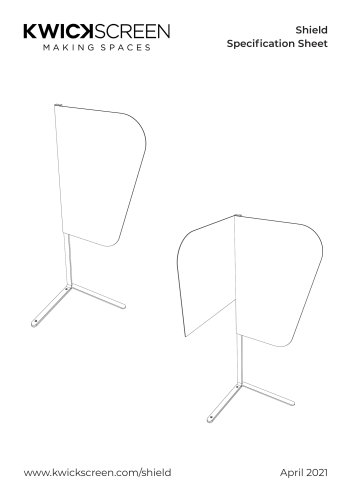 Shield Specification Sheet
5 Pages
 Kin Specification Sheet
6 Pages
 Duo Specification Sheet
5 Pages
 Air Specification Sheet
6 Pages
 KwickScreen Pro User Manual
20 Pages
 KwickScreen Duo User Manual
16 Pages
 Image Catalogue
15 Pages
 Products & Features Brochure
20 Pages
 Case Studies Booklet
14 Pages
 Simulation Catalogue
15 Pages
 KwickScreen Air Product Features
12 Pages
 KwickScreen Pro Product Features
10 Pages