
- Catalogs
- LifeLike BioTissue Inc.
- LifeLike Long Femoral Leg Simulator

LifeLike Long Femoral Leg Simulator

LifeLike Long Femoral Leg Simulator
- Line Tubing x 3
- Luer Lock Vessel Connectors A (larger) x 2
- Luer Lock Vessel Connectors B (smaller) x 4
- Reservoir with Push-to-Connect connectors
- Pump with Push-to-Connect connectors
- Zip ties
- Extra tubing and connectors
- Fill the reservoir with water and secure the lid.
- Connect the blue end of the short tubing to the blue connector on the reservoir, ensuring the plastic piece is fully inserted.
- Attach the green end of the same tube to the green inlet connector on the pump (left side).
- Connect the green end of a long tube to the green outlet connector on the pump (right side).
- Attach the red end of this tube to the red connector in the simulator's upper thigh area.
- Connect the black end of the remaining tube to the black connector in the ankle area of the simulator.
- Attach the blue end of this tube to the open blue connector on the reservoir.
- Prepare the LifeLike Medium Femoral Artery model by inserting Luer Lock Vessel Connector A into each end, securing with zip ties, and trimming to fit. Repeat for Small Femoral Artery models using Connector B.
- Insert the Femoral Arteries into the simulator by aligning and twisting the connectors to secure without twisting the vessel.
- Plug in the pump, turn it on, and check for leaks as water runs through the system.
Note: Extra connectors are provided for quick setup between training sessions. Discard used vessels and replace with prepared ones.
- Turn off the pump and slightly loosen the reservoir lid.
- Remove the tube from the pump by pressing the grey ring and pulling the tubing out.
- Run the pump until the system is empty, then turn off and unplug.
- Disconnect used vessels, cut zip ties, and remove connectors.
- Disconnect all tubing and empty the reservoir.
- Dry the simulator before storing.
Catalog excerpts

LifeLike Long Femoral Leg Simulator Set-Up Instruc ons Parts Included - Line Tubing x 3 - Luer Lock Vessel Connectors A (larger) x 2 - Luer Lock Vessel Connectors B (smaller) x 4 - Reservoir with Push-to-Connect connectors - Pump with Push-to-Connectconnectors - Zip es - Extra tubing and connectors Assembly 1. Fill the reservoir with water and screw on the lid. 2. A ach the blue end of the short piece of tubing to one of the blue connectors on the reservoir by pushing the tubing into the connector. Push the tubing in so the grey piece of plas c in the tubing is all the way into the connector. 3. A ach the green end of the same tube to the green inlet connector on the pump. If looking at the face of the pump, the inlet connector is on the le . 4. A ach the green end of one of the long pieces of tubing to the green outlet connector on the pump. If looking at the face of the pump, the inlet connector is on the right. 5. A ach the red end of the same tube to the red connector in the upper thigh area of the simulator. 6. A ach the black end of the remaining piece of tubing to the black connector in the ankle area of the simulator. 7. A ach the blue end of the same tube to the open blue connector on the reservoir. 8. Remove the LifeLike Medium Femoral Artery model from its packaging. Insert a Luer Lock Vessel Connector A into one end of the vessel and secure the connector with a zip e. Place the vessel into the Groin cavity and roughly measure the length needed to reach the connector at the other end. Trim the vessel to size, then insert a Luer Lock Vessel Connector A into the other end of the vessel and secure the connector with a zip e. Repeat for the Small Femoral Artery model using Luer Lock Vessel Connector B for each. (3 models needed total per training session: [1] Medium Femoral and [2] Small Femorals). 1. To insert the Femoral Arteries into the openings in the leg simulator, line up the Luer Lock Vessel Connector with the Inner Cavity Luer Lock Connector and give a quarter turn clockwise to connect. For the other end, twist the vessel counter-clockwise a quarter turn, insert into the connector on the opposite side of the leg opening, then turn clockwise to connect. This should allow the vessel to be inserted without any twis ng or kinking of the vessel. If the vessel is twisted, remove and try again. Repeat for the remaining cavi es. 9. Plug in the pump, turn on, and let the water run through the system while checking for any leaks. *NOTE*: Extra connectors have been provided to set up the vessels prior to the previous training session being completed for a quick switch out. Simply insert the connectors and secure with zip es. When the training session is completed, remove the used vessels from the simulator, cut away the zip es and remove the connectors. The used vessels can be discarded and prepared vessels can be inserted. The S ller Centre, 700 Collip Circle – Suite 112, London, ON, N6G 4X8 1-519-858-5034 – sales@lifelikebio ssue.com – www.lifelikebio ssue.
Open the catalog to page 1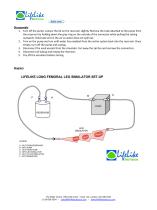
Disassembly 1. Turn off the pump. Loosen the lid on the reservoir slightly. Remove the tube a ached to the pump from the reservoir by holding down the grey ring on the outside of the connector while pulling the tubing outwards. Hold tube end in the air so water does not spill out. 2. Turn on the pump and run un l water has emp ed from the en re system back into the reservoir. Once empty, turn off the pump and unplug. 3. Disconnect the used vessels from the simulator. Cut away the zip es and remove the connectors. 4. Disconnect all tubing and empty the reservoir. 5. Dry off the simulator before storing....
Open the catalog to page 2All LifeLike BioTissue Inc. catalogs and technical brochures
 The VI Box
2 Pages


- Anatomy model
- Training anatomy model
- Training phantom
- Surgical anatomy model
- Surgical phantom
- Vascular model
- Healthcare training vascular model
- Pad simulator
- Portable simulation unit
- Artery vascular model
- Circulatory system vascular model
- Blood vessels vascular model
- Digestive system model
- Heart anatomy model
- Kit simulator
- Suture simulator
- Surgery vascular model
- Circulatory system model
- General surgery surgical set