Catalog excerpts

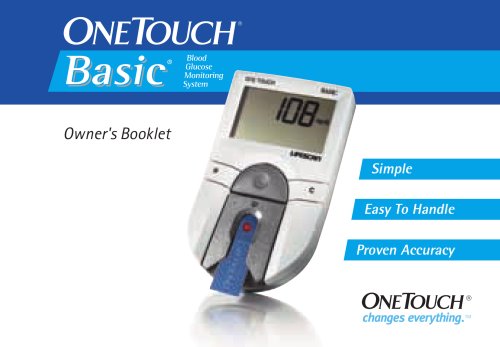
OneTouch* Verio'IQ Blood Glucose Monitoring System Owner's Booklet Instructions for use.
Open the catalog to page 1
OneTouch-Verio IQ Blood Glucose Monitoring System Owner’s Booklet
Open the catalog to page 2
Owner’s Booklet Thanks for choosing OneTouch®! The OneTouch® Verio®IQ Blood Glucose Monitoring System is one of the latest product innovations from OneTouch®. Every OneTouch® Meter is designed to make it easy to test your blood glucose and help you manage your diabetes. This Owner’s Booklet offers a complete explanation of how to use your new meter and testing supplies, and reviews the do’s and don’ts of testing your blood glucose level. Clear instructions and visuals will help you get comfortable using the OneTouch® Verio®IQ Meter, so you can expect to get reliable results every time you...
Open the catalog to page 3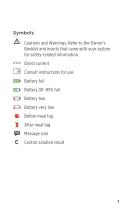
Symbols A Cautions and Warnings. Refer to the Owner’s Booklet and inserts that came with your system for safety-related information. = Direct current C® Consult instructions for use HD Battery full HD Battery 30-85% full HD Battery low IO Battery very low W Before meal tag X After meal tag Message icon C Control solution result
Open the catalog to page 4
Before you begin Before using this product to test your blood glucose, carefully read this Owner’s Booklet, and the inserts that come with the OneTouch® Verio® Test Strips and OneTouch® Verio® Control Solutions. NOTE: You must charge the battery before using the OneTouch® Verio®IQ Meter. See pages 82-89 for instructions. IMPORTANT SAFETY INSTRUCTIONS • This meter and lancing device are intended to be used by a single person and should not be shared, even with a family member. • After use and exposure to blood, all parts of this kit are considered biohazardous. A used kit can potentially...
Open the catalog to page 7
CDC Clinical Reminder: “Use of Fingerstick Devices on More than One Person Poses Risk for Transmitting Bloodborne Pathogens” (2010) http://www.cdc.gov/injectionsafety/Fingerstick-DevicesBGM.html. Intended use The OneTouch® Verio®IQ Blood Glucose Monitoring System is intended to be used for the quantitative measurement of glucose (sugar) in fresh capillary whole blood samples drawn from the fingertips. The system is intended to be used by a single patient and should not be used for testing multiple patients. The OneTouch® Verio®IQ Blood Glucose Monitoring System is intended for self-testing...
Open the catalog to page 8
Test principle Glucose in the blood sample mixes with the enzyme FAD-GDH (refer to page 104) in the test strip and a small electric current is produced. The strength of this current changes with the amount of glucose in the blood sample. Your meter measures the current, calculates your blood glucose level, displays the blood glucose result, and stores it in its memory.
Open the catalog to page 9
This page left blank intentionally.
Open the catalog to page 10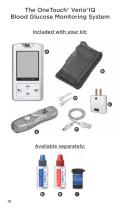
The OneTouch® Verio®IQ Blood Glucose Monitoring System Included with your kit: Available separately:
Open the catalog to page 11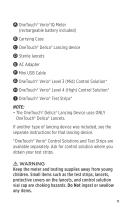
AOneTouch® Verio®IQ Meter (rechargeable battery included) Carrying Case AOneTouch® Delica® Lancing device ASterile lancets 3 AC Adapter 3 Mini USB Cable AOneTouch® Verio® Level 3 (Mid) Control Solution* AOneTouch® Verio® Level 4 (High) Control Solution* AOneTouch® Verio® Test Strips* NOTE: • The OneTouch® Delica® Lancing Device uses ONLY OneTouch® Delica® Lancets. If another type of lancing device was included, see the separate instructions for that lancing device. *OneTouch® Verio® Control Solutions and Test Strips are available separately. Ask for control solution where you obtain your...
Open the catalog to page 12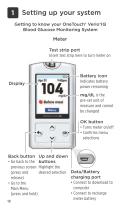
Getting to know your OneTouch® Verio®IQ Blood Glucose Monitoring System Meter Test strip port Insert test strip here to turn meter on Battery icon Indicates battery power remaining mg/dL is the pre-set unit of measure and cannot be changed OK button ■ Turns meter on/off ■ Confirms menu selections Back button • Go back to the previous screen (press and release) • Go to the Main Menu (press and hold) Up and down buttons Highlight the desired selection Data/Battery charging port • Connect to download to computer • Connect to recharge meter battery
Open the catalog to page 13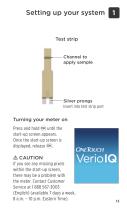
Setting up your system Test strip Channel to apply sample Silver prongs Insert into test strip port Turning your meter on until the Press and hold start-up screen appears. Once the start-up screen is displayed, release . m CAUTION If you see any missing pixels within the start-up screen, there may be a problem with the meter. Contact Customer Service at 1 888 567-3003 (English) (available 7 days a week, 8 a.m. – 10 p.m. Eastern Time).
Open the catalog to page 14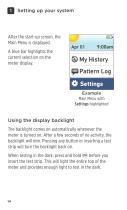
1~| Setting up your system After the start-up screen, the Main Menu is displayed. A blue bar highlights the current selection on the meter display. Example Main Menu with Settings highlighted Using the display backlight The backlight comes on automatically whenever the meter is turned on. After a few seconds of no activity, the backlight will dim. Pressing any button or inserting a test strip will turn the backlight back on. When testing in the dark, press and hold @ before you insert the test strip. This will light the entire top of the meter and provides enough light to test in the dark.
Open the catalog to page 15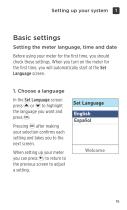
Setting up your system |T Basic settings Setting the meter language, time and date Before using your meter for the first time, you should check these settings. When you turn on the meter for the first time, you will automatically start at the Set Language screen. In the Set Language screen press @ or (^) to highlight the language you want and press (ok). Pressing @) after making your selection confirms each setting and takes you to the next screen. When setting up your meter you can press © to return to the previous screen to adjust a setting. Set Language English Espanol
Open the catalog to page 16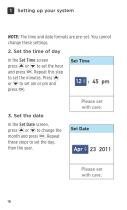
1~| Setting up your system NOTE: The time and date formats are pre-set. You cannot change these settings. 2. Set the time of day In the Set Time screen press © or to set the hour and press @). Repeat this step to set the minutes. Press © or (▼) to set am or pm and press @). In the Set Date screen, press © or (w) to change the month and press @>. Repeat these steps to set the day, then the year. Set Time : 45 pm Please set with care. Set Date Ap^23 2011 Please set with care. 16
Open the catalog to page 17All Lifescan catalogs and technical brochures
-
OneTouch Verio Flex™
2 Pages
-
OneTouch® Verio? IQ
16 Pages
-
one touch
102 Pages
-
SureStep®
5 Pages
Archived catalogs
-
OneTouch® Basic
98 Pages
-
one touch ultra
73 Pages
-
SureStepFlexx
117 Pages


