
Catalog excerpts
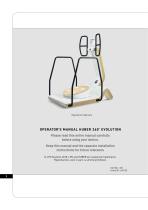
Registered trademark OPERATOR’S MANUAL HUBER 360 ® EVOLUTION Please read this entire manual carefully before using your device. Keep this manual and the separate installation instructions for future reference © LPG Systems 2018. LPG and HUBER are registered trademarks. Reproduction, even in part, is strictly prohibited. GU1306 - GB Indice B1 of 01/20
Open the catalog to page 1
Congratulations on the purchase of your HUBER 360® EVOLUTION device. This model represents many years of research, combining the latest technologies with LPG’s expertise. You can fully appreciate the technical perfection and reliability that have made LPG Systems the leader in this field. With the aim to continuously provide satisfaction, your device is equipped with a specific software devised to ensure connection with the LPG dedicated server. The data collected through this software will allow LPG to improve its support and maintenance services. This operator’s manual describes how to...
Open the catalog to page 2
> One HUBER 360® EVOLUTION > One set of guardrails > One respositioning block > One articulated stool > Two pads > One heart rate monitor > One tablet > One power cable > One set of quick unpacking and set-up instructions > One POS display
Open the catalog to page 3
APPENDIX: ELECTROMAGNETIC COMPATIBILITY. ..
Open the catalog to page 4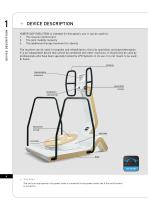
DEVICE DESCRIPTION DEVICE DESCRIPTION HUBER 360® EVOLUTION is intended for therapeutic use. It can be used for: 1. The muscle reinforcment 2. The joint mobility recovery 3. The additional therapy treatment for obesity The machine can be used in hospitals and rehabilitation clinics by specialists and physiotherapists. It is an independent device that cannot be combined with other machines. It should only be used by professionals who have been specially trained by LPG Systems in its use. It is not meant to be used at home. HANDLES TOUCHSCREEN INTERFACE MEASURING SYSTEM EMERGENCY STOP BUTTON...
Open the catalog to page 5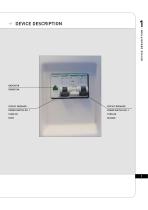
DEVICE DESCRIPTION DEVICE DESCRIPTION CIRCUIT BREAKER CIRCUIT BREAKER
Open the catalog to page 6
CONTROL SCREEN TOUCH SCREEN POWER INDICATOR
Open the catalog to page 7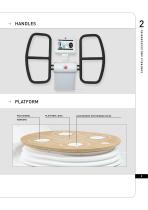
PLATFORM LEVEL ACCESSORIES POSITIONING HOLES
Open the catalog to page 8
HUBER 360® EVOLUTION comes with two Pads that can be positioned on the platform. Overview FOOT ORIENTATION ANGLE THE UPPER MOVABLE SIDE PAD ROTATION ANGLE MARKER Underside POSITIONING PINS
Open the catalog to page 9
PADS (CONT.) POSITIONING THE PADS: The Pads can be positioned on the platform in the positioning holes. POSITIONING HOLE To position the Pads on the platform, you will need to align the positioning pins on the Pads with the suitable positioning holes. 11 ≥ WARNING All operations in this section should be performed when the device is powered off.
Open the catalog to page 10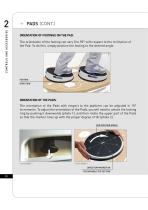
PADS (CONT.) ORIENTATION OF FOOTINGS ON THE PAD: The orientation of the footing can vary 0 to 90° with respect to the inclination of the Pad. To do this, simply position the footing to the desired angle. FOOTING DIRECTION ORIENTATION OF THE PADS: The orientation of the Pads with respect to the platform can be adjusted in 15° increments. To adjust the orientation of the Pads, you will need to unlock the locking ring by pushing it downwards (photo 1), and then rotate the upper part of the Pads so that the marker lines up with the proper degree of tilt (photo 2). PAD ROTATION ANGLE > PICTURE 2...
Open the catalog to page 11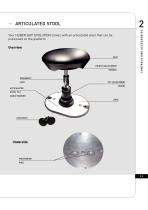
ARTICULATED STOOL Your HUBER 360® EVOLUTION comes with an articulated stool that can be positioned on the platform Overview SEAT HEIGHT ADJUSTMENT HANDLE PNEUMATIC JACK ARTICULATED TILT ADJUSTMENT WHEEL STOOL TILT ANGLE MARKER BASE LOCK NUTS POSITIONING PINS
Open the catalog to page 12
ARTICULATED STOOL (CONT.) POSITIONING THE ARTICULATED STOOL To position the articulated stool on the platform, you will need to align the positioning pins on the articulated stool with the suitable positioning holes.
Open the catalog to page 13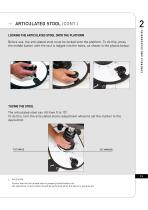
ARTICULATED STOOL (CONT.) LOCKING THE ARTICULATED STOOL ONTO THE PLATFORM Before use, the articulated stool must be locked onto the platform. To do this, press the middle button until the tool is lodged into the holes, as shown in the photos below: TILTING THE STOOL The articulated stool can tilt from 0 to 15°. To do this, turn the articulated stool’s adjustment wheel to set the marker to the desired tilt. TILT ANGLE TILT MARKER Ensure that the articulated stool is properly locked before use. All operations in this section should be performed when the device is powered of
Open the catalog to page 14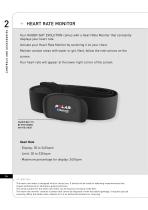
HEART RATE MONITOR Your HUBER 360® EVOLUTION comes with a Heart Rate Monitor that constantly displays your heart rate. Activate your Heart Rate Monitor by centering it on your chest. Moisten contact areas with water or gel. Next, follow the instructions on the screen. Your heart rate will appear at the lower right corner of the screen. CARDIO BELT TO BE POSITIONED ON THE CHEST Heart Rate · Display: 30 to 240 bpm · Limit: 30 to 230 bpm · Maximum percentage for display: 240 bpm 16 ≥ AT T E N T I O N The heart rate meter is designed only for casual use. It should not be used for obtaining...
Open the catalog to page 15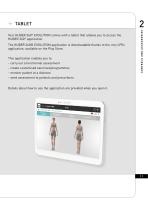
Your HUBER 360® EVOLUTION comes with a tablet that alllows you to access the HUBER 360® application. The HUBER 360® EVOLUTION application is downloadable thanks to the «my LPG» application, available on the Play Store. This application enables you to: - carry out a functionnal assessment - create customised exercises/programmes - monitor patient at a distance - send assessment to patients and prescribers Details about how to use the application are provided when you open it.
Open the catalog to page 16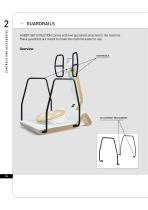
HUBER 360® EVOLUTION comes with two guardrails attached to the machine. These guardrails are meant to make the machine easier to use: Overview GUARDRAILS ATTACHMENT MECHANISMS
Open the catalog to page 17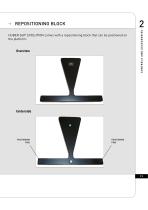
REPOSITIONING BLOCK HUBER 360® EVOLUTION comes with a repositioning block that can be positioned on the platform: POSITIONING PINS POSITIONING PINS
Open the catalog to page 18
REPOSITIONING BLOCK (CONT.) POSITIONING THE REPOSITIONING BLOCK The repositioning block can be positioned on the platform using the positioning holes shown in the photo below: POSITIONING HOLE To position the repositioning block, align the positioning pins on the block with the positioning holes in the platform.
Open the catalog to page 19All LPG Systems catalogs and technical brochures
-
HUBER 360 EVOLUTION PROTOCOLS
110 Pages
-
Leave behind H360 EVO
7 Pages
-
Aesthetic medicine leaflet
7 Pages


