
Catalog excerpts

Fetus Camera? Fetus Camera is compose of Device and APP, which is a new concept camera designed for pregnant women to watch their unborn baby anytime anywhere.
Open the catalog to page 2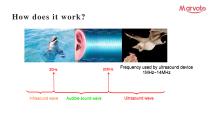
Infrasound wave Audible sound wave Frequency used by ultrasound device 1MHz~14MHz Ultrasound wave
Open the catalog to page 4
How does it work? Ultrasound wave Frequency of diasonograph 1MHz~14MHz Principle: transmitting and receiving ultrasonic signals, signal conversion processing, digital processing and 3D reconstruction processing Many two-dimensional images of black and white Continuously multiple 2D images form a 3D image
Open the catalog to page 5
Safe Enough Ultrasound is different from the X ray and CT No Ionizing Radiation and Optical radiation
Open the catalog to page 6
Safe Enough Over 1000 pregnant mothers experienced
Open the catalog to page 7
Specification Size and Weight Product size Weight with package Battery type Rechargeable Lithium-Ion Battery Continuous working hours Battery capacity Standby duration Battery nominal voltage Charging duration Battery charge limit voltage Parameter Table Probe type Waterproof level others system support
Open the catalog to page 8
Structure Description
Open the catalog to page 10
Structure Description
Open the catalog to page 11
Let’s start: Use frequency Above pregnancy of 16 weeks, no more than twice a week; The recommended interval between two usages is 2-3 days. Single use duration: Do not exceed 10 minutes for each “real use time”. Actual use duration: The sum of the actual time the camera is contact with the pregnant mother’s b
Open the catalog to page 12
Install “Fetus Camera”APP Option 1:Scan the below QR code or the QR code which was printed outside of the box to download and install the APP. Option 2: iOS users can enter the words “Fetus Camera” directly in APP Store to search and download. Android users can enter the words “Fetus Camera” in Google play and My App market to search and download. The Way “Fetus Camera ”APP Registration Email or
Open the catalog to page 14
Turn on • Press and hold on the power button. • Mode light “is flashing yellow- green alternately ”release your finger. • Three lights are all on, camera is turned on successfully. The ultrasonic sensor has a short subtle sound. After the power is turned on, the ultrasonic sensor at the bottom of the camera will have an automatic calibration, a short subtle sound maybe heard, which is normal. Turn off automatically or failed to turn on. 1)The camera’s power is as low as 5% 2)Improper use causes the camera temperature to reach the warn
Open the catalog to page 15
Pairing – by Wi-Fi After the camera is turned on, it will broadcast a Wi-Fi hotspot named “Marvoto_M1_******” Open APP and add devi
Open the catalog to page 16
Basic shooting steps 1、Lay on a comfortable sofa or bed. 2、Put Gel evenly onto the pregnant mother’s belly. 3、Move or rotate even incline the camera to find the baby position. 4、Adjust the finder frame and split line for generating 3D images. 5、Save the videos or images after adjusting the Filter and oth
Open the catalog to page 18
Baby position Baby in the mother’s belly will be in any position. For example: But normally, there are four main position showed: Head down Head right Head down Head up Head left Head right Head down is a common position.
Open the catalog to page 19
Pro Mode A black and white image or video This model will show a sectional drawing of baby, which will capture the movement and heart beating of baby.
Open the catalog to page 20
How to play the Pro Mode? Confirm and find the baby position 1、Ask doctor when you go to hospital for checking 2、Find head of baby first 3、Find spine of baby for refere
Open the catalog to page 21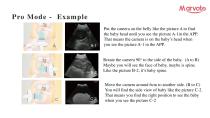
Put the camera on the belly like the picture A to find the baby head until you see the picture A-1in the APP. That means the camera is on the baby’s head when you see the picture A-1 in the APP. Rotate the camera 90° to the side of the baby. (A to B) Maybe you will see the face of baby, maybe is spine. Like the picture B-2, it’s baby spine. Move the camera around 6cm to another side. (B to C) You will find the side view of baby like the picture C-2. That means you find the right position to see the baby when you see the picture C
Open the catalog to page 22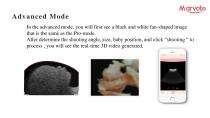
Advanced Mode In the advanced mode, you will first see a black and white fan-shaped image that is the same as the Pro-mode. After determine the shooting angle, size, baby position, and click “shooting “ to process , you will see the real-time 3D video generated
Open the catalog to page 23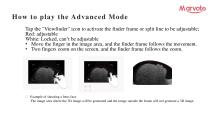
How to play the Advanced Mode Tap the "Viewfinder" icon to activate the finder frame or split line to be adjustable; Red: adjustable White: Locked, can’t be adjustable • Move the finger in the image area, and the finder frame follows the movement. • Two fingers zoom on the screen, and the finder frame follows the zoom. ⁎ Example of shooting a fetus face The image area where the 3D image will be generated and the image outside the frame will not generate a 3D i
Open the catalog to page 24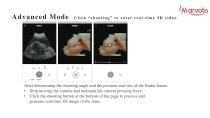
Advanced Mode Click “shooting” to enter real -time 3D video After determining the shooting angle and the position and size of the finder frame: • Stop moving the camera and maintain the current pressing force. • Click the shooting button at the bottom of the page to process and generate real-time 3D image of the f
Open the catalog to page 25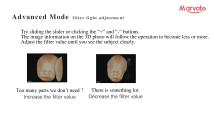
Advanced Mode filter light adjustment Try sliding the slider or clicking the “+” and “-” buttons. The image information on the 3D photo will follow the operation to become less or more. Adjust the filter value until you see the subject clearly. Too many parts we don’t need? There is something lot. Decrease the filter value Increase the fil
Open the catalog to page 26
Common causes of failure of fetus facial 3D image capture
Open the catalog to page 27
Causes of failure 1) The fetus face is close to the placenta: The fetus face is tightly close to the placenta, and there is no gap between the face and the placenta. The split line cannot accurately divide the contour of the face, resulting in a blurred three-dimensional image. 2) Insufficient amniotic fluid in the face of the fetus: The distance from the face to the placenta of the fetus or the depth of the amniotic fluid is less than 1 cm
Open the catalog to page 28
Causes of failure 3) The fetus is too active: When the positioning of the finder frame and the split line is completed in the early stage, if the fetus moves or turns during the three-dimensional imaging, it may result in blurred or invisible images; 4) The fetus is facing inward: If the fetus head back is facing outward (mother's belly), the face is not visible. 5) There is occlusion in front of the fetus: When there is a hand, foot or umbilical cord in front of the fetus, the face picture taken will be blocked by hands and feet or the umbilical cord, thus the fetus face will be unclear or...
Open the catalog to page 29All Marvoto Technology catalogs and technical brochures
-
Belly Fit Z1
18 Pages
-
Muscle & Fat Z2
2 Pages


