 Website:
Medema
Catalog excerpts

Quick guide Mini Crosser M-MaxX
Open the catalog to page 1
Quick guide to the Mini Crosser M-MaxX Introduction Congratulations on your new Mini Crosser M-MaxX electric mobility scooter. You have now taken possession of an electric mobility scooter developed for outdoor driving by active users. It is what is called a Class C vehicle in accordance with the European classication of electric scooters. For optimum enjoyment of this vehicle - and to avoid breakdowns and accidents - we recommend that you read the User Manual carefully. As a new user, you should pay particular attention to the section entitled “Driving the Mini Crosser M-MaxX”. Note: This...
Open the catalog to page 4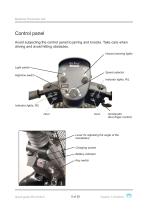
Control panel Avoid subjecting the control panel to jarring and knocks. Take care when driving and avoid hitting obstacles. Hazard warning lights Light switch Speed selector High/low switch Indicator lights, R/L Indicator lights, R/L Horn Accelerator (four-nger control) Lever for adjusting the angle of the handlebars Charging socket Battery indicator Key switch
Open the catalog to page 5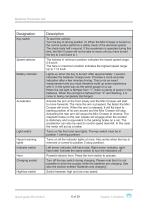
To start the vehicle: Turn the key to driving position (1) When the Mini Crosser is turned on, the control system performs a safety check of the electrical system. The check lasts half a second. If the accelerator is operated during this time, the Mini Crosser will not be able to move until you have turned the key to 0 and back to 1. Speed selector The tortoise in minimum position indicates the lowest speed range. 0-6 km/h The hare in maximum position indicates the highest speed range. Up to 11.5 km/h Battery indicator Lights up when the key is turned. After approximately 1 second,...
Open the catalog to page 6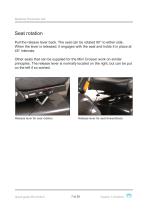
Seat rotation Pull the release lever back. The seat can be rotated 90° to either side. When the lever is released, it engages with the seat and holds it in place at 45° intervals. Other seats that can be supplied for the Mini Crosser work on similar principles. The release lever is normally located on the right, but can be put on the left if so wished. Release lever for seat rotation. Release lever for seat forward/back.
Open the catalog to page 7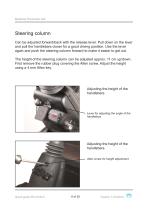
Steering column Can be adjusted forward/back with the release lever. Pull down on the lever and pull the handlebars closer for a good driving position. Use the lever again and push the steering column forward to make it easier to get out. The height of the steering column can be adjusted approx. 11 cm up/down. First remove the rubber plug covering the Allen screw. Adjust the height using a 4 mm Allen key. Adjusting the height of the handlebars. Lever for adjusting the angle of the handlebars Adjusting the height of the handlebars. Allen screw for height adjustment
Open the catalog to page 8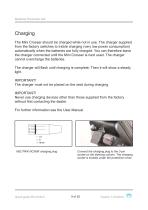
Charging The Mini Crosser should be charged while not in use. The charger supplied from the factory switches to trickle charging (very low power consumption) automatically when the batteries are fully charged. You can therefore leave the charger connected until the Mini Crosser is next used. The charger cannot overcharge the batteries. The charger will ash until charging is complete. Then it will show a steady light. IMPORTANT! The charger must not be placed on the seat during charging. IMPORTANT! Never use charging devices other than those supplied from the factory without rst contacting...
Open the catalog to page 9
Battery indicator The table below indicates the fault types which the battery indicator can display in the case of an electronic fault on the Mini Crosser. Count these and read off in the table what kind of fault they indicate. However, it is recommended that you can quote the number of the ash code when contacting the supplier. LED CODE POSSIBLE CAUSE 1. Short circuit in motor or motor cable 2. Failure of control unit Overcurrent fault EEPROM fault 1. Fault in or failure of EEPROM Main contactor fault 1. Main contactor welded 2. Fault in driver in main contactor 3. Fault in coil in main...
Open the catalog to page 10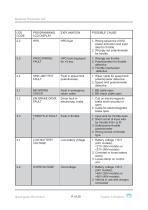
POSSIBLE CAUSE 1. Wrong sequence of KSI, power activation and input data for throttle 2. Wrongly set potentiometer for throttle PROC/WIRING FAULT 1. Wrongly set throttle 2. Potentiometer for throttle defective 3. Throttle mechanism defective Fault in speed limit potentiometer 1. Wiper cable for speed limit potentiometer defective 2. Speed limit potentiometer defective Fault in emergency return cable 1. BB cable open 2. BB check cable open EM BRAKE DRVR FAULT Driver fault in electromag. brake 1. Coil on electromagnetic brake short-circuited or open 2. Cable for electromagnetic brake open 1....
Open the catalog to page 11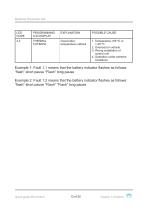
POSSIBLE CAUSE THERMAL CUTBACK Over/undertemperature cutback 1. Temperature >95 ºC or <-25 ºC 2. Overload on vehicle 3. Wrong installation of control unit 4. Operation under extreme conditions Example 1: Fault 1,1 means that the battery indicator ashes as follows: “ash” short pause “Flash” long pause Example 2: Fault 1,2 means that the battery indicator ashes as follows: “ash” short pause “Flash” “Flash” long pause.
Open the catalog to page 12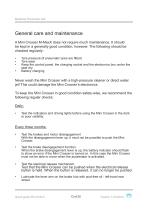
General care and maintenance A Mini Crosser M-MaxX does not require much maintenance. It should be kept in a generally good condition, however. The following should be checked regularly: • • • • Tyre pressure (if pneumatic tyres are tted) Tyre wear Keep the control panel, the charging socket and the electronics box under the seat dry. Battery charging Never wash the Mini Crosser with a high-pressure cleaner or direct water jet! This could damage the Mini Crosser’s electronics. To keep the Mini Crosser in good condition safety-wise, we recommend the following regular checks: Daily: • Test...
Open the catalog to page 13
Annual The Mini Crosser M-MaxX is designed for safe travel for at least 10 years, up to a max. of 5,000 hours, provided it is serviced and safety-checked every year, corresponding to 500 hours of operation. The service must be carried out by an authorised workshop. IMPORTANT! For safety reasons it is of the utmost importance that the servicing and safety check intervals are complied with, as this minimises the risk of brake failure and short-circuits in the wiring, which could generate heat and cause a re. (For further information see the Service Manual.) Insurance In the eyes of the law a...
Open the catalog to page 14All Medema catalogs and technical brochures
-
iZi Combi X3
1 Pages
-
Izi Up car seat
1 Pages
-
Niga children chair
2 Pages
-
Hip standing frame
6 Pages
-
M-Joy Spare parts
11 Pages
-
M2 Cabin Spare parts
28 Pages
-
M1 Cabin Spare parts
28 Pages
-
Mini Crosser M1
16 Pages
-
Mini Crosser M Joy
16 Pages
-
Mini Crosser
17 Pages


