
- Catalogs
- Medentika GmbH
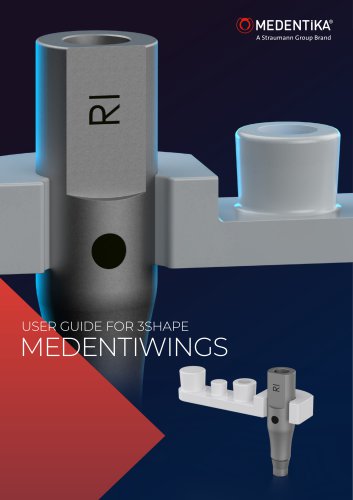
- USER GUIDE FOR 3SHAPE MEDENTIWINGS


USER GUIDE FOR 3SHAPE MEDENTIWINGS
USER GUIDE FOR 3SHAPE MEDENTIWINGS
MedentiWINGS is a new product in the Medentika portfolio designed to enhance precision in intraoral scanning, particularly for edentulous cases. It connects distant Scanbodies to provide more reference points, improving digital workflow accuracy.
Key Features
- Supports better denture fit with new Medentika metal Scanbodies (-SB).
- Maintains a cost-efficient digital workflow with full flexibility.
- Improves scan accuracy and reduces rework and rescanning.
Design and Compatibility
- Engineered for precision and durability with rounded edges, higher body visibility, and reduced diameter.
- Reusable and sterilizable, allowing multiple uses.
- New design Scanbodies are compatible with chairside and lab scanners, featuring a special non-reflective surface treatment.
Assembly Instructions
- Choose the right MedentiWINGS based on Scanbody diameter and compatibility symbol.
- Click the MedentiWINGS onto the Scanbody, ensuring the flat side is free.
- Select the best size and shape of MedentiWINGS according to the distance between Scanbodies.
- Fix the Scanbody combined with MedentiWINGS in the implants or on the abutment.
- Bond and cure the MedentiWINGS with composite material in the patient's mouth.
Scan Protocol for 3Shape
- Select "New Scan" in the patient's profile and choose the lab for scan submission.
- Follow the suggested scan protocol, which includes scanning the whole jaw with Medentika Scanbodies and MedentiWINGS, and then scanning the prosthetic interface and surrounding tissue.
- Ensure all surfaces are scanned, particularly the flat side and upper quarter of the Scanbody.
- After scanning, mark the positions of the implants and crop out the Scanbodies and MedentiWINGS.
- Finalize the scan by capturing any missing areas and export the scan file.
Important Notes
- For new design Scanbodies, download the corresponding CADCAM libraries.
- Ensure correct matching of Scanbodies with intraoral scan files in CAD software.
Contact Information
For more information, visit Medentika's website or contact them at [email protected].
Catalog excerpts
MEDENTiK A® P RO ST H E T I C S O LU T I O N S | DIGITAL WORKFLOW COMPONENT S
Open the catalog to page 1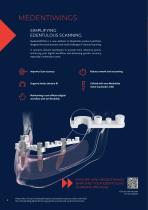
MEDENTIWINGS SIMPLIFYING EDENTULOUS SCANNING. MedentiWINGS is a new addition to Medentika product portfolio, designed to ensure precision and avoid challenges in intraoral scanning. It connects distant Scanbodies to provide more reference points, enhancing your digital workflow and delivering greater accuracy, especially in edentulous cases. Improves Scan accuracy Reduces rework and rescanning Supports better denture fit Utilized with new Medentika metal Scanbodies (-SB) Maintaining a cost-efficient digital workflow with full flexibility EXPLORE HOW MEDENTIWINGS SIMPLIFIES YOUR EDENTULOUS SCANNING...
Open the catalog to page 2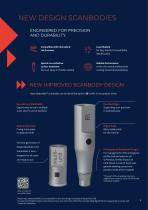
NEW DESIGN SCANBODIES ENGINEERED FOR PRECISION AND DURABILITY. Compatible with Chairside & Lab Scanners Laser Marked for Easy Implant Compatibility Identification Special non-reflective surface treatment No Scan Spray or Powder needed Reliable Performance Perfect for dental professionals seeking streamlined workflows NEW IMPROVED SCANBODY-DESIGN New Medentika® scanbodies can be identified by the ‘-SB’ suffix in the product name. Reusable and Sterilizable Opportunity to use in multiple scans since it can be sterilized Rounded Edges Supporting scan-precision in CAD software Reduced Diameter Giving...
Open the catalog to page 3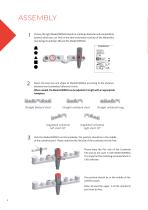
Choose the right MedentiWINGS based on Scanbody diameter and compatibility Symbol, which you can find on the label and product surface of the Medentika new design Scanbody (-SB) and the MedentiWINGS. Select the best size and shape of MedentiWINGS according to the distance between two Scanbodies/ reference Points. When needed, the MedentiWINGS can be adjusted in length with an appropriate handpiece Straight bilateral short Straight unilateral short Angulated unilateral left short 20° Straight unilateral long Angulated unilateral right short 20° Click the MedentiWINGS on the Scanbody. The position...
Open the catalog to page 4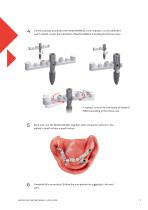
Fix the scanbody (combined with MedentiWINGS) in the implants / on the abutment and if needed, correct the orientation of MedentiWINGS according to the clinical case. If needed, correct the orientation of MedentiWINGS according to the clinical case. Bond and cure the MedentiWINGS together with composite material in the patient´s mouth to have a good fixation. Complete full scan protocol. (Follow the scan protocol as suggested in the next part) MEDENTiK A® MEDENTIWINGS | USER GUIDE
Open the catalog to page 5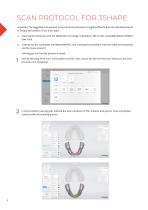
SCAN PROTOCOL FOR 3SHAPE Important: The suggested scan protocol, instructed in this document, is slightly different from the standard protocol of 3shape and consists of two main steps: a. Scanning the whole jaw with the Medentika new design Scanbodies (-SB) and the compatible MedentiWINGS (Jaw Scan) Croping out the scanbodies and MedentiWINGS and scanning the prosthetic interface (Abutment/Implant) and the tissue around it. Follwing you can find the protocol in detail: Start by selecting “New Scan” in the patient’s profile. Next, choose the lab from the list to which you will send the scans once...
Open the catalog to page 6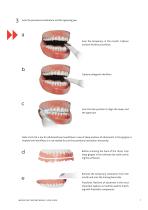
Scan the provisional restoration and the opposing jaw. a Scan the temporary in the mouth. Capture occlusal and buccal surfaces. b Capture antagonist dentition. c Scan the bite position to align the lower and the upper jaw. Note: Part d & e are for Abutment-level workflow.In case of deep position of abutments in the gingiva or implant level workflow, it is not needed to scan the provisional restoration extraoraly. Before scanning the back of the Temp, crop away gingiva in the software (to avoid confusing the software). Remove the temporary restoration from the mouth and scan the missing basal...
Open the catalog to page 7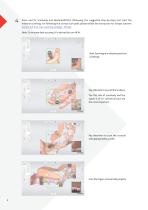
Place and fix Scanbody and MedentiWINGS (Following the suggested step-by-step) and start the intraoral scanning. For following the correct scan-path, please follow the Instruction for 3shape scanner: Correct full Trios scan scanning strategy - 3Shape Note: To increase data accuracy, It is advised to turn off AI. Start Scanning at a reference point on Scanbody. Pay attention to scan all the surfaces. The flat side of scanbody and the upper ¼ of it´s cylindrical part are the most important. Pay attention to scan the occlusal side appropriately as well. Scan the linguo-occlusal side properly.
Open the catalog to page 8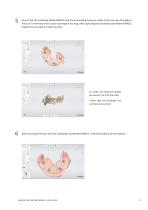
Ensure that the Scanbody, MedentiWINGS and the surrounding tissue are visible in the live view throughout the scan. To minimize errors, avoid scanning for too long. After capturing the Scanbodies and MedentiWINGS, inspect the scan data to confirm quality. To make sure that the shapes are correct, turn off the color. Check that all Scanbody flat surfaces are scanned. After scanning of the jaw with the Scanbodies and MedentiWINGS , mark the positions of the implants. MEDENTiK A® MEDENTIWINGS | USER GUIDE
Open the catalog to page 9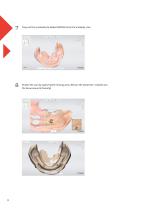
Crop-out the scanbodies & MedentiWINGS from the Scanbody scan. Finalize the scan by capturing the missing areas. (Rescan the abutment / implant and the tissue around intraorally)
Open the catalog to page 10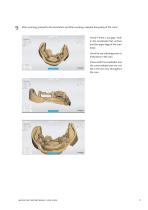
After scanning, proceed to the calculation and after counting, evaluate the quality of the scans. Check if there is any gap / hole in the scanbodies flat surface and the upper edge of the scanbody. Check for any stitching errors or distortions in the scan. Ensure both the scanbodies and the surrounding tissue are visible in the live view throughout the scan. MEDENTiK A® MEDENTIWINGS | USER GUIDE
Open the catalog to page 11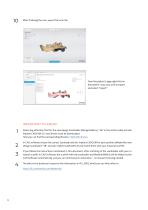
After finalizing the scan, export the scan file. From the patient´s page right-click on the patient´s case, you wish to export and select “Export”. Please pay attention that for the new design Scanbodies (Recognizable by “-SB” in the article code) and Lab. Implant CADCAM-CS, new librarie must be downloaded. Here you can find the corresponding libraries: CADCAM libraries In CAD software choose the correct Scanbody and lab. Implant CADCAM for each position (Medentika new design Scanbodies “-SB” and Lab. Implant CADCAM-CS) and match them with your intraoral-scanfile. If you follow the instructions...
Open the catalog to page 12All Medentika GmbH catalogs and technical brochures

- Implant abutment
- Titanium implant abutment
- Dental implant
- Titanium dental implant
- Internal implant abutment
- Conical dental implant
- Straight dental implant
- Screw implant abutment
- Internal dental implant
- Dental implant analog
- Straight dental implant analog
- Healing abutment
- Multi-unit implant abutment
- Titanium healing abutment
- Impression coping
- Straight healing abutment
- Dental implant wrench
- Titanium dental implant analog
- Implant screw
- Internal healing abutment