- Catalogs
- MicroAire Surgical Instruments
- SmartRelease®
SmartRelease®
1 /16Pages

SmartRelease®
1 /16Pages
Catalog excerpts

SmartRelease® Endoscopic Carpal Tunnel Endoscopic Carpal Tunnel Release Surgical Technique
Open the catalog to page 1
Traditionally, a patient treated surgically for carpal tunnel syndrome could expect significant recovery time away from work due to the tender scar in the palm and heel of the hand. When the carpal tunnel is released endoscopically with the MicroAire SmartRelease System, clinical results indicate that postoperative morbidity is improved and time away from normal activities and full employment are reduced by as much as 46 percent.1 The safety of this device has also been documented in a large clinical study involving over 1,000 cases in a multicenter study.2 The results of this study showed minimal...
Open the catalog to page 2
Table of Contents Instrumentation. . . . . . . . . . . . . . . . . . . . . . . . . . . . . . . . . . . . . . . . . . . . . . 4 Troubleshooting Guide for Endoscope Fogging. . . . . . . . . . . . . . . . . . . . . . . . . 5 Surgical Setup. . . . . . . . . . . . . . . . . . . . . . . . . . . . . . . . . . . . . . . . . . . . . . 6–7 Anesthesia. . . . . . . . . . . . . . . . . . . . . . . . . . . . . . . . . . . . . . . . . . . . 7 Operative Technique. . . . . . . . . . . . . . . . . . . . . . . . . . . . . . . . . . . . . . . . . 8–15 Step 1 Making the Incision and Creating a Flap. . . . . . . ....
Open the catalog to page 3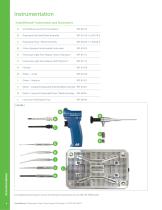
Instrumentation SmartRelease® Instruments and Accessories A SmartRelease Aluminum Handpiece Disposable Standard Blade Assembly Disposable Onyx™ Blade Assembly 2.9mm Eyepiece Autoclavable Endoscope Endoscope Light Post Adapter, Stortz®/Olympus® Endoscope Light Post Adapter, Wolf®/Dyonics® Dilator – Small Dilator – Medium Dilator – Coequal to Disposable Standard Blade Assembly REF 81061 Dilator - Coequal to Disposable Onyx™ Blade Assembly Instrument Sterilization Tray For additional information, consult the MicroAire Instructions for Use (REF: IM-STRELEASE) SmartRelease® Endoscopic Carpal Tunnel...
Open the catalog to page 4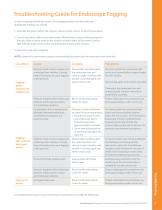
Troubleshooting Guide for Endoscope Fogging In order to quickly identify the source of the fogging problem and formulate the appropriate solution, you should: 1. Assemble the system before the surgeon makes the skin incision to start the procedure. 2. Turn on the camera, light source and monitor. White balance using a white sponge and then lay a blue or green towel on the window using the fabric of the towel to set the light intensity and to focus on the mid and distant portion of the window. 3. Observe for any sign of fogging. NOTE: Beware of contamination caused by disassembling the camera...
Open the catalog to page 5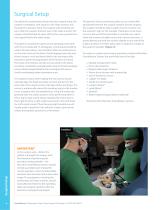
Surgical Setup Two physical considerations dictate the best surgical setup: the surgeon’s orientation with respect to the video monitor and the patient’s operative hand. The surgical suite should be set up to offer the surgeon the best view of the video monitor. The surgeon should be able to easily shift his/her view upward from the surgical field to the video image. The patient is positioned supine on the operating room table with the arm abducted 75–80 degrees. A tourniquet should be used in this procedure. Care should be taken to avoid pressure on the ulnar nerve at the elbow. Sterile draping...
Open the catalog to page 6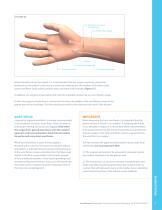
FIGURE III B - Proximal wrist crease (incision line) A - Flexor carpi radialis A - Pisiform A - Hook of the hamate C - Construction line A - Flexor carpi ulnaris Before elevation of the tourniquet, it is recommended that the surgeon mark key anatomical landmarks on the patient’s hand using a sterile skin marking pen: the tendons of the flexor carpi ulnaris and flexor carpi radialis, pisiform bone and hook of the hamate. [Figure III] In addition, the surgeon should select and mark the intended incision line at a wrist flexion crease. Finally, the surgeon should draw a construction line from the...
Open the catalog to page 7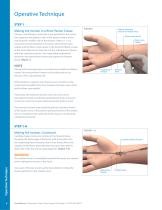
Operative Technique STEP 1 Making the Incision in a Wrist Flexion Crease Choose a wrist flexion crease that is just proximal to the crease that separates the glabrous skin of the palmar surface of the hand and the “mobile” skin of the forearm. Make a 1–2 cm transverse incision between the tendons of the flexor carpi radialis and the flexor carpi ulnaris in the proximal flexion crease of the wrist. Take care to stop short of the subcutaneous tissues and their cutaneous nerves. Use a spreading longitudinal dissection to protect these nerves and expose the forearm fascia. [Figure 1] Palmar cutaneous...
Open the catalog to page 8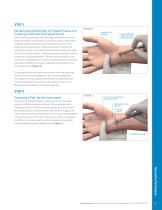
STEP 2 Elevating the Distal Edge of Forearm Fascia and Creating a Path Into the Carpal Tunnel FIGURE 2 Hook of the hamate While vertically elevating the distal edge of forearm fascia in a palmar direction, use tenotomy scissors or a pair of hemostats to gently spread and separate the forearm fascia from the underlying tenosynovium of the ulnar bursae. Position the synovium elevator in line with the base of the ring finger, radial to the hook of the hamate. Using the synovium elevator, feel the roughness (“washboard effect”) of the transverse fibers of the transverse carpal ligament. Continue...
Open the catalog to page 9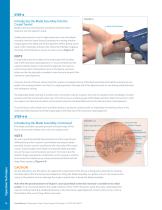
STEP 4 Introducing the Blade Assembly Into the Carpal Tunnel FIGURE 4 Hook of the hamate Blade extension and retraction should be checked before insertion into the patient’s hand. Holding the patient’s wrist in slight extension, insert the blade assembly into the carpal tunnel, pressing the viewing window snugly against the deep side of the ligament. While aiming at the base of the ring finger, advance the instrument distally, hugging the hook of the hamate to assure an ulnar course. [Figure 4] NOTE Median nerve To optimally orient the window of the endoscope with the deep side of the transverse...
Open the catalog to page 10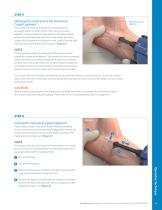
STEP 5 Defining the Distal End of the Transverse Carpal Ligament FIGURE 5 Transverse carpal ligament Use a sufficient number of proximal-to-distal passes to accurately define an ulnar “strip” of the transverse carpal ligament. Transverse fibers of the ligament should be visible within this strip. Palpating with the thumb, define the distal margin of the ligament at its junction with a pad of fat and align the point of entry markers at this junction. [Figure 5] NOTE The fat typically overlaps the deep side of the ligament’s distal margin by a couple of millimeters.3 This contrasts with the occasional...
Open the catalog to page 11All MicroAire Surgical Instruments catalogs and technical brochures
 The PAL® Solution
2 Pages
 LipoFilter®
4 Pages
 PAL® Infiltration System
4 Pages
 PAL® System
6 Pages
 Endotine®
12 Pages

