- Catalogs
- Micropoint BioScience Inc.
- qLabs® Vet
qLabs® Vet
1 /57Pages

qLabs® Vet
1 /57Pages
Catalog excerpts
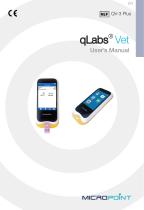
qLabs® Vet User’s Manual
Open the catalog to page 1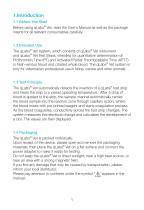
1. ntroduction I 1.1 Before You Start Before using qLabs® Vet, read the User's Manual as well as the package inserts for all relevant consumables carefully. 1.2 Intended Use The qLabs® Vet system, which consists of qLabs® Vet instrument and qLabs® Vet Test Strips, intended for quantitative determination of Prothrombin Time (PT) and Activated Partial Thromboplastin Time (APTT) in fresh venous blood and citrated whole blood. The qLabs® Vet system is only for veterinarian professional use in feline, canine and other animals. 1.3 Test Principle The qLabs® Vet automatically detects the insertion of...
Open the catalog to page 5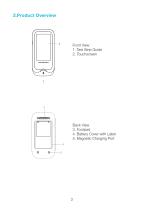
Front View 1. Test Strip Guide 2. Touchscreen Back View 3. Footpad 4. Battery Cover with Label 5. Magnetic Charging Port
Open the catalog to page 6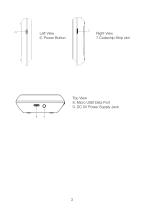
Left View 6. Power Button Right View 7.Codechip Strip slot Top View 8. Micro USB Data Port 9. DC 5V Power Supply Jack 8
Open the catalog to page 7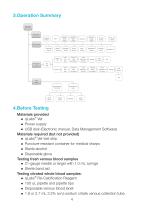
3. peration Summary O Operation Preparation Language Setting Bluetooth Switch Setting Sample No. Switch Setting Reference Range Setting Sleep Setting Upload/Print Setting Transport Mode APTT Units Setting Meter Setup Date/Time Setting Backlight Setting Screen Rotation Sample Test Insert Test Strip Input Test Strip Information Insert Codechip of Test Strip Beeper Setting Insert Test Strip Input Test Strip Information Insert Codechip of Test Strip Input QC Liquid Information Test Type Insert Codechip of QC Liquid Results Query Review Sample Test Result Delete Result Upload Result Review QC Test...
Open the catalog to page 8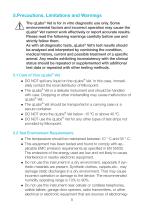
5. recautions, Limitations and Warnings P The qLabs® Vet is for in vitro diagnostic use only. Some environmental factors and incorrect operation may cause the qLabs® Vet cannot work effectively or report accurate results. Please read the following warnings carefully before use and strictly follow them. As with all diagnostic tests, qLabs® Vet’s test results should be analyzed and interpreted by combining the condition, medical history, current and possible treatment of a specific animal. Any results exhibiting inconsistency with the clinical status should be repeated or supplemented with additional...
Open the catalog to page 9
netic radiation, as these may interfere with the proper operation of the instrument. 5.3 Patient health Status Current patient health status may cause inaccurate or unexpected test results. It is important to take certain health factors into consideration when interpreting the test results and deciding on a course of action for your patients. Failure to do so may lead to an incorrect interpretation of the test result. 5.4 Performing a Test ●● The qLabs® Vet should be placed on a level surface that is free of vibration. Testing on an uneven or unstable surface may cause inaccurate results. DO...
Open the catalog to page 10
●● The user must use the matching 5V special charger provided by Micropoint to charge. ●● Do not bring the meter close to a high-temperature heat source. ●● Do not allow the meter to be hit or exert heavy pressure on the meter. ●● If it is found that there is leakage from the battery cover on the back of the meter, direct skin contact should be avoided as much as possible. In case of accidental contact with skin due to battery leakage, please rinse with water. If your eyes come into contact with battery liquid, you should also seek medical care. ●● The battery should be disposed with the meter...
Open the catalog to page 11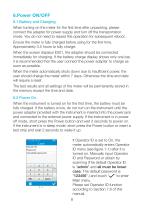
6. ower ON/OFF P 6.1 Battery and Charging When turning on the meter for the first time after unpacking, please connect the adapter for power supply and turn off the transportation mode. You do not need to repeat this operation for subsequent reboot. Ensure the meter is fully charged before using for the first time. Approximately 3.5 hours to fully charge. When the screen displays E001, the adapter should be connected immediately for charging. If the battery charge display shows only one bar, it is recommended that the user connect the power adapter to charge as soon as possible. When the meter...
Open the catalog to page 12
Once Operator ID is On, the Log out icon in Main screen will be enabled and displayed in brown (see figure 1-2). To switch between the operators, please return to the screen for inputting the operator ID by pressing the Log out icon, and then re-enter the operator ID. 1-2 If Operator ID is Off, the Log out icon in Main screen will be disabled and grayed out (see figure 1-3), and the meter then directly enters the Main screen after it is turned on. 6.3 Sleep mode After a short press and release of the Power button, the screen will be off and enter sleep mode. The sleep mode is a low power mode...
Open the catalog to page 13
After a press of the Power button for 3 seconds, the system will deliver a message to select. Press " " to power off the instrument, or press " " to cancel the operation (see figure 1-4). When the battery power of the meter is exhausted, it will automatically shut down. 1-4
Open the catalog to page 14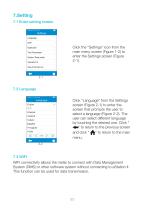
7. etting S 7.1 Enter setting screen Click the "Settings" icon from the main menu screen (Figure 1-2) to enter the Settings screen (Figure 2-1). 7.2 Language Click "Language" from the Settings screen (Figure 2-1) to enter the screen that prompts the user to select a language (Figure 2-2). The user can select different language by touching the desired one. Click " " to return to the previous screen and click " " to return to the main menu. 2-2 7.3 WIFI WIFI connectivity allows the meter to connect with Data Management System (DMS) or other software system without connecting to eStation II. This...
Open the catalog to page 15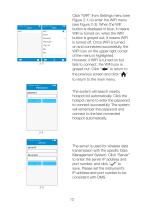
Click “WIFI” from Settings menu (see Figure 2-1) to enter the WIFI menu (see Figure 2-3). When the WIF button is displayed in blue, it means WIFI is turned on; when the WIFI button is grayed out, it means WIFI is turned off. Once WIFI is turned on and connected successfully, the WIFI icon on the upper right corner of the menu is highlighted. However, if WIFI is turned on but fails to connect, the WIFI icon is grayed out. Click “ ” to return to the previous screen and click “ ” to return to the main menu. The system will search nearby hotspot list automatically. Click the hotspot name to enter...
Open the catalog to page 16All Micropoint BioScience Inc. catalogs and technical brochures
 qLabs®ElectroMeter Plus
2 Pages
 qLabs® ElectroMeter (Q3)
2 Pages
 630-00291 Q-3 Pro Meter
59 Pages

- Detection kit
- Blood detection kit
- Plasma detection kit
- Infectious disease detection kit
- Respiratory disease assay kit
- Clinical detection kit
- COVID-19 assay kit
- Antigen detection kit
- IgG assay kit
- Immunoassay analyzer
- Fecal test kit
- Clinical diagnostic immunoassay analyzer
- Automated immunoassay analyzer
- Saliva assay kit
- POC analyzer
- Benchtop immunoassay analyzer
- Throat detection kit
- Nasal detection kit
- Urine test strip