- Catalogs
- Modular Services Company
- Flatwall 4540-S Installation Manual
Flatwall 4540-S Installation Manual
1 /9Pages

Flatwall 4540-S Installation Manual
1 /9Pages
Catalog excerpts

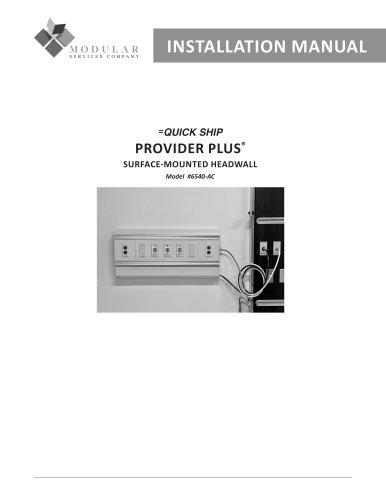
INSTALLATION MANUAL ≈QUICK SHIP SURFACE-MOUNTED HEADWALL Model #4540-S
Open the catalog to page 1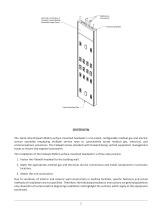
Electrical Junction Box, if included, Located Behind Removable Upper Panel Lower Mounting Plate OVERVIEW The Quick Ship Flatwall 4540-S surface-mounted headwall is a UL-listed, configurable medical gas and electric service assembly employing multiple service rows to conveniently locate medical gas, electrical, and communications provisions. The Flatwall comes standard with forward-facing vertical equipment management tracks to mount and organize accessories. The installation of the Flatwall 4540-S surface-mounted headwall is a three-step process: 1. Fasten the Flatwall headwall to the building...
Open the catalog to page 2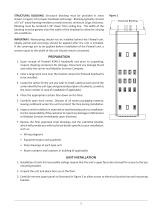
STRUCTURAL BLOCKING: Structural blocking must be provided in areas shown in Figure 1 for proper headwall anchorage. Blocking typically consists of 2”x 6” wood framing members or steel channel, minimum 16 ga. thickness. Blocking must be centered 1.50” down from ceiling line. The width of the blocking must be greater than the width of the headwall to allow for varying site conditions. Figure 1. Structural Blocking IMPORTANT: Wainscoting should not be installed behind the Flatwall unit. Ideally, partial wall coverings should be applied after the unit is installed. If the coverings are to be applied...
Open the catalog to page 3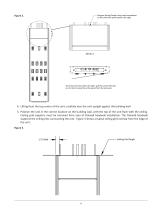
Depress Spring Plunger using small screwdriver or #8 screw then push panel to the right Once the panel has slid to the right, pull the panel's left side out to then remove the entire panel from the extrusion. 4. Lifting from the top center of the unit, carefully lean the unit upright against the building wall. 5 . Position the unit in the correct location on the building wall, with the top of the unit flush with the ceiling. Ceiling grid supports must be removed from area of Flatwall headwall installation. The Flatwall headwall supports the ceiling tiles surrounding the unit. Figure 3 shows a...
Open the catalog to page 4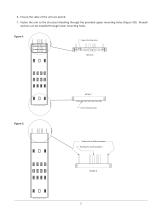
6. Ensure the sides of the unit are plumb. 7. Fasten the unit to the structural blocking through the provided upper mounting holes (Figure 4D). Drywall anchors can be installed through lower mounting holes. Figure 4. Upper Mounting Holes C Lower Mounting Holes
Open the catalog to page 5
MEDICAL GAS SERVICE CONNECTIONS Use extreme care in making medical gas service connections. Each single-point service connection has been provided with a color-coded medical gas label. Medical gas systems provided by Modular Services have been cleaned, purged, brazed, blown down, labeled, and tested for cross connections and leaks in accordance with the most recent edition of NFPA 99. They are certified to be compliant to all of these requirements and to be leak free. The medical gas system installer is responsible for connecting this manufactured assembly to the pipeline in compliance with all...
Open the catalog to page 6
Vertical Track Adaptors to Forward-Facing Vertical Track 1. Align the Vertical Track Adaptor with the Forward-Facing Vertical Track so that the tee knob is facing towards the center of the unit (Figure 7a). 2. Insert Vertical Track Adaptor into Forward-Facing Vertical Track and slide to desired accessory height (Figure 7b). Figure 7. a.
Open the catalog to page 7
3. Turn tee knob clockwise to secure Vertical Track Adaptor in place (Figure 7c). c. CARE AND MAINTENANCE 1. Clean with mild detergent and warm water. Do not use lubricants or oils on unit. 2. Avoid excessive moisture build-up, as it can damage mechanisms in the unit. 3. Disinfect as required with disinfectant approved by the Environmental Protection Agency. 4. To remove difficult spots or stains, use standard household cleansers and a soft-bristled brush. 5. For parts or repairs, contact your sales representative. INSTALLATION TERMS AND CONDITIONS Each Modular Services unit, or unit section,...
Open the catalog to page 8
WARRANTY Modular Services Company warrants that all equipment assemblies shall be free from defects in material and workmanship for a period of 12 months from date of the owner’s acceptance to the installing contractor or the date the equipment is put into service, whichever comes first. Warranty excludes electric lamps and/or any material not furnished by Modular Services. Warranty does not cover damage due to improper installation and/or abuse. It is the responsibility of the customer to report any noted product deficiencies to Modular Services immediately upon discovery. It is the responsibility...
Open the catalog to page 9All Modular Services Company catalogs and technical brochures
 Provider Plus® 6540-AC Specs
2 Pages
 Flatwall 4540-S Specs
3 Pages
 MOBILE HEADWALL
2 Pages
 Profile 7200-S Series
2 Pages
 Method Snapshot
2 Pages
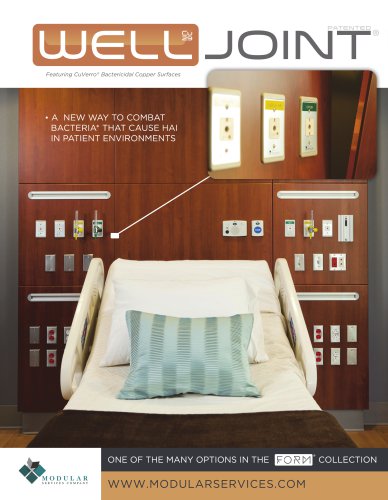 WellJoint®
2 Pages
 Flatwall 4500-S Series
2 Pages
 5-Sided Open Access Column
2 Pages
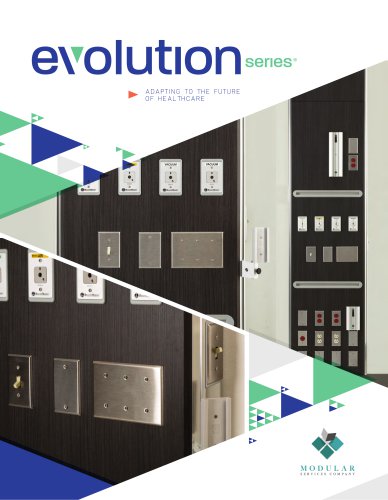 Evolution Series
2 Pages
 Bed Docker Construction
1 Page
 ArtWorks-Accessories
4 Pages
 Long-Term Care
2 Pages
 APTUS HD & L
2 Pages
 APTUS Cart
2 Pages
 Method
8 Pages
 NICU
NICU2 Pages
 Columns
4 Pages
 NOVA LED Exam Light
2 Pages
 SUPER EXAM 50 ®
3 Pages
 Clarity
2 Pages
 AMBIANCE ® COLOR CHART
1 Page
 Provider Plus
2 Pages
 2-Gas Profile
2 Pages
 Profile
8 Pages
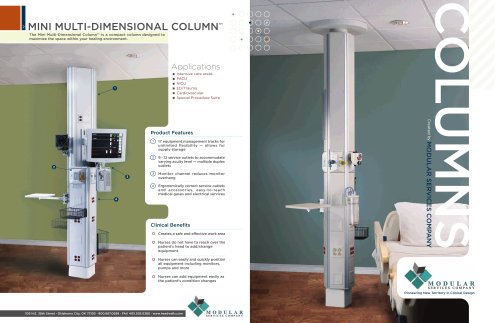
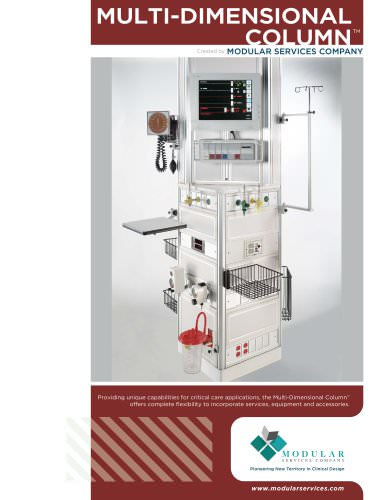 Multi-Dimensional
2 Pages
 Form
Form8 Pages
 Flatwalls
2 Pages
 Critical Care Cart
2 Pages
 Console
2 Pages
 Bed Docker
2 Pages
 Longterm Care
2 Pages
 APTUS Laptop Arm
1 Page
 AIM LED
4 Pages
 Ceiling Columns
2 Pages
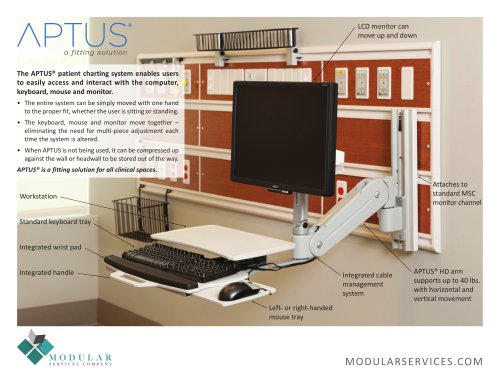
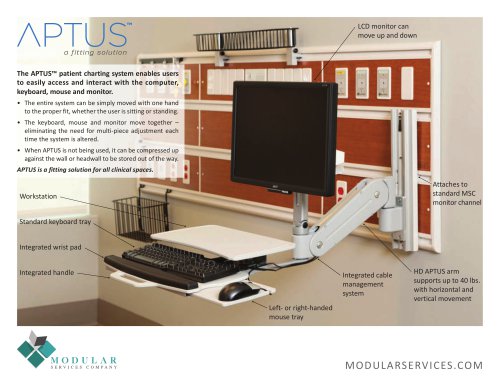 APTUS
APTUS2 Pages
 ArtWorks
4 Pages
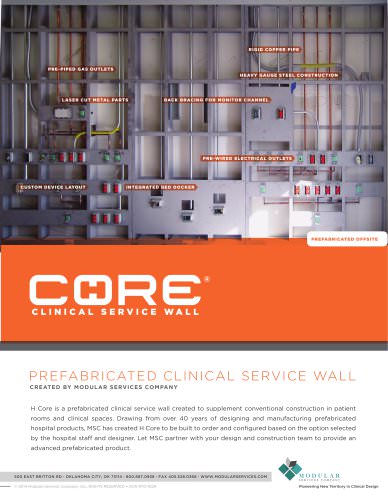 H Core
2 Pages
 ArtWorks Brochure
2 Pages
 ambiance_brochure
2 Pages
 Accessories Brochure
26 Pages
 5-Sided Column Brochure
2 Pages
 Columns Brochure
2 Pages


- Medical dolly
- Logistics trolley
- Infusion stand
- Medical support arm
- Examination lamp
- LED examination lamp
- Monitor support arm
- Bed head unit
- Wall-mounted support arm
- Medical gas pressure reducer
- Medical lamp
- Articulated support arm
- Wall-mounted bed head unit
- Medical gas flow meter
- Gas outlet
- Hospital flow meter
- Horizontal bed head unit
- Bed head unit with light
- 2-hook infusion stand
- Medical pressure regulator