- Catalogs
- Nanchang Micare Medical Equipment
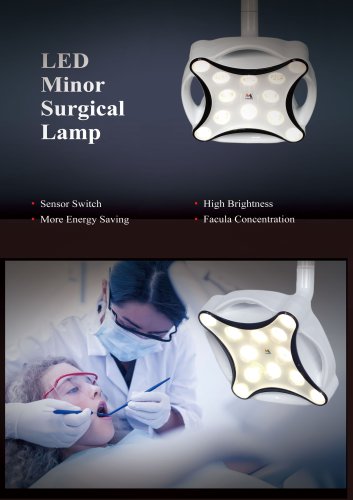
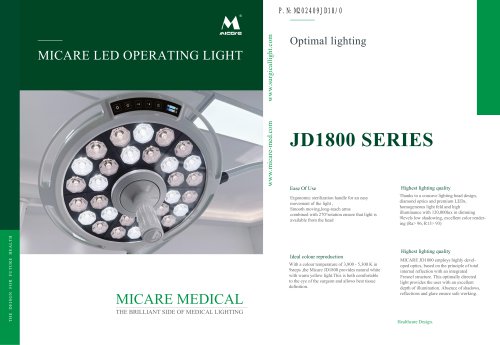
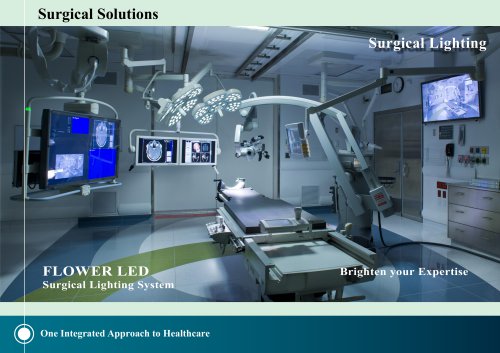
- LED Minor Surgical Light Instrucciones JD1700,JD1700L,JD1700G,JD1700J
- Company
- Products
- Catalogs
- News & Trends
- Exhibitions
LED Minor Surgical Light Instrucciones JD1700,JD1700L,JD1700G,JD1700J
1 /24Pages

LED Minor Surgical Light Instrucciones JD1700,JD1700L,JD1700G,JD1700J
1 /24Pages
Catalog excerpts

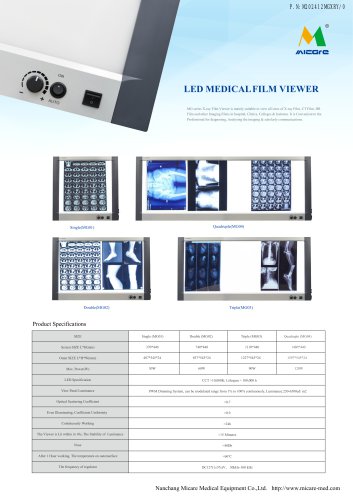
Recordation Certificate No.: Gan Hong Drug Production Recordation No. 20220120 Medical device filing certificate number: Ganhong Machinery No. 20160044 JD Series LED Minor Surgical Light (JD1700、JD1700L、 JD1700G、 JD1700J) User Manual NANCHANG MICARE MEDICAL EQUIPMENT CO.,LTD. Address: No. 666, Yaohu West 5th Road, High-tech Zone, Nanchang city, Jiangxi Province, China Post code: 330099
Open the catalog to page 1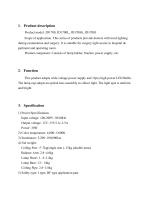
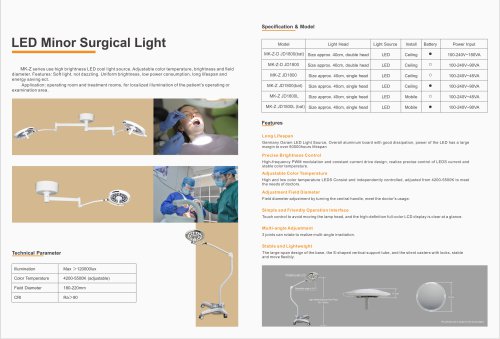
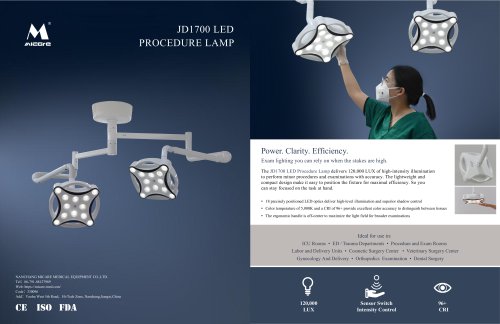
1、Product description Product model: JD1700, JD1700L, JD1700G, JD1700J Scope of application: This series of products provide doctors with local lighting during examination and surgery. It is suitable for surgery light source in hospital de partment and operating room. Product component: Consists of lamp holder, bracket, power supply, etc. 2、Function This product adopts wide voltage power supply and 12pcs high-power LED Bulbs . The lamp cap adopts an optical lens assembly to collect light. The light spot is uniform and bright. 3、Specification 1) Power Specifications Input voltage: 100-200V~50/60Hz...
Open the catalog to page 4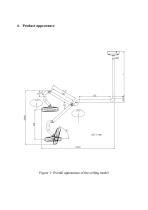
Figure 1: Overall appearance of the ceiling model
Open the catalog to page 5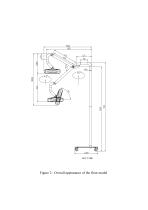
Figure 2 : Overall appearance of the floor model
Open the catalog to page 6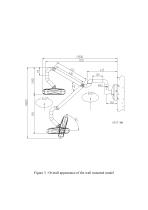
Figure 3 : Overall appearance of the wall mounted model
Open the catalog to page 7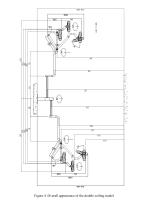
Figure 4 :Overall appearance of the double ceiling model
Open the catalog to page 8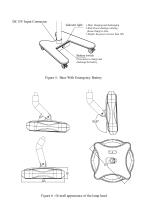
indicator light 1.Blue: charging and discharging 2.Red: Power shortage warning , please charge in time 3.Purple: the power is lower than 10% Battery switch Press down to charge and discharge the battery Figure 5: Base With Emergency Battery Figure 6 : Overall appearance of the lamp head
Open the catalog to page 9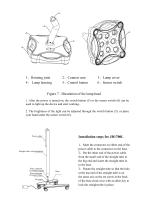
1、Rotating joint 4、 Lamp housing Figure 7 : Illustration of the lamp head 1. After the power is turned on, the switch button (5) or the sensor switch (6) can be used to light up the device and start working. 2. The brightness of the light can be adjusted through the switch button (5), or place your hand under the sensor switch (6). Power cable Straight tube (with nameplate) Wire connector (Terminal Female) Wire connector (Terminal Male) Set screw 1、Mate the connector on either end of the power cable to the connector on the base. 2、Put the other end of the power cable from the small end of the...
Open the catalog to page 10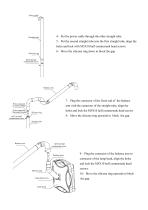
Power cable 4、Put the power cable through the other straight tube. Straight tube 5、Put the second straight tube into the first straight tube, align the holes and lock with M5X10 half countersunk head screws. 6、Move the silicone ring down to block the gap. Silicone ring M5X10 Half countersunk screw 7、Plug the connector of the fixed end of the balance Wire connector (Terminal Male) Wire connector (Terminal Female) arm with the connector of the straight tube, align the holes and lock the M5X10 half countersunk head screws Silicone ring 8、Move the silicone ring upwards to block the gap. M5X10 Half...
Open the catalog to page 11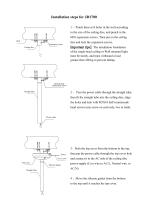
Installation steps for JD1700 1 、Punch three φ14 holes in the wall according to the size of the ceiling disc, and punch in the M10 expansion screws. Then put on the ceiling Wall Expansion screw disc and lock the expansion screws. Important tips:The installation foundation Ceiling disc of the single-head ceiling or Wall mounted light must be sturdy, and must withstand a load greater than 100 kg to prevent falling. M5X10 Half countersunk screw 2 、 Pass the power cable through the straight tube, Straight tube then fit the straight tube into the ceiling disc, align the holes and lock with M5X10 half...
Open the catalog to page 12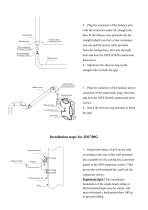
5、Plug the connector of the balance arm with the connector under the straigh tube, then fit the balance arm upwards into the Straight tube M5X10 Half countersunk screw Silicone ring straight tube(if you feel a clear resistance, you can pull the power cable upwards Wire connector (Terminal Female) from the ceiling disc), fit it into the right Wire connector (Terminal Male) hole and lock the M5X10 half countersunk head screw. 6、Slip down the silicone ring on the straight tube to block the gap. M5X10 Half countersunk screw Rotating joint Silicone ring Lamp head screw Lamp head 7、Plug the connector...
Open the catalog to page 13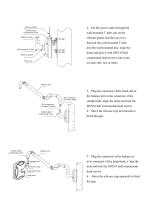
2、Put the power cable through the AC(110-220V) M5X10 Half countersunk screw wall-mounted T-tube, put on the silicone gasket and the top cover, Adapter wiring then put the wall-mounted T-tube into the wall-mounted disc, align the wall-mounted T-tube holes and lock it with M5X10 half Silicone gasket countersunk head screws (one screw on each side, two in total). 3、Plug the connector of the fixed end of Wire connector (Terminal Male) Wire connector (Terminal Female) M5X10 Half countersunk screw M5X10 Half countersunk screw the balance arm to the connector of the straight tube, align the holes and...
Open the catalog to page 14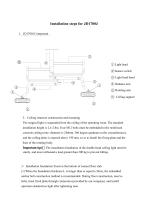
Installation steps for JD1700J 1、JD1700J Component Light head Sensor switch Light head bend Balance arm Rotating arm Ceiling support 2、Ceiling structure construction and mounting The surgical light is suspended from the ceiling of the operating room. The standard installation height is 2.4-2.8m. Four M12 bolts must be embedded in the reinforced concrete ceiling (note: diameter is 240mm, 360 degree quadrant on the circumference), and the ceiling plate is exposed above 150 mm, so as to install the fixing plate and the base of the rotating body. Important tips:The installation foundation of the...
Open the catalog to page 15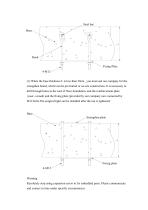
Hook Fixing Plate 4-M12 (1) When the base thickness L is less than 20cm , you must ask our company for the strengthen board, which can be pre-buried or on-site construction. It is necessary to drill through holes in the roof of floor foundation, and the reinforcement plate (user- owned) and the fixing plate (provided by our company) are connected by M12 bolts.The surgical light can be installed after the nut is tightened. Strengthen plate Fixing plate 4-M12 Warning Resolutely stop using expansion screw to fix embedded parts. Please communicate and contact in time under specific circumstances.
Open the catalog to page 16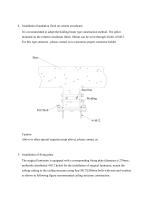
4、Installation foundation fixed on cement crossbeam It is recommended to adopt the holding beam type construction method. The splint mounted on the cement crossbeam (thick 10mm) can be worn through 4 bolts of M12. For this type structure , please contact us to customize proper connector holder. Caution Above or other special request(except above), please contact us. 5、Installation of fixing plate The surgical luminaire is equipped with a corresponding fixing plate (diameter is 270mm, uniformly distributed 4-012 holes) for the installation of surgical luminaire, mount the ceiling casting to the...
Open the catalog to page 17All Nanchang Micare Medical Equipment catalogs and technical brochures
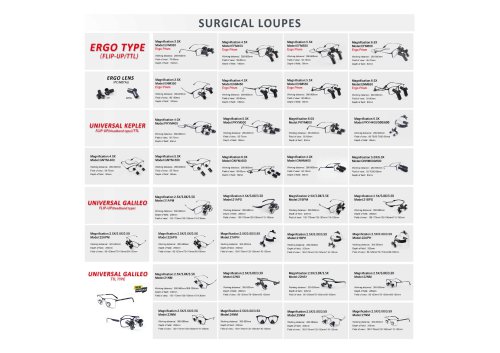 Medical loupes
1 Page
 MICARE Medical Loupes 2024
69 Pages
 Catalog of Medical Led Headlight
10 Pages
 VET LED Surgical Lights
10 Pages
 Medical Surgical Loupes
1 Page
 JD1800L
1 Page
 Infrared therapy lamp IL-001
8 Pages
 JD1700 Minor Surgical Light
4 Pages
 Binocular Loupe
2 Pages


Archived catalogs
 Medical Examination Lamp
11 Pages
 Surgical Tables Operating Tables
27 Pages

- Sterilizer
- Steam sterilizer
- LED surgery light
- Surgical table
- Medical kit
- Ceiling-mounted surgical light
- Blood pressure monitor
- Automatic blood pressure monitor
- Universal operating table
- Infusion stand
- Stainless steel sterilizer
- Adjustable height operating table
- Examination lamp
- Electric operating table
- LED examination lamp
- 4-hook infusion stand
- Surgical light with control panel
- Phototherapy lamp
- 2-arm surgical light