LF01093U

LF01093U
The Life/form® Central Venous Cannulation Simulator is designed to train medical personnel in central venous cannulation. It is anatomically and functionally accurate, simulating the clinical experience with a lifelike feel and easy maintenance.
The simulator includes a main torso, muscle bone assembly, skin, enema bags, needles, baby powder, venous blood, various vein tubes, connectors, strapping ties, an instruction manual, and a carrying case.
The simulator allows for subclavian vein approaches (infraclavicular and supraclavicular), internal jugular vein approaches (anterior, central, posterior), and external jugular approach. It also demonstrates anatomical landmarks for pericardiocentesis and thoracentesis.
Preparation involves inspecting components, applying baby powder, positioning vein tubing, attaching connectors, and filling enema bags with simulated blood. Proper setup ensures realistic training scenarios.
While the manual does not specify procedures, it recommends following a procedural manual and instructor guidance to avoid confusion.
Cleaning is advised after each use with lukewarm water and mild soap. Nasco Cleaner can be used for stubborn stains. The simulator should be repowdered before each use.
Do not store tubes in the simulator, mark on it, or allow contact with ink or corrosive materials to prevent damage.
Replacement kits and supplies such as venous blood and cleaner are available for purchase.
A list of other available simulators from Nasco is provided, covering a wide range of medical training needs.
Catalog excerpts

Central Venous Cannulation Simulator Instruction Manual WARNING: Products may contain dry natural rubber. Life/form Products by Nasco
Open the catalog to page 1
Project Consultant The design and assembly of this simulator would not have been possible without the cooperation and expertise furnished to us by: • Forrest M. Gridley, M.A., P .A.-C. • Division of Urology, Department of Surgery • Physician Assistant Program • Emergency Medical Services Program • University of Wisconsin-Madison About the Simulator The Life/form® Central Venous Cannulation Simulator is anatomically and functionally correct; it is designed to instruct medical personnel in the practice of central venous cannulation. The simulator incorporates superficial anatomical detail and functional...
Open the catalog to page 2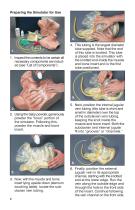
4. 1. 1. Inspect the contents to be certain all necessary components are includ ed (see “List of Components”). 4. This tubing is the largest diameter tube supplied. Note that the end of this tube is knotted. This tube is placed into the simulator with the knotted end inside the muscle and bone insert and is the first tube positioned. 5. 2. 2. Using the baby powder, generously powder the “torso” portion of the simulator. Following this, powder the muscle and bone insert. 5. Next, position the internal jugular vein tubing (this tube is short and small in diameter) over the top of the subclavian...
Open the catalog to page 3
10. 7. 7. Making sure all tubes are prop erly positioned and held in place, “invert” the muscle and bone section and position this in the torso. Place the open end of the external jugular vein through the hole in the jaw of the torso piece. 10. Pull the ends of all three tubes through the “slit” in the skin. This is located on the simulator’s left shoulder. Be sure all tubing is still in the channels. 8. 8. Position the carotid pulse tubing into the external “groove” of the muscle-bone section. 9. 9. Apply the skin to the torso, beginning at the neck. At this point, feed the external jugular...
Open the catalog to page 4
12. 12. Mix the blood solution according to the instructions on the bottle. Once mixed, pour contents into the enema bag, seal the top of the bag, and hang on an IV stand (not provided). The bottom of the enema bag should not be more than 12" to 14" above the simulator. 13. 13. The simulator is almost ready to use. All that remains is the “bleeding of the lines.” To do this, remove the skin from the right shoulder areas — enough to reveal the “knotted ends” of the subclavian and internal jugular. Insert the 22-gauge needle into the tubing of the subclavian, very close to the knot. When the air...
Open the catalog to page 5
Adult Injectable Arm (White) Male Catheterization Female Catheterization Prostate Examination Ostomy Care Surgical Bandaging Enema Administration Pediatric Injectable Arm Intramuscular Injection Breast Examination Arterial Puncture Arm Pediatric Injectable Head First Aid Arm Intradermal Injection Arm Heart Catheterization (TPN) Ear Examination Peritoneal Dialysis Suture Practice Arm Suture Practice Leg Spinal Injection Hemodialysis Practice Arm Episiotomy Suturing Set Suture Kit Pelvic, Normal & Abnormal Stump Bandaging, Upper Stump Bandaging, Lower Cervical Effacement Birthing Station Cricothyrotomy...
Open the catalog to page 6Archived catalogs
 LF01145U
2 Pages
 Bariatric CPR Manikin
2 Pages
 LF03740
4 Pages
 LF00970
2 Pages
 First Aid Arm LF01005
4 Pages
 LF00980U
4 Pages
 LF00984U
4 Pages
 dissection materials
32 Pages
 Nasco healthcare 2019-2020
268 Pages
 health education
140 Pages


- Solvent reagent
- Anatomy model
- Training anatomy model
- Molecular biology reagent
- Teaching anatomical model
- Training medical simulator
- Laboratory reagent
- Thermometer
- Microscopy
- Human scissors
- General care simulator
- Compound microscope
- Laboratory microscope
- Desktop microscope
- Surgical scissors
- Dye reagent kit
- Clinical chemistry reagent kit
- Digital thermometer
- Medium reagent
- Buffer solution reagent