Life/form® Basic Buddy® CPR Manikin

Life/form® Basic Buddy® CPR Manikin
The Life/form® Basic Buddy® CPR Manikin is designed for realistic and economical CPR training. Key features include a sanitary airway system, head tilt, realistic chest rise, and adjustable compression resistance for both child and adult simulations. It is lightweight, compact, and comes with a five-year warranty.
List of Components
- Base
- Chest
- Head
- Aluminum Screw Post
- Adult Compression Block
- Package of 10 Lung Bags
- Lung Installation Tool
Set Up Instructions
The manikin is shipped disassembled. To assemble:
- Attach the chest to the base by locking it into place at three points.
- Attach the head by inserting the aluminum screw post through the head and base, then secure with a mounting screw.
- Install the lung bag using the lung installation tool, ensuring proper placement beneath the airway cutoff ridge.
CPR Simulation Setup
- For child CPR, the manikin is ready after lung bag installation.
- For adult CPR, insert the adult compression block by rolling the manikin on its side.
Maintenance
Replace the lung bag for each new student to maintain hygiene. Remove the old lung bag through the neck opening and insert a new one.
Available Supplies
- LF03677U Basic Buddy® Foam Compression Cylinder
- LF03676U Basic Buddy® Head Screws, Pkg. of 5
- LF03690U Basic Buddy® Chest with Foam Adult Compression Block
- LF03691U Basic Buddy® White Base
- LF03692U Basic Buddy® Head Only
- LF03693U Basic Buddy® CPR Manikin
- LF03694U Basic Buddy® CPR Manikins, Pkg. of 5
- LF03695U Basic Buddy® CPR Manikins, Pkg. of 10
- LF03729U Basic Buddy® Lung Installation Tool, Pkg. of 4
- LF03696U Basic Buddy® Airways, Pkg. of 100
- LF03697U Nylon Carrying Bag (holds 5 Basic Buddy® CPR Manikins)
Quality Standards
The product is manufactured under a quality management system certified to ISO 9001 and ISO 13485 standards.
Catalog excerpts

Products are manufactured using a quality management system certified as being in conformity with ISO 9001 and ISO 13485. Products are manufactured using a quality management system certified as being in conformity with ISO 9001 and ISO 13485. BASIC BUDDY® BASIC BUDDY® The Life/form® Basic Buddy® CPR Manikin is the most realistic, economical manikin available for the training of CPR skills. Features include sanitary airway system, head tilt, realistic chest rise, child and adult compression resistance, palpable landmarks, and a lightweight and compact design. Five-year warranty. The Life/form® Basic Buddy® CPR Manikin is the most realistic, economical manikin available for the training of CPR skills. Features include sanitary airway system, head tilt, realistic chest rise, child and adult compression resistance, palpable landmarks, and a lightweight and compact design. Five-year warranty. of Components Base Chest Head Aluminum Screw Post Adult Compression Block Package of 10 Lung Bags Lung Installation Tool of Components Base Chest Head Aluminum Screw Post Adult Compression Block Package of 10 Lung Bags Lung Installation Tool Your Basic Buddy Manikin is shipped disassembled. Simply follow these easy steps to assemble your manikin. Your Basic Buddy® Manikin is shipped disassembled. Simply follow these easy steps to assemble your manikin. Attaching the Cover to the Base Attaching the Cover to the Base Place the chest on top of the base and lock it into place at the three points indicated. (See figure 1.) Place the chest on top of the base and lock it into place at the three points indicated. (See figure 1.) See diagram for part reference. See diagram for part reference.
Open the catalog to page 1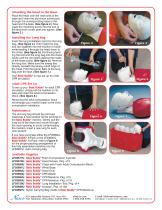
Attaching the Head to the Base Place the head over the neck area of the base and insert the aluminum screw post through the corresponding holes in the head and the base. (See figure 2.) Now insert the mounting screw into the end of the aluminum screw post and tighten. (See figure 3.) Attaching the Head to the Base Place the head over the neck area of the base and insert the aluminum screw post through the corresponding holes in the head and the base. (See figure 2.) Now insert the mounting screw into the end of the aluminum screw post and tighten. (See figure 3.) Installing the Lung Bag Insert...
Open the catalog to page 2Archived catalogs
 LF01145U
2 Pages
 Bariatric CPR Manikin
2 Pages
 LF03740
4 Pages
 LF00970
2 Pages
 First Aid Arm LF01005
4 Pages
 LF00980U
4 Pages
 LF00984U
4 Pages
 LF01093U
6 Pages
 dissection materials
32 Pages
 Nasco healthcare 2019-2020
268 Pages
 health education
140 Pages


- Solvent reagent
- Anatomy model
- Training anatomy model
- Molecular biology reagent
- Teaching anatomical model
- Training medical simulator
- Laboratory reagent
- Thermometer
- Microscopy
- Human scissors
- General care simulator
- Compound microscope
- Laboratory microscope
- Desktop microscope
- Surgical scissors
- Dye reagent kit
- Clinical chemistry reagent kit
- Digital thermometer
- Medium reagent
- Buffer solution reagent