- Catalogs
- Nextremity Solutions
- Nextra® CH
Nextra® CH
1 /12Pages

Nextra® CH
1 /12Pages
Catalog excerpts
Cannulated Hammertoe System Surgical Technique
Open the catalog to page 1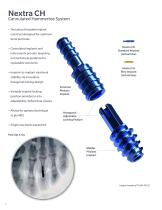
NextraHammertoe System CH Cannulated • Two-piece threaded implant construct designed for optimum bone purchase Nextra CH Standard Implant (Actual Size) • Cannulated implants and instruments provide targeting and technique guidance for repeatable outcomes Nextra CH Mini Implant (Actual Size) • Implant-to-implant rotational stability via innovative hexagonal locking design • Variable implant locking position provides in-situ adjustability before final closure • Allows for optional technique to pin MPJ Proximal Phalanx Implant Hexagonal Adjustable Locking Feature • Single-use sterile packed kit...
Open the catalog to page 2
Standard Implant (Blue) 5.1 mm 5.2 mm 2.2 mm 3.0 mm Mini Implant (Gold) 3.4 mm Nextra CH Sterile Instrument Kit • Single patient use instrument tray • Designed for precise, repeatable outcomes • Optimized for OR efficiency Proximal Implant Sizing Template Planar Proximal Drill Reversible Driver Shaft
Open the catalog to page 3
Surgical Technique The following surgical technique describes the steps necessary to perform hammertoe surgery using the Nextra CH Cannulated Hammertoe System. This system includes both Standard and Mini implants. Please follow the outlined steps for both sized implants. Differences in procedures for Standard or Mini are noted. 1. Preparation – PIP Joint Exposure Prepare the insertion site using standard surgical techniques. A typical approach involves a 2 cm dorsolinear incision over the target joint. Access to the bone is gained via a transverse capsulotomy with release of the collateral ligaments...
Open the catalog to page 4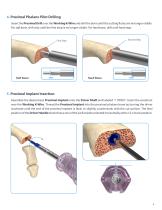
4. Proximal Phalanx Pilot Drilling Insert the Proximal Drill over the Working K-Wire and drill the bone until the cutting flutes are no longer visible. For soft bone, drill only until the first step is no longer visible. For hard bone, drill until hard stop. Second Step First Step Soft Bone Hard Bone 5. Proximal Implant Insertion Assemble the desired size Proximal Implant onto the Driver Shaft end labeled “1 PROX”. Insert the construct over the Working K-Wire. Thread the Proximal Implant into the proximal phalanx bone by turning the driver clockwise until the end of the proximal implant is flush...
Open the catalog to page 5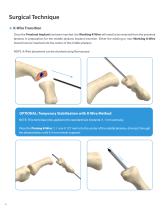
Surgical Technique 6. K-Wire Transition Once the Proximal Implant has been inserted, the Working K-Wire will need to be removed from the proximal phalanx in preparation for the middle phalanx implant insertion. Either the existing or new Working K-Wire should now be inserted into the center of the middle phalanx. NOTE: K-Wire placement can be checked using fluoroscope. OPTIONAL: Temporary Stabilization with K-Wire Method NOTE: This technique only applies to the standard size implants (1.1 mm cannula). Place the Pinning K-Wire (1.1 mm X 127 mm) into the center of the middle phalanx, driving it...
Open the catalog to page 6
7. Resection – Planning Middle Phalanx Insert the 9 mm Planar over the Working K-Wire or the Pinning K-Wire if optional technique was used. Using the Planar, resect the desired amount of middle phalanx. NOTE: If the resected bone surface created by the Planar did not cover the entire middle phalanx bone face, a curette or rongeur can finish the resection to ensure a flat surface is achieved. 8. Middle Phalanx Sizing Template Insert the Sizing Template over the K-Wire to determine the optimal Middle Phalanx Implant size. The outer diameter of the Sizing Template cylinders represent the outer diameter...
Open the catalog to page 7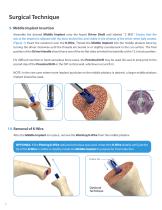
Surgical Technique 9. Middle Implant Insertion Assemble the desired Middle Implant onto the keyed Driver Shaft end labeled “2 MID”. Ensure that the tab of the implant is aligned with the laser etched line and visible in the window of the driver when fully seated. (Figure 1) Insert the construct over the K-Wire. Thread the Middle Implant into the middle phalanx bone by turning the driver clockwise until the threads are buried or or slightly countersunk in the cut surface. The final position of the Driver Handle should have one of the six flat sides oriented horizontally at the 12 o’clock position....
Open the catalog to page 8
11. Alignment & Reduction Align the stem of the Middle Implant axially with the Proximal Implant (Figure 1). Reduce the proximal phalanx and middle phalanx by compressing the implants (Figure 2). Seat the implants to achieve bone-to-bone contact for final apposition (Figure 3). Close the wound in the conventional manner.* In-Situ Repositioning: In the case that the final reduction or implant position is not satisfactory, the implant construct can be disassembled for in-site adjustments. OPTIONAL: If the Pinning K-Wire technique was used, additional joint stabilization can be achieved by driving...
Open the catalog to page 9
Revision Surgical Technique The following surgical technique describes the steps necessary to perform revision surgery of the Nextra CH Cannulated Hammertoe System. The following steps can be applied to both Standard and Mini implants. Please follow the outlined steps for both sized implants. Implant Removal Using Driver Handle Make a dorsolinear incision over the joint to be revised. Clear any bone growth from around the implant construct that has filled the joint space. Using an osteotome or other surgical tool, distract the proximal and middle phalanxes until the Proximal Implant and Middle...
Open the catalog to page 10
Implant Removal Using Retriever In the rare case that the Proximal Implant cannot be unthreaded, the Retriever may be used. Insert the hooked end of the Retriever through the cannulation of the Proximal Implant (Figures 1 & 2) until the hook can grab the tip (Figure 3). Keep the laser line in the 12 o’clock position and apply upward force when pulling until the Proximal Implant is completely removed from the proximal phalanx (Figure 4).
Open the catalog to page 11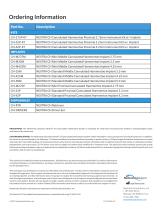
Ordering Information Part No. NEXTRA CH Cannulated Hammertoe Proximal 2.75mm Instrument Kit w/ Implant NEXTRA CH Cannulated Hammertoe Proximal 3.2mm Instrument Kit w/ Implant NEXTRA CH Cannulated Hammertoe Proximal 4.2mm Instrument Kit w/ Implant NEXTRA CH Mini Middle Cannulated Hammertoe Implant 2.75 mm NEXTRA CH Mini Middle Cannulated Hammertoe Implant 3.5 mm NEXTRA CH Mini Middle Cannulated Hammertoe Implant 4.25 mm NEXTRA CH Standard Middle Cannulated Hammertoe Implant 3.5 mm NEXTRA CH Standard Middle Cannulated Hammertoe Implant 4.25 mm NEXTRA CH Standard Middle Cannulated Hammertoe Implant...
Open the catalog to page 12All Nextremity Solutions catalogs and technical brochures
 InCoreTM Lapidus System
14 Pages
 InCore TMT System
14 Pages
 Foot Plating System
12 Pages
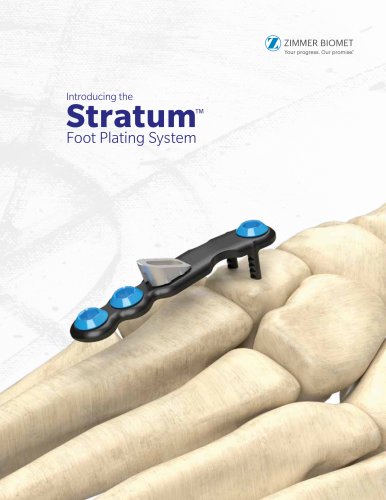 Foot Plating System
12 Pages
- Bone plate
- Arthrodesis plate
- Osteotomy plate
- Locking arthrodesis plate
- Locking osteotomy plate
- Foot arthrodesis plate
- Arthrodesis screw
- Proximal osteotomy plate
- Foot arthrodesis screw
- Foot osteotomy plate
- Headless arthrodesis screw
- Non-locking osteotomy plate
- Hallux valgus osteotomy plate
- Metatarsal bone osteotomy plate
- Forefoot arthrodesis plate