- Catalogs
- Nexxt Spine
- Saxxony®
Saxxony®
1 /12Pages

Saxxony®
1 /12Pages
Catalog excerpts
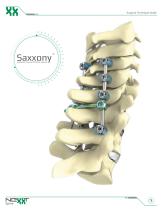
Surgical Technique Guide Posterior Cervical Thoracic System
Open the catalog to page 1
i>vh ■*. ""in-r-i.-n ^r-.- vr i'-\ ! ;/• i■ i■ It. j>-- li-.r-.iy Screw Hole Preparation 3 Additional Surgical Options 9 The Saxxony® Posterior Cervical Thoracic System consists of rods, pedicle screws and hook anchors, connectors and set screws. Rods are available in either straight, prebent (curved) or transition forms in a variety of lengths. Polyaxial pedicle screws are available fully threaded or having a partially smooth shaft in a variety of diameter-length combinations. Connectors include rod-rod, rod-screw and screw-screw. Set screws fasten the rod, anchors and connectors. All implant...
Open the catalog to page 2
i>vh ■*. ""in-r-i.-n ^r-.-v r i'-\ !-i/'h'ivi'j.jK i'jij'u:-* The patient should be positioned in the prone position as appropriate for a posterior approach. Operative level(s) and physiological alignment should be confirmed with radiographic imaging and direct visualization. A standard midline exposure may be used to perform the procedure.
Open the catalog to page 3
2B) Drill: Once the desired screw trajectory has been determined, the Adjustable Drill Guide may be used to drill to the desired depth. Turn the adjustment knob either clockwise or counterclockwise to lock the drill guide to the chosen drill depth (Fig 3). The depth is set correctly when the pin located in the visualization window indicates the depth desired. Note: Turn counterclockwise to decrease depth or clockwise to increase depth. Attach the Drill to the Quick Connect Handle. Insert the Drill into the Drill Guide and drill through the pilot hole until the positive depth stop is reached....
Open the catalog to page 4
2C) Tap: The screw hole may be tapped by attaching the appropriate diameter tap to the Quick Connect Handle and advancing the Tap to the desired depth, using the depth markings as a guide. Note: Tap diameters are line-to-line. Tap diameters match screw diameters. (Fig 4).
Open the catalog to page 5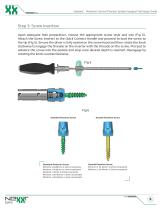
Step 3: Screw Insertion Upon adequate hole preparation, choose the appropriate screw style and size (Fig 6). Attach the Screw Inserter to the Quick Connect Handle and proceed to load the screw to the tip (Fig 5). Ensure the driver is fully seated on the screw head and then rotate the knob clockwise to engage the threads on the inserter with the threads on the screw. Proceed to advance the screw into the pedicle and stop once desired depth is reached. Disengage by rotating the knob counterclockwise. Fig 5 Fig 6 Standard Posterior Screw Standard Posterior Screw: Ø3.5mm x 8-28mm; in 2mm increments...
Open the catalog to page 6
i>vh ■*. ""in-r-i.-n Sv-,:vt i -i ! ■!_.'■ h' " ivi'j.jK Utilize the Rod Template to determine the required length and contour of the Rods. After the desired length and contour has been identified, the Rod may be cut to the appropriate length using the Rod Cutter and formed to the desired contour using the Rod Bender. Insert the Rod into the head of each screw. Press the Double-Ended Set Screw Inserter (Fig 7) onto the Set Screw to retain it. Then, insert the retained Set Screw into the head of the screw and provisionally tighten. Repeat for all Set Screws. Note: The Double-Ended Set Screw Inserter...
Open the catalog to page 7
Step 6: Compression / Distraction Prior to compression or distraction, one Set Screw should be tightened. To compress, place the inner edges of the Compressor around the screws and squeeze the handles together gently until the appropriate distance apart is achieved. To distract, place the outer edges of the Distractor inside the screws and squeeze the handles together until the appropriate distance apart is achieved. Step 7: Final Tightening / Counter Torque Guide the tip of the Counter Torque over the polyaxial screw (Fig 8). Pass the Final Driver through the Counter Torque and mate with the...
Open the catalog to page 8
Additional Surgical Options Cross Connectors Using the provided Crosslink Measuring Calipers, determine the appropriate length for the Cross Connector. Place the Cross Connector in the desired location. Provisionally tighten the Set Screws with the Set Screw Inserter followed by final tightening with the set screw Final Driver. Utilize the Crosslink Bender to make adjustments if necessary (Fig 9). Head to Head Connector Crosslink Bender Head to Head Connector
Open the catalog to page 9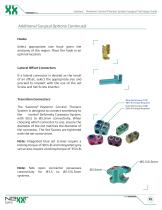
Additional Surgical Options Continued Hooks Select appropriate size hook given the anatomy of the region. Place the hook in an optimal location. Lateral Offset Connectors If a lateral connector is desired as the result of an offset, select the appropriate size and proceed to implant with the use of the set Screw and Set Screw Inserter. Transition Connectors Blue Set Screws: (T25) 90in-lb Torque Required Grey Set Screws: (T20) 35in-lb Torque Required The Saxxony® Posterior Cervical Thoracic System is designed to connect seamlessly to the Inertia® Deformity Corexxion System, with Ø3.5 to Ø5.5mm...
Open the catalog to page 10
Removal Removal of the Saxxony® components is done so by reversing the implant procedure. INDICATIONS FOR USE The Saxxony® Posterior Cervical Thoracic System is intended to immobilize and stabilize cervical (C1 to C7) and thoracic (T1 to T3) spinal segments as an adjunct to fusion for the treatment of the following acute and chronic instabilities: traumatic spinal fractures and/or traumatic dislocations; instability or deformity; failed previous fusions (e.g. pseudarthrosis); tumors involving the cervical/thoracic spine; and degenerative disease, including intractable radiculopathy and/or myelopathy,...
Open the catalog to page 11
Federal law (USA) restricts this device to sale and use by, or on the order of, a physician. WARNINGS AND PRECAUTIONS 1. Mixing of dissimilar metals can accelerate the corrosion process. Stainless steel and titanium implants must NOT be used together in building a construct. 2. The Saxxony® Posterior Cervical Thoracic System devices should be implanted only by surgeons who are fully experienced in the use of such implants and the required specialized spinal surgery techniques. Prior to use, surgeons should be trained in the surgical procedures recommended for use of these devices. 3. The correct...
Open the catalog to page 12All Nexxt Spine catalogs and technical brochures
 FACET FIXX®
3 Pages
 INERTIA® Deformity Portfolio
5 Pages
 HONOUR® PEEK Implant System
3 Pages
 HONOUR® ORB
8 Pages
 INERTIA®
3 Pages
 NEXXT MATRIXX®
3 Pages


- Interbody fusion cage
- PEEK interbody fusion cage
- Anterior interbody fusion cage
- Lumbar interbody fusion cage
- Spinal stabilization system
- Posterior spinal osteosynthesis unit
- Cervical interbody fusion cage
- Adult spinal osteosynthesis unit
- Titanium interbody fusion cage
- Posterior interbody fusion cage
- Metallic pedicle screw
- Transforaminal interbody fusion cage
- Thoraco-lumbar osteosynthesis unit
- Cannulated pedicle screw