- Catalogs
- Nobel Biocare Services AG
- All-on-4® digital workflow
- Company
- Products
- Catalogs
- News & Trends
- Exhibitions
All-on-4® digital workflow
1 /26Pages
All-on-4® digital workflow
1 /26Pages
Catalog excerpts

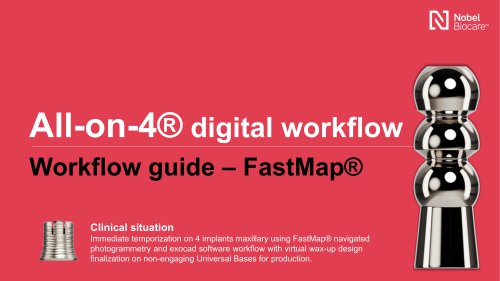
All-on-4® digital workflowWorkflow guide - FastMap®Clinical situation Immediate temporization on 4 implants maxillary using FastMap® navigated photogrammetry and exocad software workflow with virtual wax-up design finalization on non-engaging Universal Bases for production.
Open the catalog to page 1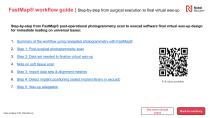
FastMap® workflow guide | Step-by-step from surgical execution to final virtual wax-up Step-by-step from FastMap® post-operational photogrammetry scan to exocad software final virtual wax-up design for immediate loading on universal bases: 1. Summary of the workflow using navigated photogrammetry with FastMap® 2. Step 1: Post-surgical photogrammetry scan 3. Step 2: Data set needed to finalize virtual wax-up 4. Note on soft tissue scan 5. Step 3: Import data sets & alignment meshes 6. Step 4: Detect implant positioning (select implant library in exocad) 7. Step 5: Wax-up adaptation See more clinical...
Open the catalog to page 2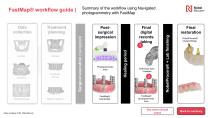
Summary of the workflow using Navigated photogrammetry with FastMap Final digital records taking Photogrammetry scan FastMap® scanbodies Case courtesy of Dr. Peter Bouvry Healing period Postsurgical impression Soft tissue scan if needed Final restoration NobelProcera® + Lab finishing FastMap® workflow guide | NobelProcera® Implant Bridge FastMap® photogrammetry scan See more clinical cases
Open the catalog to page 3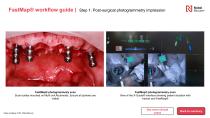
FastMap® workflow guide | Step 1: Post-surgical photogrammetry impression FastMap® photogrammetry scan Scan bodies mounted on Multi-unit Abutments. Ensure all spheres are visible Case courtesy of Dr. Peter Bouvry FastMap® photogrammetry scan View of the X-Guide® interface showing patient situation with tracker and FastMap® See more clinical cases
Open the catalog to page 4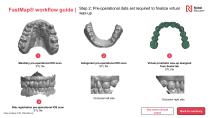
FastMap® workflow guide | Maxillary pre-operational IOS scan STL file Step 2: Pre-operational data set required to finalize virtual wax-up Antagonist pre-operational IOS scan STL file Occlusion left side Bite registration pre-operational IOS scan STL file Case courtesy of Dr. Peter Bouvry Virtual prosthetic wax-up designed from dental lab STL file Occlusion right side See more clinical cases
Open the catalog to page 5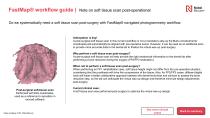
FastMap® workflow guide | Note on soft tissue scan post-operational Do we systematically need a soft tissue scan post-surgery with FastMap® navigated photogrammetry workflow: Anticipation is key! A post-surgical soft tissue scan in this current workflow is not a mandatory step as the Multi-unit Abutments' coordinates will automatically be aligned with pre-operative scans. However, it can be used as an additional scan to provide more accurate data to the dental lab to finalize the virtual wax-up post-surgery. Why perform a soft tissue scan post-surgery? A post-surgical soft tissue scan will help...
Open the catalog to page 6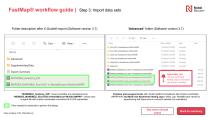
Folder description after X-Guide® export (Software version 3.7) “Advanced” folder (Software version 3.7) File folder File folder File folder File folder File folder File folder ovnraH ujflui ADDITIONAL TIPS “MANDIBLE_Anatomy_IOS” means mandible pre-operational scan “MERGED_MANDIBLE_Elos-IO2C-A-NobelBiocare-MultiUnitNPRP” means post-surgical file with implant coordinates converted into ELOS scanbodies. Files needed for dental lab to perform the design Contains post-surgical scans with implant platform breakdown files of Elos scanbodies (NPRP/WP) and Multi-unit Abutments healing caps (“white_cap”...
Open the catalog to page 7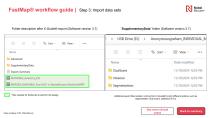
FastMap® workflow guide | Step 3: Import data sets Folder description after X-Guide® export (Software version 3.7) Files needed for dental lab to perform the design Case courtesy of Dr. Peter Bouvry “SupplementaryData” folder (Software version 3.7) Additional export files location coming from X-Guide® IconiX different options, such as segmentation, dual scans, additional STLs See more clinical cases
Open the catalog to page 8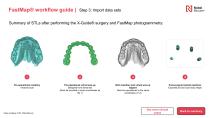
FastMap® workflow guide | Step 3: Import data sets Summary of STLs after performing the X-Guide® surgery and FastMap photogrammetry: Pre-operational maxillary Intraoral scan Case courtesy of Dr. Peter Bouvry Pre-operational virtual wax-up Designed from dental lab (Must be provided in same coordinates as file 1) Both maxillary and virtual wax-up aligned Must be repositioned in the same coordinates (1+2) See more clinical cases Post-surgical implant positions Exported as Elos scan body shape
Open the catalog to page 9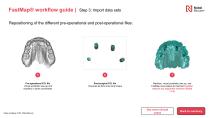
FastMap® workflow guide | Step 3: Import data sets Repositioning of the different pre-operational and post-operational files: Pre-operational STL file Virtual prosthetic wax-up and maxillary in same coordinates Case courtesy of Dr. Peter Bouvry Post-surgical STL file Exported as Elos scan body shape Maxillary, virtual prosthetic wax-up, and FastMap scan bodies all matched together without any alignment meshes needed (1+2) See more clinical cases
Open the catalog to page 10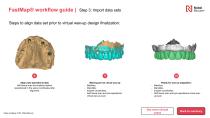
FastMap® workflow guide | Step 3: Import data sets Steps to align data set prior to virtual wax-up design finalization: Align post-operational data Soft tissue scan and implant position repositioned in the same coordinates after alignment Case courtesy of Dr. Peter Bouvry Missing pre-op virtual wax-up Maxillary, Mandible, Implant coordinates, Soft tissue scan and pre-operational virtual wax-up scan Ready for wax-up adaptation: Maxillary, Mandible, Implant coordinates, Soft tissue scan and pre-operational virtual waxup scan See more clinical cases
Open the catalog to page 11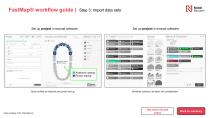
FastMap® workflow guide | Step 3: Import data sets Set up project in exocad software Set up project in exocad software Must be filled as Anatomic and pontic wax-up Elements colored to be taken into consideration Case courtesy of Dr. Peter Bouvry See more clinical cases
Open the catalog to page 12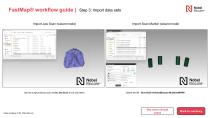
FastMap® workflow guide | Step 3: Import data sets Import Jaw Scan (wizard mode) Import Scan Marker (wizard mode) Use the surgical tissue scan as the Jaw Scan if one was taken Case courtesy of Dr. Peter Bouvry See more clinical cases
Open the catalog to page 13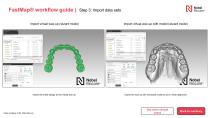
Import virtual wax-up (wizard mode) Import virtual wax-up with model (wizard mode) Import the smile design as the virtual wax-up Search FattMip ' NobelBiocare Import the wax-up with extracted model to aid in mesh alignment See more clinical cases Case courtesy of Dr. Peter Bouvry
Open the catalog to page 14All Nobel Biocare Services AG catalogs and technical brochures
 X-Guide
2 Pages
 Product catalog 2024/2025
220 Pages
 NobelPearl™
8 Pages

Archived catalogs
 Posterior_Solution_Brochure
6 Pages
 On1 concept
6 Pages
 Temporay snap abutment
2 Pages
 creos
creos4 Pages
 Nobelspeedy
6 Pages
 All-on-4 ®
6 Pages
 creos™
16 Pages
 Product Catalog 2017/18
372 Pages
 TiUnite
2 Pages
 All-on-4
6 Pages
 4® treatment concept
16 Pages
 Conical connection
8 Pages
 GBR
GBR6 Pages
 Exceptional brochure long
28 Pages
 creos xenograft brochure
16 Pages
 Global Course Catalog 2016
64 Pages


- Nobel Biocare implant abutment
- Nobel Biocare titanium implant abutment
- Nobel Biocare straight implant abutment
- Dental surgery instrument kit
- Nobel Biocare dental implant
- Nobel Biocare titanium dental implant
- Internal implant abutment
- Nobel Biocare conical dental implant
- Angled implant abutment
- Nobel Biocare straight dental implant
- Dental implant surgery instrument kit
- Hexagonal implant abutment
- Bone substitute
- Screw implant abutment
- Internal hexagon implant abutment
- Dental implant analog
- Nobel Biocare internal dental implant
- Nobel Biocare cylindrical dental implant
- Straight dental implant analog
- External implant abutment