- Catalogs
- Noris Medical Ltd.
- Torque_Pro
Torque_Pro
1 /1Page

Torque_Pro
1 /1Page
Catalog excerpts
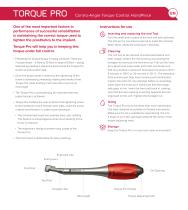
Contra-Angle Torque Contra-Angle Torque Control HandPiece Control HandPiece One of the most important factors in performance of successful rehabilitation is maintaining the correct torque used to tighten the prosthetics to the implant. Torque Pro will help you in keeping this torque under full control. • Presetting the desired torque is easily achieved. There are 7 torque levels – 5 Ncm to 35 Ncm in steps of 5 Ncm – easily selected by rotating a dial at the back end of the Torque Pro. A click sounds at each step. • Once the torque level is selected, the tightening of the screw is achieved by manually rotating the handle of the Torque Pro while holding it with the other hand at its mid-length. • The Torque Pro is automatically de-clutched when the preset torque is achieved. • Torque Pro enables the user to deliver the tightening screw to the hardest-to-reach remote molar sites, insert the screw in place and thread it in, under a pre-set torque. • The miniaturized head size enables clear site visibility. This feature is advantageous when de-threading of the screw is required. Instructions for use Inserting and replacing the end Tool Turn the small lever located at the front end anti clockwise. The tool port is now free to pull out or insert the end tool. When done, rotate the small lever clockwise. Cleaning The unit has to be cleaned and sterilized before and after usage. Detach the front end by unscrewing the hexagon nut and pull the front end out. Pull out the inner part. Brush with soap water each part and make sure that any residue is removed. Autoclave the entire unit for 5 minutes in 135ºC or 20 minutes in 121 ºC. The detached front end ensures high level cleaning and sterilization. Inspect the parts for any damage before re-assembly. Insert back the inner part, make sure that the longer side goes in first. Insert the front end back in, making sure that the tool opening is exactly opposite the line engraved on the unit. Tighten the hexagon nut. Oiling The Torque Pro has to be oiled after each sterilization. Use heat resistant oil suitable for Dental instruments. Make sure the oil is suitable for autoclaving. Put 2 to 3 drops of oil in the opening located at the center of the torque adjusting knob. • The ergonomic design provides easy usage of the Torque Pro. Keep the Torque Pro in a cool and clean environment. • The front head is detachable for easy cleaning. Engraved Line Small Lever Front End Tool Port Hexagon Nut Torque Pro Handle Mid-length
Open the catalog to page 1All Noris Medical Ltd. catalogs and technical brochures
 noris_product_cat-2021
104 Pages
 Tuff-TT
2 Pages
 Tuff™
Tuff™2 Pages
 Unit-Multi
8 Pages
- Implant abutment
- Titanium implant abutment
- Straight implant abutment
- Dental surgery instrument kit
- Dental implant
- Titanium dental implant
- Conical dental implant
- Angled implant abutment
- Drill bit
- Dental implant surgery instrument kit
- Hexagonal implant abutment
- Internal hexagon implant abutment
- Hexagonal dental implant
- Dental drill bit
- Multi-unit implant abutment
- Dental screwdriver
- Internal hexagon dental implant
- Self-tapping dental implant
- Transfer abutment
- Dental implant wrench