Catalog excerpts

High-Power Xenon 2000 Light Source Installation and Operation Manual IMPORTANT NOTICE This document is applicable for the HPX-2000 and HPX-2000-HP-DUV products manufactured in the USA. They are identifiable by serial numbers beginning with serial number 10500 for the HPX-2000 and serial number 20500 for the HPX-2000-HP-DUV. Document: 354-00000-000-01 Version 1.1 Protective Eye Wear Must Be Worn When Using This Instrument Intense Ultraviolet Radiation Present See Important Safety Notices inside.
Open the catalog to page 1
AMERICAS & WORLD HEADQUARTERS Phone: Fax: Sales: Orders: Support: info@oceanoptics.com orders@oceanoptics.com techsupport@oceanoptics.com EUROPE, MIDDLE EAST & AFRICA Phone: Fax: Email: ASIA Phone: Fax: Email: Ocean Optics, Inc. 830 Douglas Ave. Dunedin, FL 34698 USA Manufacturing & Logistics 4301 Metric Dr. Winter Park, FL 32792 USA Sales & Support Geograaf 24 6921 EW Duiven The Netherlands Manufacturing & Logistics Maybachstrasse 11 73760 Ostfildern Germany Ocean Optics Asia 666 Gubei Road Kirin Tower Suite 601B Changning District Shanghai PRC, 200336 www.oceanoptics.com Copyright © 2017...
Open the catalog to page 2
About This Manual Document Purpose and Intended Audience This document provides you with an installation section to get your HPX-2000 or HPX-2000-HPDUV light source up and running. What’s New in this Document This version of the High-Power Xenon Light Source Installation and Operation Manual corresponds to the units manufactured in the United States. They are identifiable by serial numbers beginning with serial number 10500 for the HPX-2000 and serial number 20500 for the HPX-2000. Document Summary Chapter Contains a list of package contents and unpacking instructions. Also contains...
Open the catalog to page 5
About This Manual Upgrades Occasionally, you may find that you need Ocean Optics to make a change or an upgrade to your system. To facilitate these changes, you must first contact Customer Support and obtain a Return Merchandise Authorization (RMA) number. Please contact Ocean Optics for specific instructions when returning a product.
Open the catalog to page 6
About This Manual Important Safety Notices 1. Do not remove or modify any installed safety device on this equipment. Doing so will void your warranty and create an unsafe operating environment. 2. Dangerous voltages are present in this device. There are NO user serviceable parts inside. 3. Only allow qualified personnel to operate this unit. 4. Do not use the unit if it is damaged in any way. Contact your dealer for repair or replacement information. 5. Always screw in the fiber optic cables before starting the instrument. Protective eyewear must be worn when using this equipment. Intense...
Open the catalog to page 7
About This Manual Certifications and Compliance ISO CERTIFICATION Ocean Optics, the industry leader in miniature photonics, has been certified for ISO 9001:2008 applicable to the design and manufacture of electro-optical equipment since 2009. WEEE COMPLIANCE The WEEE symbol on the product indicates that the product must not be disposed of with normal household waste. Instead, such marked waste equipment must be disposed of by arranging to return to a designated collection point for the recycling of waste electrical and electronic equipment. Separating and recycling this waste equipment at...
Open the catalog to page 8
About This Manual FCC COMPLIANCE This equipment has been tested and found to comply with the limits for a Class A digital device, pursuant to Part 15 of the FCC Rules. These limits are designed to provide reasonable protection against harmful interference when the equipment is operated in a commercial environment. This equipment generates uses and can radiate radio frequency energy and, if not installed and used in accordance with the instruction manual, may cause harmful interference to radio communications. Operation of this equipment in a residential area is likely to cause harmful...
Open the catalog to page 9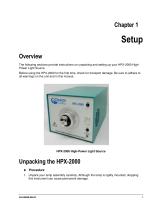
Setup Overview The following sections provide instructions on unpacking and setting up your HPX-2000 HighPower Light Source. Before using the HPX-2000 for the first time, check for transport damage. Be sure to adhere to all warnings on the unit and in this manual. HPX-2000 High-Power Light Source Unpacking the HPX-2000 ► Procedure 1. Unpack your lamp assembly carefully. Although the lamp is rigidly mounted, dropping this instrument can cause permanent damage.
Open the catalog to page 11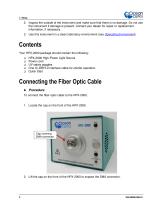
2. Inspect the outside of the instrument and make sure that there is no damage. Do not use the instrument if damage is present. Contact your dealer for repair or replacement information, if necessary. 3. Use this instrument in a clean laboratory environment (see Operating Environment). Contents Your HPX-2000 package should contain the following: HPX-2000 High-Power Light Source Power cord UV safety goggles One IC-DB15-2 interface cable for shutter operation Quick Start Connecting the Fiber Optic Cable ► Procedure To connect the fiber optic cable to the HPX-2000, 2. Lift the cap on the front...
Open the catalog to page 12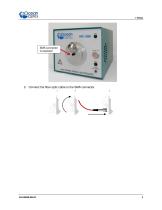
3. Connect the fiber optic cable to the SMA connector.
Open the catalog to page 13
HPX-2000 Specifications This section provides information on the operating environment, physical controls, and dimensions of the HPX-2000. It also provides pinout information for the connector. Operating Environment The following table provides information on optimizing the operating environment of your HPX2000. Unit should be situated so that its location or position does not interfere with proper ventilation. 5°C – 35°C. Unit should be situated away from any device that emits excessive heat. Object and Liquid Entry Unit should be positioned so that objects do not fall on top of the unit....
Open the catalog to page 14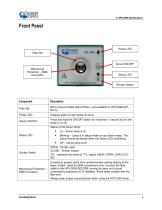
Front Panel Power LED Filter Slit Xenon ON/OFF Mechanical Protection – SMA Connector Shutter Switch Filter Slit Slit to accommodate optical filters. (not available on HPX-2000-HPDUV)) Displays state of main power to lamp. Xenon ON/OFF Press and hold the ON/OFF switch for more than 1 second to turn the lamp on or off. Status of the Xenon lamp: Blinking – Lamp is in setup mode or cool down mode. The Lamp cannot be started when the Status LED is blinking. Shutter Switch OPEN - Shutter open CLOSE - Shutter closed TTL - operation by external TTL- signal (HIGH=OPEN, LOW=CLOSE) Mechanical...
Open the catalog to page 15All Ocean Insight catalogs and technical brochures
-
NIRQuest+ NIR Spectrometers
2 Pages
-
OCEAN SR SERIES
37 Pages
-
Ocean ST Microspectrometer
2 Pages
Archived catalogs
-
Fibers and Probes
22 Pages
-
Jaz Modular Spectroscopy
18 Pages
-
Sampling Accessories
26 Pages
-
Light Sources
20 Pages
-
Spectrometers
58 Pages
-
HR2000+
43 Pages
-
HR4000
2 Pages
-
USB4000
2 Pages
-
USB2000+
2 Pages
-
Flame Spectrometer
2 Pages


