
Catalog excerpts
Comfortable reading starts with the C ClearView C Advanced Features and Functions Geavanceerde eigenschappen en functies Fonctionnalités et fonctions avancées Funzioni Avanzate Características y funciones avanzadas Erweiterte Ausstattungsmerkmale und Funktionen 高级特性与功能
Open the catalog to page 1
ClearView C Advanced Features and Functions Optelec P.O. Box 399 2993 LT Barendrecht The Netherlands Telephone: +31 (0)88 6783 444 Fax +31 (0)88 6783 400 E-mail: info@optelec.nl Website: www.optelec.com
Open the catalog to page 12
1. Introduction Congratulations on choosing the ClearView C, a desktop video magnifier developed by Optelec. The ClearView C enables you to read, write, view photos, do work and so much more. The ClearView C magnifies and enhances text, objects and images and allows you to view them in your preferred high contrast color combination, brightness and contrast settings. It is easy to operate and can be used at home, work and school. The ClearView C has a unique ergonomic, modular design that focuses on ease of use, comfortable reading and maximum working space. The high quality reading table...
Open the catalog to page 13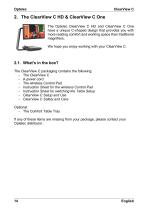
2. The ClearView C HD & ClearView C One The Optelec ClearView C HD and ClearView C One have a unique C-shaped design that provides you with more reading comfort and working space than traditional magnifiers. We hope you enjoy working with your ClearView C. 2.1. What’s in the box? The ClearView C packaging contains the following: - The ClearView C - A power cord - The wireless Control Pad - Instruction Sheet for the wireless Control Pad - Instruction Sheet for switching the Table Setup - ClearView C Setup and Use - ClearView C Safety and Care Optional: - The Comfort Table Tray If any of...
Open the catalog to page 14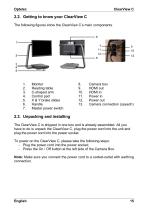
2.2. Getting to know your ClearView C The following figures show the ClearView C’s main components. Monitor Reading table C-shaped arm Control pad X & Y brake slides Handle Master power switch Camera box HDMI out HDMI in Power in Power out Camera connection (speech) 2.3. Unpacking and installing The ClearView C is shipped in one box and is already assembled. All you have to do is unpack the ClearView C, plug the power cord into the unit and plug the power cord into the power socket. To power on the ClearView C, please take the following steps: - Plug the power cord into the power socket; -...
Open the catalog to page 15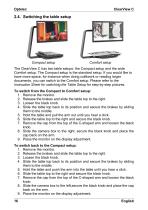
2.4. Switching the table setup Compact setup Comfort setup The ClearView C has two table setups: the Compact setup and the wide Comfort setup. The Compact setup is the standard setup. If you would like to have more space, for instance when doing craftwork or reading larger documents, you can switch to the Comfort setup. Please refer to the Instruction Sheet for switching the Table Setup for step-by-step pictures. To switch from the Compact to Comfort setup: 1. Remove the monitor. 2. Release the brakes and slide the table top to the right. 3. Loosen the black knob. 4. Slide the table top...
Open the catalog to page 16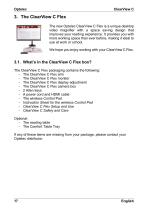
3. The ClearView C Flex The new Optelec ClearView C Flex is a unique desktop video magnifier with a space saving design that improves your reading experience. It provides you with more working space than ever before, making it ideal to use at work or school. We hope you enjoy working with your ClearView C Flex. 3.1. What’s in the ClearView C Flex box? The ClearView C Flex packaging contains the following: - The ClearView C Flex arm - The ClearView C Flex monitor - The ClearView C Flex display adjustment - The ClearView C Flex camera box - 2 Allen keys - A power cord and HDMI cable - The...
Open the catalog to page 17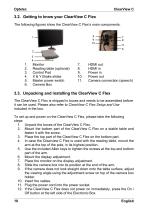
3.2. Getting to know your ClearView C Flex The following figures show the ClearView C Flex’s main components. Monitor Reading table (optional) Control Pad X & Y Brake slides Master power switch Camera Box HDMI out HDMI in Power in Power out Camera connection (speech) 3.3. Unpacking and installing the ClearView C Flex The ClearView C Flex is shipped in boxes and needs to be assembled before it can be used. Please also refer to ClearView C Flex Setup and Use included in the box. To set up and power on the ClearView C Flex, please take the following steps: 1. Unpack the boxes of the ClearView...
Open the catalog to page 18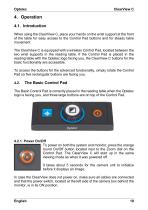
4. Operation 4.1. Introduction When using the ClearView C, place your hands on the wrist support at the front of the table for easy access to the Control Pad buttons and for steady table movement. The ClearView C is equipped with a wireless Control Pad, located between the two wrist supports in the reading table. If the Control Pad is placed in the reading table with the Optelec logo facing you, the ClearView C buttons for the basic functionality are accessible. To access the buttons for the advanced functionality, simply rotate the Control Pad so five rectangular buttons are facing you....
Open the catalog to page 19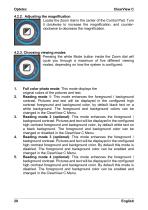
4.2.2. Adjusting the magnification Locate the Zoom dial in the center of the Control Pad. Turn it clockwise to increase the magnification, and counterclockwise to decrease the magnification. 4.2.3. Choosing viewing modes Pressing the white Mode button inside the Zoom dial will cycle you through a maximum of five different viewing modes, depending on how the system is configured: Full color photo mode: This mode displays the original colors of the pictures and text. Reading mode 1: This mode enhances the foreground / background contrast. Pictures and text will be displayed in the configured...
Open the catalog to page 20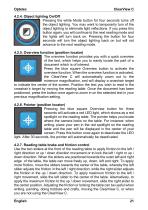
4.2.4. Object lighting On/Off Pressing the white Mode button for four seconds turns off the object lighting. You may want to temporarily turn of the object lighting to eliminate light reflections. If you press this button again, you will continue to the next reading mode and the lights will turn back on. Pressing the button for four seconds will turn the object lighting back on but will not advance to the next reading mode. 4.2.5. Overview function (position locator) The overview function provides you with a quick overview of the text, which helps you to easily locate the part of a document...
Open the catalog to page 21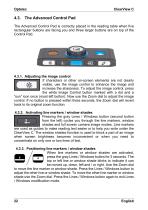
4.3. The Advanced Control Pad The Advanced Control Pad is correctly placed in the reading table when five rectangular buttons are facing you and three larger buttons are on top of the Control Pad. 4.3.1. Adjusting the image control If characters or other on-screen elements are not clearly visible, use the image control to enhance the image and increase the sharpness. To adjust the image control, press the white Image Control button marked with a dot and a “sun” icon once (most left button). Now use the Zoom dial to adjust the image control. If no button is pressed within three seconds, the...
Open the catalog to page 22All Optelec catalogs and technical brochures
-
 Compact 8
60 Pages
-
 Traveller HD
129 Pages
-
 ClearView Speech
88 Pages
-
 Compact 7 HD
174 Pages
-
 ClearView+
108 Pages