
Catalog excerpts
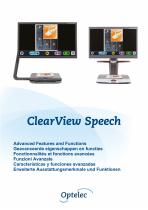
ClearView Speech Advanced Features and Functions Geavanceerde eigenschappen en functies Fonctionnalités et fonctions avancées Funzioni Avanzate Características y funciones avanzadas Erweiterte Ausstattungsmerkmale und Funktionen
Open the catalog to page 1
ClearView Speech
Open the catalog to page 3
ClearView Speech
Open the catalog to page 4
ClearView Speech
Open the catalog to page 5
ClearView Speech
Open the catalog to page 7
ClearView Speech ClearView Speech Advanced Features and Functions Optelec P.O. Box 399 2990 AJ Barendrecht The Netherlands Phone: +31 (0)88 678 34 44 E-mail: info@optelec.nl Internet: www.optelec.com 6
Open the catalog to page 8
ClearView Speech Congratulations on choosing the Optelec ClearView Speech, an intuitive video magnifier to listen to, view and magnify text. The ClearView Speech will add speech as well as full page overview, a picture viewer and fast document navigation to your ClearView C or ClearView+. 1.1 About this manual At Optelec, we are constantly improving our products and their functionality. Therefore, it is possible that this manual is not the latest version. Please download the most up-to-date manual on www.optelec.com at the Support section. This manual will familiarize you with the speech...
Open the catalog to page 9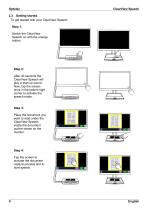
ClearView Speech 2.3 Getting started To get started with your ClearView Speech: Step 1: Switch the ClearView Speech on with the orange button. Step 2: After 40 seconds the ClearView Speech will play a start up sound. Now, tap the screen once in the bottom right corner to activate the speech mode. Step 3: Place the document you want to read under the ClearView Speech, inside the document outline shown on the monitor. Step 4: Tap the screen to activate the document capture process and to start speech.
Open the catalog to page 10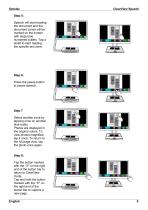
ClearView Speech Step 5: Speech will start reading the document and the document zones will be marked on the screen with large blue numbered bullets. Tap a bullet to start reading the specific text zone. Step 6: Press the pause button to pause speech. Step 7 Select another zone by tapping once on another blue bullet. Photos are displayed in the original colors. To view photos magnified, tap it once. To return to the full page view, tap the photo once again. Step 8: Tap the button marked with the “X” on the right end of the button bar to return to ClearView mode. Tap and hold the button...
Open the catalog to page 11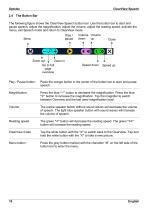
ClearView Speech The following figure shows the ClearView Speech button bar. Use the button bar to start and pause speech, adjust the magnification, adjust the volume, adjust the reading speed, activate the menu, exit Speech mode and return to ClearView mode. Play / pause Zoom out Zoom in Go to full page overview Volume Volume down up Speed down Play / Pause button: Press the orange button in the center of the button bar to start and pause speech. Press the blue “–” button to decrease the magnification. Press the blue “+” button to increase the magnification. Tap the magnifier to switch...
Open the catalog to page 12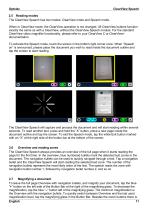
ClearView Speech 2.5 Reading modes The ClearView Speech has two modes: ClearView mode and Speech mode. When in ClearView mode, the ClearView operation is not changed. All ClearView buttons function exactly the same as with a ClearView, without the ClearView Speech module. For the standard ClearView video magnifier functionality, please refer to your ClearView C or ClearView+ documentation. To activate the Speech mode, touch the screen in the bottom right corner once. When “Speech on” is announced, please place the document you wish to read inside the document outline and tap the screen to...
Open the catalog to page 13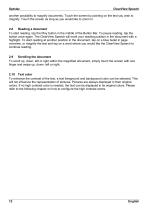
ClearView Speech another possibility to magnify documents. Touch the screen by pointing on the text you wish to magnify. Touch the screen as long as you would like to zoom in. 2.8 Reading a document To start reading, tap the Play button in the middle of the Button Bar. To pause reading, tap the button once again. The ClearView Speech will mark your reading position in the document with a highlight. To start reading at another position in the document, tap on a blue bullet in page overview, or magnify the text and tap on a word where you would like the ClearView Speech to continue reading....
Open the catalog to page 14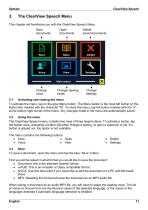
ClearView Speech The ClearView Speech Menu This chapter will familiarize you with the ClearView Speech Menu. Save documents Change voice Open documents Change viewing mode Delete saved documents Change settings 3.1 Activating and closing the menu To activate the menu, tap on the grey Menu button. The Menu button is the most left button on the Button Bar marked with the character “M”. To close the menu, tap the button marked with the “X” at the bottom right corner of the menu. Any changes made in the menu are automatically saved. 3.2 Using the menu The ClearView Speech menu contains two rows...
Open the catalog to page 15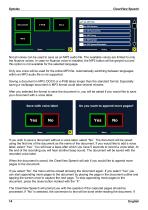
ClearView Speech Not all voices can be used to save as an MP3 audio file. The available voices are limited to only the Nuance voices. In case no Nuance voice is installed, the MP3 button will be greyed out and this option is not available for the selected language. Only one voice will be used for the entire MP3 file. Automatically switching between languages within an MP3 audio file is not supported. Saving a document in MP3, DOCX or e-PUB takes longer than the standard format. Especially saving a multipage document in MP3 format could take several minutes. After you selected the format to...
Open the catalog to page 16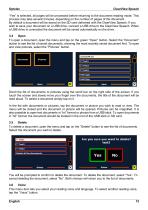
ClearView Speech “Yes” is selected, all pages will be processed before returning to the document reading mode. This process may take several minutes, depending on the number of pages of the document. By default a document will be saved on the SD card delivered with the ClearView Speech. If you wish to save your document on a USB drive, connect a USB drive to the ClearView Speech. When a USB drive is connected the document will be saved automatically on the drive. 3.4 Open To open a document, open the menu and tap on the green “Open” button. Select the “Document” button to see the list of...
Open the catalog to page 17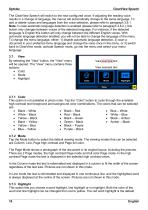
ClearView Speech The ClearView Speech will switch to the next configured voice. If adjusting the reading voice results in a change of language, the menus will automatically change to the same language. To add or delete voices and languages from the voice selection, please refer to paragraph 3.8.1. Note: In case automatic language detection is enabled (please refer to paragraph 3.8.2.), this button only changes between voices of the detected language. For instance, if the detected language is English this button will only change between the different English voices. With automatic language...
Open the catalog to page 18All Optelec catalogs and technical brochures
-
Compact 8
60 Pages
-
Traveller HD
129 Pages
-
Compact 7 HD
174 Pages
-
ClearView+
108 Pages
-
ClearView C
192 Pages


