
Catalog excerpts

Compact 7 HD Advanced Features and Functions Geavanceerde eigenschappen en functies Fonctionnalités et fonctions avancées Funzioni Avanzate Características y funciones avanzadas Erweiterte Ausstattungsmerkmale und Funktionen
Open the catalog to page 1
Advanced Features and Functions Optelec P.O. Box 399 2990 AJ Barendrecht The Netherlands Phone: +31 (0)88 678 34 44 E-mail: info@optelec.nl Internet: www.optelec.com
Open the catalog to page 10
1. Introduction Congratulations on choosing the Compact 7 HD! Optelec’s unique auto-focus electronic video magnifier enables you to view and magnify printed text and images in high resolution HD quality in full color or one of the high contrast modes. The Compact 7 HD 7-inch display, combined with its low magnification of 2.5 times, gives you maximum overview while providing up to 30 times magnification for a higher zoom level. With its multifunctional design, unique lighting concept, autofocus, and integrated reading stand, the Compact 7 HD can be used for reading, viewing images, price...
Open the catalog to page 11
About this manual At Optelec, we are constantly improving our products and their functionalities. Therefore, it is possible that this manual is not the latest version. Please download the most up-to-date manual on www.optelec.com at the Support section. This manual will familiarize you with the features and basic operation of the Compact 7 HD. Please read this manual carefully before using your device. What’s in the box? The Compact 7 HD packaging contains the following: The Compact 7 HD video magnifier A protective pouch A wrist strap A power supply4 country-specific power plugs (EU, US,...
Open the catalog to page 12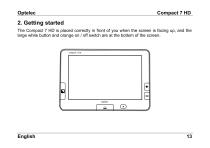
2. Getting started The Compact 7 HD is placed correctly in front of you when the screen is facing up, and the large white button and orange on / off switch are at the bottom of the screen.
Open the catalog to page 13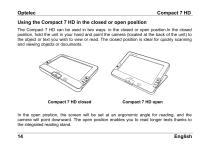
Using the Compact 7 HD in the closed or open position The Compact 7 HD can be used in two ways: in the closed or open position.In the closed position, hold the unit in your hand and point the camera (located at the back of the unit) to the object or text you wish to view or read. The closed position is ideal for quickly scanning and viewing objects or documents. In the open position, the screen will be set at an ergonomic angle for reading, and the camera will point downward. The open position enables you to read longer texts thanks to the integrated reading stand.
Open the catalog to page 14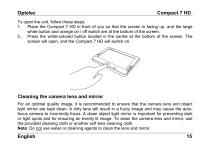
To open the unit, follow these steps: 1. Place the Compact 7 HD in front of you so that the screen is facing up, and the large white button and orange on / off switch are at the bottom of the screen. 2. Press the white-colored button located in the centre at the bottom of the screen. The screen will open, and the Compact 7 HD will switch on. Cleaning the camera lens and mirror For an optimal quality image, it is recommended to ensure that the camera lens and object light mirror are kept clean. A dirty lens will result in a fuzzy image and may cause the autofocus camera to incorrectly focus....
Open the catalog to page 15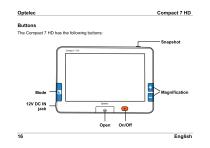
Buttons The Compact 7 HD has the following buttons: Snapshot Mode 12V DC IN jack Open
Open the catalog to page 16
Pressing the white button in the centre at the bottom of the screen will open the Compact 7 HD and switch the unit on. Pressing the Mode button to the left of the screen allows you to select one of the viewing modes. Pressing this button for three seconds will turn off the object lighting. Pressing this button for three seconds again, will turn back on the object lighting. Pressing the + or – button to the right of the screen allows you to increase or decrease the magnification. Pressing the + and – buttons simultaneously for one second will allow you to enter or exit the Compact 7 HD menu....
Open the catalog to page 17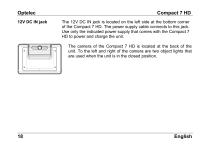
Compact 7 HD The 12V DC IN jack is located on the left side at the bottom corner of the Compact 7 HD. The power supply cable connects to this jack. Use only the indicated power supply that comes with the Compact 7 HD to power and charge the unit. The camera of the Compact 7 HD is located at the back of the unit. To the left and right of the camera are two object lights that are used when the unit is in the closed position.
Open the catalog to page 18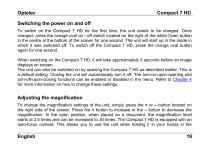
Switching the power on and off To switch on the Compact 7 HD for the first time, the unit needs to be charged. Once charged, press the orange oval on / off switch located on the right of the white Open button in the centre at the bottom of the screen for one second. The unit will start up in the mode in which it was switched off. To switch off the Compact 7 HD, press the orange oval button again for one second. When switching on the Compact 7 HD, it will take approximately 3 seconds before an image displays on screen. The unit can also be switched on by opening the Compact 7 HD as described...
Open the catalog to page 19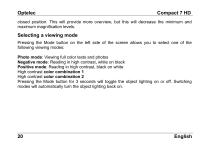
closed position. This will provide more overview, but this will decrease the minimum and maximum magnification levels. Selecting a viewing mode Pressing the Mode button on the left side of the screen allows you to select one of the following viewing modes: Photo mode: Viewing full color texts and photos Negative mode: Reading in high contrast, white on black Positive mode: Reading in high contrast, black on white High contrast color combination 1 High contrast color combination 2 Pressing the Mode button for 3 seconds will toggle the object lighting on or off. Switching modes will...
Open the catalog to page 20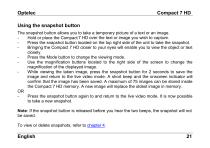
Using the snapshot button The snapshot button allows you to take a temporary picture of a text or an image. Hold or place the Compact 7 HD over the text or image you wish to capture. Press the snapshot button located on the top right side of the unit to take the snapshot. Bringing the Compact 7 HD closer to your eyes will enable you to view the object or text closely. Press the Mode button to change the viewing mode. Use the magnification buttons located to the right side of the screen to change the magnification of the displayed image. While viewing the taken image, press the snapshot...
Open the catalog to page 21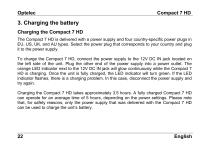
3. Charging the battery Charging the Compact 7 HD The Compact 7 HD is delivered with a power supply and four country-specific power plugs in EU, US, UK, and AU types. Select the power plug that corresponds to your country and plug it to the power supply. To charge the Compact 7 HD, connect the power supply to the 12V DC IN jack located on the left side of the unit. Plug the other end of the power supply into a power outlet. The orange LED indicator next to the 12V DC IN jack will glow continuously while the Compact 7 HD is charging. Once the unit is fully charged, the LED indicator will...
Open the catalog to page 22All Optelec catalogs and technical brochures
-
 Compact 8
60 Pages
-
 Traveller HD
129 Pages
-
 ClearView Speech
88 Pages
-
 ClearView+
108 Pages
-
 ClearView C
192 Pages