
Catalog excerpts

Gardening is < help your horn. Gardening incll j growing and cm f many sorts. Atm horticulture. InM plants are ofterm flowers, foliage. B
Open the catalog to page 1
Advanced Features and Functions
Open the catalog to page 2
Advanced Features and Functions
Open the catalog to page 3
Introduction Congratulations on receiving your new Compact 8 from Optelec. This handheld electronic video magnifier has a stand for table reading, or it can be held for viewing nearby objects. Small enough to easily carry with you, the Compact 8 is ideal for magnification on the go. A convenient carrying case is provided to protect the unit during transport. Featuring a built-in 8-inch LED (light-emitting diode) screen, the Compact 8 allows you to magnify images up to 30 times. You can adjust the display of live images and image captures based on your personal preferences, including...
Open the catalog to page 5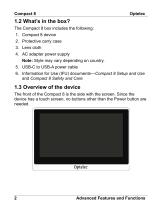
1.2 What’s in the box? The Compact 8 box includes the following: 1. Compact 8 device 2. Protective carry case 3. Lens cloth 4. AC adapter power supply Note: Style may vary depending on country. 5. USB-C to USB-A power cable 6. Information for Use (IFU) documents—Compact 8 Setup and Use and Compact 8 Safety and Care 1.3 Overview of the device The front of the Compact 8 is the side with the screen. Since the device has a touch screen, no buttons other than the Power button are needed. Advanced Features and Function
Open the catalog to page 6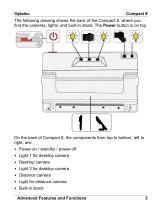
The following drawing shows the back of the Compact 8, where you find the cameras, lights, and built-in stand. The Power button is on top. On the back of Compact 8, the components from top to bottom, left to right, are: • Power on / standby / power off • Light 1 for desktop camera • Desktop camera • Light 2 for desktop camera • Distance camera • Light for distance camera • Built-in stand Advanced Features and F
Open the catalog to page 7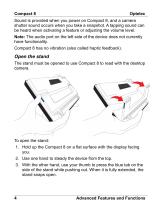
Sound is provided when you power on Compact 8, and a camera shutter sound occurs when you take a snapshot. A tapping sound can be heard when activating a feature or adjusting the volume level. Note: The audio port on the left side of the device does not currently have functionality. Compact 8 has no vibration (also called haptic feedback). Open the stand The stand must be opened to use Compact 8 to read with the desktop camera. To open the stand: 1. Hold up the Compact 8 on a flat surface with the display facing you. 2. Use one hand to steady the device from the top. 3. With the other hand,...
Open the catalog to page 8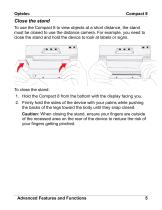
Close the stand To use the Compact 8 to view objects at a short distance, the stand must be closed to use the distance camera. For example, you need to close the stand and hold the device to look at labels or signs. To close the stand: 1. Hold the Compact 8 from the bottom with the display facing you. 2. Firmly hold the sides of the device with your palms while pushing the backs of the legs toward the body until they snap closed. Caution: When closing the stand, ensure your fingers are outside of the recessed area on the rear of the device to reduce the risk of your fingers getting pinched....
Open the catalog to page 9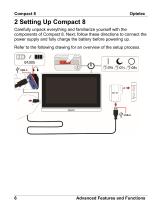
2 Setting Up Compact 8 Carefully unpack everything and familiarize yourself with the components of Compact 8. Next, follow these directions to connect the power supply and fully charge the battery before powering up. Refer to the following drawing for an overview of the setup process. Advanced Features and Functions
Open the catalog to page 10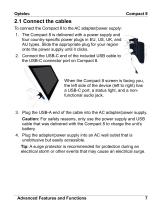
2.1 Connect the cables To connect the Compact 8 to the AC adapter/power supply: 1. The Compact 8 is delivered with a power supply and four country-specific power plugs in EU, US, UK, and AU types. Slide the appropriate plug for your region onto the power supply until it clicks. 2. Connect the USB-C end of the included USB cable to the USB-C connector port on Compact 8. When the Compact 8 screen is facing you, the left side of the device (left to right) has a USB-C port, a status light, and a nonfunctional audio jack. 3. Plug the USB-A end of the cable into the AC adapter/power supply....
Open the catalog to page 11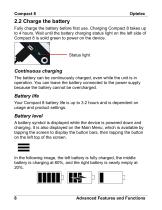
2.2 Charge the battery Fully charge the battery before first use. Charging Compact 8 takes up to 4 hours. Wait until the battery charging status light on the left side of Compact 8 is solid green to power on the device. Status light Continuous charging The battery can be continuously charged, even while the unit is in operation. You can leave the battery connected to the power supply because the battery cannot be overcharged. Battery life Your Compact 8 battery life is up to 3.2 hours and is dependent on usage and product settings. Battery level A battery symbol is displayed while the...
Open the catalog to page 12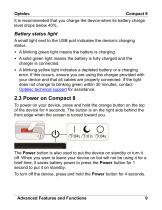
OptelecCompact 8 It is recommended that you charge the device when its battery charge level drops below 40%. Battery status light A small light next to the USB port indicates the device’s charging status. • A blinking green light means the battery is charging. • A solid green light means the battery is fully charged and the charger is connected. • A blinking yellow light indicates a depleted battery or a charging error. If this occurs, ensure you are using the charger provided with your device and that all cables are properly connected. If the light does not change to blinking green within...
Open the catalog to page 13
Compact 8Optelec See the following table for a quick reference on using the Power button. 2.4 Software setup instructions The first time you power on your Compact 8, you are asked to select a language. The default is Easy mode. You can switch to Advanced mode at any time. It is simple to switch between the modes. See Easy mode and Advanced mode on page 12 for details. If you would also like to set the clock with the correct time and date, complete the instructions on page 14. 10 Advanced Features and Functions
Open the catalog to page 14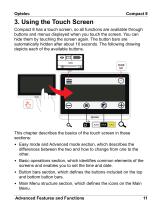
Compact 8 has a touch screen, so all functions are available through buttons and menus displayed when you touch the screen. You can hide them by touching the screen again. The button bars are automatically hidden after about 10 seconds. The following drawing depicts each of the available buttons. This chapter describes the basics of the touch screen in these sections: • Easy mode and Advanced mode section, which describes the differences between the two and how to change from one to the other. • Basic operations section, which identifies common elements of the screens and enables you to set...
Open the catalog to page 15All Optelec catalogs and technical brochures
-
 Traveller HD
129 Pages
-
 ClearView Speech
88 Pages
-
 Compact 7 HD
174 Pages
-
 ClearView+
108 Pages
-
 ClearView C
192 Pages