- Catalogs
- Optergo AB
- DeLight LED
DeLight LED
1 /5Pages

DeLight LED
1 /5Pages
Catalog excerpts

Congratulations on the good choice! Studying the operation manual will help you get the best out of your device Please consider before use: Patient’s eyes must be protected with sunglasses Metal parts of this product contain nickel and chrome Use and storage at room temperature Cables and connectors should be handled carefully Cleaning Clean the device by wiping with a moist towel. Recommended detergents include eyeglass cleaners and dish soaps (as mild water solutions). The device can be disinfected with 70% alcohol. Carrying strap is hand washable at 40°C temperature. Do not wash under running water
Open the catalog to page 1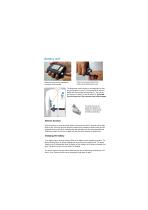
Battery unit Attach the lamp cord by pushing the connector into the socket Push the connector’s latch to the bottom when detaching the cord The large power switch is easy to use aseptically by pressing with forearm or wrist. It is recommended to wear the battery with the provided carrying strap (1). The unit can also be worn on belt (2) or kept in pocket (3). Do not pull from the lamp cord—the connector may suffer damage. The lamp cord can be guided and attached to clothing or carrying strap with the provided clips. Dimmer function When the light is on, press the power switch continuously for...
Open the catalog to page 2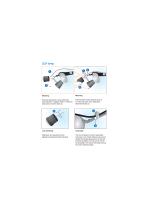
Place the attachment’s hooks behind the loupe structure or adapter metal (1). Press the lamp down to lock the latch (2). Press the latch forward towards lamp (1). Turn the lamp down (2) to release the attachment hooks (3). Lock sensitivity Cord guide Attachment lock sensitivity can be adjusted by shaping the latch spring (2). The clip (1) fastens the cord to spectacles and keeps it out of sight. Silicone tube around temple (2) provides good grip for the clip and prevents scratching. The clip can be moved by spreading it from above and sliding it along the cord to desired position.
Open the catalog to page 3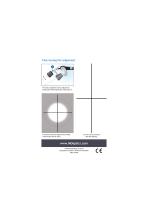
Fine tuning the alignment The lamp’s alignment can be adjusted by bending the metal attachment at the base (1). The beam should be aligned to the middle of the loupes’ field of vision. You can use the cross for help with aligning. www.MOoptics.com © MeridentOptergo Oy 2015 Designed and made in Finland and Sweden Utility mod
Open the catalog to page 4Archived catalogs
 MO Leaflet
2 Pages
