- Catalogs
- Optibio Co., Ltd
- Optical Q Fluorescence Immunoassay Diagnostic Device
Optical Q Fluorescence Immunoassay Diagnostic Device
1 /32Pages

Optical Q Fluorescence Immunoassay Diagnostic Device
1 /32Pages
Catalog excerpts

This product is a medical device. Make sure to read the safety instructions thoroughly for proper use of the product. Keep the document in a place where you can easily access it.
Open the catalog to page 1
OptiBio product warranty applies only when the product is used in accordance with the Instructions for Use provided by OptiBio. Under no circumstances shall OptiBio be liable for any direct or indirect damages incurred. If you need technical support or have any inquiries, please contact us at: OptiBio Technical and Service Support Department +82-43-217-7030 OptiBio Co., Ltd. Chungbuk TP bonbukwan # 301, 302, 401, 404, 405, 406, 409, 414, 76 Yeongudanji-ro, Ochang-eup, Cheongwon-gu, Cheongju-si, Chungcheongbuk-do, Republic of Korea (28116) Tel: +82-43-217-7030 | Fax: +82-43-217-7031 Web: www.optibio.co.kr...
Open the catalog to page 2
■ Optical Q is a Point of Care (POC) device that measures the fluorescence intensity resulting from the immune response between a fluorescence-bound antibody and a marker present in body fluids such as human blood, urine, amniotic fluid, etc. ■ OptiBio provides immunoassay test cartridges associated with various markers that can be applied to Optical Q. ■ Optical Q is prohibited for use other than the In Vitro Diagnostic purposes. ■ Optical Q can be used for diagnostic testing and monitoring of various markers in hospitals or medical screening centers. ■ Easy to use (Simple interface & Self-auto...
Open the catalog to page 4
- In this Instructions for Use, the terms " Warning" and "Cautiori' are used to indicate safety and other important instructions. The definitions of these terms are provided below. Please make sure you clearly understand their meanings before reading this Instructions for Use. - The following information is provided to ensure the safety of the user and prevent property damage. Before using this product, please carefully read the precautions and instructions for proper use. - Optical Q contains high voltage circuits. Do not remove or open any part of the Optical Q case. It may cause electric shock....
Open the catalog to page 5
- Before using Optical Q, please thoroughly read and follow all instructions, warnings, and precautions in this Instructions for Use. - Before use, make sure that Optical Q is operating safely and in an appropriate working condition. - Do not insert anything into the openings, sockets, or holders of Optical Q without specific instructions. This may cause electric shock. - Do not look directly at the inside of the cartridge insertion port or the laser. Do not use any device, such as a mirror, to observe the laser beam or lens. - Use Optical Q with care. Do not throw, shake, or drop it, as this...
Open the catalog to page 6
Standard Conformity Declaration according to the Article 110 of CE Regulations. This product has been designed and manufactured in accordance with the essential requirements of the Regulation (EU) 2017/746 on in vitro diagnostic medical devices. The CE label has been affixed to the product by applying the relevant procedures.
Open the catalog to page 7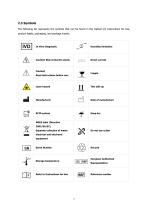
2.3 Symbols The following list represents the symbols that can be found in the Optical Q's Instructions for Use, product labels, packaging, and package inserts. Humidity limitation Caution! Risk of electric shock. Direct current Read instructions before use. Laser hazard RFID system WEEE label (Directive 2002/96/EC) Separate collection of waste electrical and electronic equipment Serial Number European Authorized Storage temperature Reference number
Open the catalog to page 8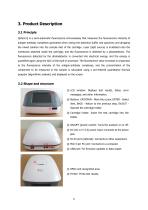
3. Product Description 3.1 Principle Optical Q is a semi-automatic fluorescence immunoassay that measures the fluorescence intensity of antigen-antibody complexes generated when mixing the detection buffer and specimen and dropping the mixed solution into the sample inlet of the cartridge. Laser (light source) is irradiated onto the membrane attached inside the cartridge, and the fluorescence is detected by a photodetector. The fluorescence detected by the photodetector is converted into electrical energy, and the energy is quantified again using the ADC of the built-in processor. The fluorescence...
Open the catalog to page 9
- Power cable The user should check if the above items are included in the package contents. If there are any missing items, please contact our local distributor or OptiBio Co., Ltd. (Tel: +82-43-217-7030 / Email: [email protected]) - Before installing Optical Q, please check the package contents for any damage or missing components. If there are any missing items, please contact our local distributor or OptiBio Co., Ltd. (Tel: +82-43-217-7030 / Email: [email protected]) ■ Before using Optical Q, please read the "Safety Instructions" in this Instructions for Use. ■ Make sure the voltage...
Open the catalog to page 10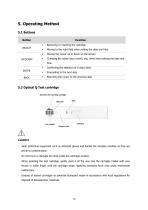
Function ■ Removing or inserting the cartridge ■ Moving to the right field when setting the date and time ■ Moving the cursor up or down on the screen ■ Changing the value (year, month, day, time) when setting the date and time ■ Confirming the selection of a menu item. ■ Proceeding to the next step ■ Returning the cursor to the previous step 5.2 Optical Q Test cartridge Caution - Wear protective equipment such as sterilized gloves and handle the samples carefully as they are prone to contamination. - Do not touch or damage the strip inside the cartridge window. - When inserting the test cartridge,...
Open the catalog to page 11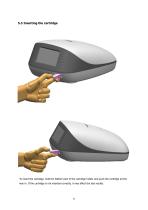
To insert the cartridge, hold the bottom part of the cartridge holder and push the cartridge all the way in. If the cartridge is not inserted correctly, it may affect the test results.
Open the catalog to page 12
During the system check, the connection and operational status of the Motor, P.I Sensor, Printer, Laser, Temperature, Barcode, and RFID are verified. Test Auto Report S e t t i n g 2) Press the 'ENTER' button when the system check is completed. 3) After the system check ends, the main menu will be displayed. 1) Press the power switch of the analyzer to turn it on. The analyzer will display the screen shown above and perform a system check. If an error occurs, a warning message as shown below will be displayed, and you may refer to Section 7. Troubleshooting for more details. Check the Motor&P.I...
Open the catalog to page 13All Optibio Co., Ltd catalogs and technical brochures
 Optical Q CoV-19 nAb
3 Pages
- Detection kit
- Respiratory disease assay kit
- COVID-19 assay kit
- IgG assay kit
- Immunoassay analyzer
- Automated immunoassay analyzer
- Clinical diagnostic immunoassay analyzer
- Antibody detection kit
- Continuous access immunoassay analyzer
- Blood immunoassay analyzer
- Fluorescence immunoassay analyzer
- Serum immunoassay analyzer
- Plasma immunoassay analyzer
- Immunity detection kit
- Neutralizing antibody test kit
- Portable immunoassay analyzer
- Vitamin immunoassay analyzer
- Vitamin D immunoassay analyzer