- Catalogs
- OrthoPediatrics
- PediFrag ™ System 2.7/3.5
PediFrag ™ System 2.7/3.5
1 /30Pages

PediFrag ™ System 2.7/3.5
1 /30Pages
Catalog excerpts

PediLoc® Product Family System 2.7/3.5 Surgical Technique
Open the catalog to page 1
System Overview Description The OrthoPediatrics PediFrag™ System 2.7/3.5 is part of the PediLoc® Product Family and includes plates and screws used for internal fixation to facilitate bone healing and repair. It combines the advantages of traditional plating techniques with the advancements offered by locked plating. This flexible system includes plates that can be used with 2.7 and 3.5 cortical and locking screws. Additionally, 4.0mm cannulated cancellous screws are available. The PediFrag System 2.7/3.5 is manufactured from stainless steel for increased strength and ease of removal. Within...
Open the catalog to page 4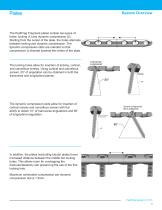
System Overview The PediFrag Fragment plates contain two types of holes: locking (1) and dynamic compression (2). Starting from the center of the plate, the holes alternate between locking and dynamic compression. The dynamic compression slots are oriented so that compression is directed towards the center of the plate. The locking holes allow for insertion of locking, cortical, and cancellous screws. Using cortical and cancellous screws, 20° of angulation can be obtained in both the transverse and longitudinal planes. The dynamic compression slots allow for insertion of cortical screws and cancellous...
Open the catalog to page 5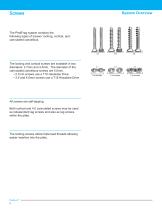
System Overview The PediFrag system contains the following types of screws: locking, cortical, and cannulated cancellous. The locking and cortical screws are available in two cannulated cancellous screws are 4.0mm. • 2.7mm screws use a T10 Hexalobe Drive T10 Hexalobe T15 Hexalobe T15 Hexalobe • 3.5 and 4.0mm screws use a T15 Hexalobe Drive Both cortical and 4.0 cannulated screws may be used as independent lag screws and also as lag screws The locking screws utilize triple lead threads allowing easier insertion into the plate.
Open the catalog to page 6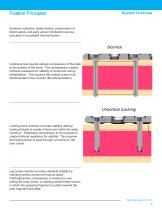
Fixation Principles System Overview Anatomic reduction, stable fixation, preservation of blood supply, and early active mobilization are key principles in successful internal fixation. Cortical screw insertion allows compression of the plate to the surface of the bone. This compression creates frictional resistance for stability of constructs during rehabilitation. This requires the cortical screw to be fixed/inserted in two cortices (Bi-cortical fixation). Locking screw insertion provides stability utilizing locking threads to create a fixed point within the plate construct. Plate/bone compression...
Open the catalog to page 7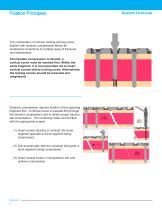
Fixation Principles The combination of cortical, locking and lag screw fixation with dynamic compression allows for anatomical corrections of multiple types of fractures and osteotomies. If bone/plate compression is desired, a cortical screw must be inserted first. Within the same fragment, it is recommended not to insert cortical screws before locking screw. Alternatively, the locking screws should be loosened and retightened. Dynamic compression requires fixation of the opposing fragment first. A cortical screw is inserted first through the dynamic compression slot to obtain proper fracture...
Open the catalog to page 8
Surgical Technique 1 Note: Bending plates through locking holes can cause significant distortion of the locking threads making locking screw insertion difficult. Threaded drill guides and threaded plate holders can be utilized to protect threads. 2 Note: Due to fatigue, plates will not withstand bending multiple times in one location. If damage occurs, do not use implant. 3 Note: While bending the plates, bending pliers may be utilized to maintain control of the implant.
Open the catalog to page 9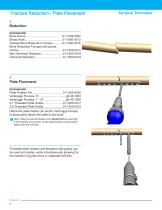
Threaded plate holders and threaded drill guides can be used as handles, while simultaneously allowing for the insertion of guide wires or calibrated drill bits. Surgical Techniq
Open the catalog to page 10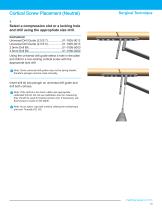
Cortical Screw Placement (Neutral) Surgical Technique Insert drill bit into plunger on universal drill guide and drill both cortices. 2 Note: If the drill bit is too short, utilize size appropriate calibrated drill bit. Do not use calibration lines for measuring, they should be used for locking screws only. If necessary, use fluoroscopy to assist in drill depth. 3 Note: As an option, tap both cortices utilizing the cortical taps and mini T-handle AO, QC.
Open the catalog to page 11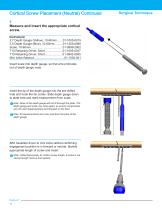
Insert the tip of the depth gauge into the pre-drilled hole and hook the far cortex. Slide depth gauge down to plate hole and read measurement from scale. 1 Note: Nose of the depth gauge will not fit through the plate. The depth gauge and scale can come apart, so ensure components are not used inappropriately and dropped on the floor. 2 Note: All measurements are to be read from the back of the depth gauge. Affix hexalobe driver to mini inline ratchet confirming engagement position is in forward or neutral. Identify appropriate length of screw and insert. 4 Note: Utilize fluoroscopy to confirm...
Open the catalog to page 12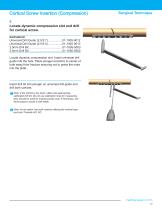
Cortical Screw Insertion (Compression) Surgical Technique Insert drill bit into plunger on universal drill guide and drill both cortices. 1 Note: If the drill bit is too short, utilize size-appropriate calibrated drill bit. Do not use calibration lines for measuring, they should be used for locking screws only. If necessary, use fluoroscopy to assist in drill depth. 2 Note: As an option, tap both cortices utilizing the cortical taps and mini T-handle AO, QC.
Open the catalog to page 13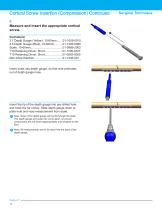
Insert the tip of the depth gauge into pre-drilled hole and hook the far cortex. Slide depth gauge down to plate hole and read measurement from scale. 1 Note: Nose of the depth gauge will not fit through the plate. The depth gauge and scale can come apart, so ensure components are not used inappropriately and dropped on the floor. 2 Note: All measurements are to be read from the back of the depth gauge. Surgical Technique
Open the catalog to page 14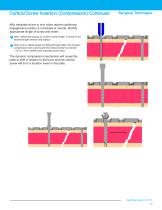
Cortical Screw Insertion (Compression) Continued Surgical Technique Affix hexalobe driver to mini inline ratchet confirming engagement position is in forward or neutral. Identify appropriate length of screw and insert. 3 Note: Utilize fluoroscopy to confirm screw length. If screw is not desired length remove and replace. 4 Note: Due to depth gauge not fitting through plate, the dynamic compression slot could cause the cortical screw to protrude ~1.0 to 1.5mm farther than expected past cortex. The dynamic compression mechanism will cause the plate to shift in relation to the bone and the cortical...
Open the catalog to page 15All OrthoPediatrics catalogs and technical brochures
 PediFlex
24 Pages
 PediLoc
2 Pages
 Cannulated Screw
8 Pages

- Bone plate
- Compression plate
- Metallic compression plate
- Locking compression plate
- Rectangular table
- Distal compression plate
- Orthopedic surgery instrument kit
- Compression bone screw
- Metallic compression bone screw
- Proximal compression plate
- Arthrodesis nail
- Lateral compression plate
- Medial compression plate
- Tibia compression plate
- General purpose compression bone screw
- External fixation system
- Metallic intramedullary nail
- Cannulated compression bone screw
- Arthrodesis plate
- Proximal fixation intramedullary nail