- Products
- Catalogs
- News & Trends
- Exhibitions
CHOOSING AND INSTALLING THE ARM BRACE
1 /10Pages

CHOOSING AND INSTALLING THE ARM BRACE
1 /10Pages
Catalog excerpts
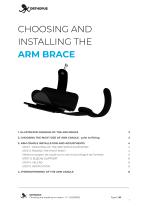
CHOOSING AND INSTALLING THE ARM BRACE 1. ILLUSTRATED DIAGRAM OF THE ARM BRACE 2. CHOOSING THE RIGHT SIZE OF ARM CRADLE - prior to fitting 3. ARM CRADLE INSTALLATION AND ADJUSTMENTS STEP 1: MOUNTING OF THE ORTHOPUS SUPPORTER STEP 2: FINDING THE PIVOT POINT Mettez le support de coude sur le cran le plus éloigné de l’orthèse STEP 3: ELBOW SUPPORT ORTHOPUS Choosing and installing arm brace - V1 - 2022/09/02
Open the catalog to page 1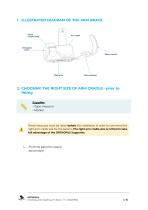
1. ILLUSTRATED DIAGRAM OF THE ARM BRACE 2. CHOOSING THE RIGHT SIZE OF ARM CRADLE - prior to fitting Supplies : - Tape measure - Marker These measures must be taken before the installation in order to command the right arm cradle size for the patient. The right arm cradle size is critical to take full advantage of the ORTHOPUS Supporter. Find the patient’s lateral epicondyle ORTHOPUS Choosing and installing arm brace - V1 - 2022/09/02
Open the catalog to page 2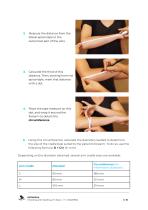
Measure the distance from the lateral epicondyle to the outermost part of the ulna Calculate the third of this distance. Then, starting from the epicondyle, mark that distance with a dot. Place the tape measure on this dot, and wrap it around the forearm to obtain the circumference. Using this circumference, calculate the diameter needed to determine the size of the cradle best suited to the patient’s forearm. To do so, use the following formula: D = C/π (in mm). Depending on the diameter obtained, several arm cradle sizes are available: Circumference (for information purposes) ORTHOPUS Choosing...
Open the catalog to page 3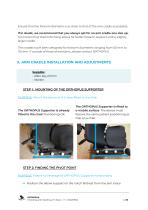
Ensure that the forearm diameter is as close to that of the arm cradle as possible. If in doubt, we recommend that you always opt for an arm cradle one size up. It is known that thermoforming allows for better forearm support with a slightly larger cradle. The cradles have been designed for forearm diameters ranging from 50 mm to 110 mm. If outside of these dimensions, please contact ORTHOPUS. 3. ARM CRADLE INSTALLATION AND ADJUSTMENTS Supplies : - Allen key 2.5mm - Marker STEP 1: MOUNTING OF THE ORTHOPUS SUPPORTER PURPOSE: Mount the device as if it were fitted to the chair The ORTHOPUS Supporter...
Open the catalog to page 4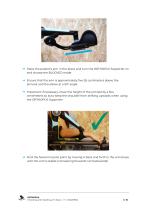
➔ Place the patient’s arm in the brace and turn the ORTHOPUS Supporter on and choose the BLOCKED mode ➔ Ensure that the arm is approximately five (5) centimeters above the armrest and the elbow at a 90° angle ➔ Important: if necessary, lower the height of the armrest by a few centimeters so as to keep the shoulder from shifting upwards when using the ORTHOPUS Supporter ➔ Find the forearm’s pivot point by moving it back and forth in the arm brace until the arm is stable (not leaning forwards nor backwards) ORTHOPUS Choosing and installing arm brace - V1 - 2022/09/
Open the catalog to page 5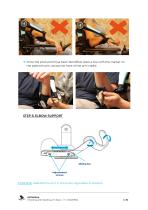
➔ Once the pivot point has been identified, draw a line with the marker on the patient’s arm, across the front of the arm cradle STEP 3: ELBOW SUPPORT PURPOSE: Stabilize the arm in the brace regardless of position ORTHOPUS Choosing and installing arm brace - V1 - 2022/09/02
Open the catalog to page 6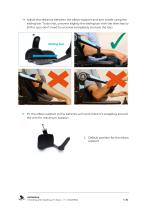
➔ Adjust the distance between the elbow support and arm cradle using the sliding bar. To do that, unscrew slightly the sliding bar with the allen key to shift it (you don’t need to unscrew completely to move the bar) ➔ Fit the elbow support to the patient’s arm and check it’s wrapping around the arm for maximum support 1. Default position for the elbow support ORTHOPUS Choosing and installing arm brace - V1 - 2022/09/02
Open the catalog to page 7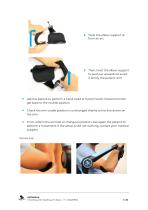
2. Twist the elbow support to form an arc 3. Then, twist the elbow support to push up upwards to avoid it annoy the patient’ arm ➔ Ask the patient to perform a hand-head or hand-mouth movement then get back to the neutral position ➔ Check the arm cradle position is unchanged thanks to the line drawn on the arm ➔ If not, reform the armrest or change its position. Ask again the patient to perform a movement. If the setup is still not working, contact your medical supplier Correct size: ORTHOPUS Choosing and installing arm brace - V1 - 2022/09/02
Open the catalog to page 8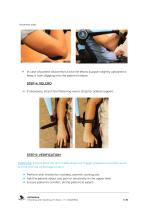
Incorrect size: ➔ In case of patient discomfort, twist the elbow support slightly upwards to keep it from digging into the patient’s elbow. STEP 4: VELCRO ➔ If necessary, attach the fastening velcro strap for added support. STEP 5: VERIFICATION PURPOSE: Ensure that the arm cradle does not trigger pressure anywhere so as to limit the risk of damage to skin. ➔ Perform skin checks for: redness, warmth, itching, etc ➔ Ask the patient about any pain or sensitivity in the upper limb ➔ Ensure patient’s comfort. (Is the patient at ease?) ORTHOPUS Choosing and installing arm brace - V1 - 2022/09
Open the catalog to page 9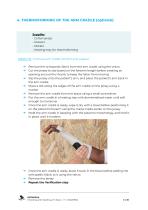
4. THERMOFORMING OF THE ARM CRADLE (optional) Supplies : - Cotton jersey - Scissors - Marker - Heating tray for thermoforming OBJECTIF : Improve arm cradle comfort and support Ϣޔ Remove the orthopedic fabric from the arm cradle using the velcro ➔ Cut the jersey to size based on the forearm length before creating an opening around the thumb to keep the latter from moving ➔ Slip the jersey onto the patient’s arm, and place the patient’s arm back in the arm cradle ➔ Place a dot along the edges of the arm cradle on the jersey using a marker ➔ Remove the arm cradle from the brace using a small screwdriver...
Open the catalog to page 10All ORTHOPUS catalogs and technical brochures
 ORTHOPUS SUPPORTER
2 Pages