MOUSE WRAP
1 /4Pages

MOUSE WRAP
1 /4Pages
Catalog excerpts

Mouse Wrap
Open the catalog to page 1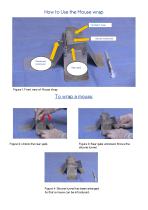
How to Use the Mouse wrap Ventilation holes Silicone membrane Membrane locking pin Rear gate Figure 1: Front view of Mouse Wrap Figure 2: Unlock the rear gate Figure 3: Rear gate unlocked. Shows the silicone tunnel. Figure 4: Silicone tunnel has been enlarged So that a mouse can be introduced.
Open the catalog to page 2
Figure 5: The mouse is shown the tunnel. It will run in Figure 6: Pull the membrane to snug around the mouse. Lock the tab and replace the rear gate over the tail Figure 7: The tail is now accessible for IV, tail tip, tattoo or blood collection Figure 8: To release the mouse, unlock the tail gate, Unlock the membrane and allow mouse to exit the front or back of the device Disinfection or sterilisation recommendations: 1. Rinse the Wrap in warm soapy water to remove any gross contamination. 2. The Wrap can then be sprayed with 70% alcohol and left to dry. 3. The Wrap can also be autoclaved (121C...
Open the catalog to page 3
www.otawog.com Dunedin, New Zealand [email protected]
Open the catalog to page 4All Otawog Rodent Anaesthesia Systems catalogs and technical brochures
 OTA-C
OTA-C1 Page
- Positioning pillow
- Retractor
- Surgical retractor
- Veterinary operating table
- 1-section veterinary operating table
- Animal spreader
- Warming pad
- Mechanical veterinary operating table
- Veterinary cushion
- Metabolic cage
- Modular metabolic cage
- Small animal veterinary operating table
- Stainless steel metabolic cage
- Rodent veterinary operating table