- Catalogs
- Priorclave
- Operation & Maintenance Manual
Operation & Maintenance Manual
1 /61Pages

Operation & Maintenance Manual
1 /61Pages
Catalog excerpts
Priorclave Manual QCS-SH Issue 1 05/07/11 Priorclave Manual QCS-SH Issue 1 05/07/11 Operation & Maintenance Manual Front Loading Direct Steam Heated Priorclaves
Open the catalog to page 1
Priorclave Manual QCS-SH Issue 1 INTRODUCTION Priorclave autoclaves are a range of general-purpose laboratory autoclaves intended primarily for media preparation, the making safe of ordinary laboratory and pathological waste and other apparatus sterilisation purposes. The autoclaves are manufactured to a high standard and feature a number of patented innovative design features. The sophisticated TACTROL microprocessor control system provides a very simple method of setting even the most complex cycles. The machines have been designed from the outset for easy and safe operation and maintenance....
Open the catalog to page 3
This Page Has Been Deliberately Left Blank
Open the catalog to page 4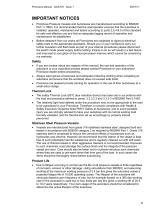
Priorclave Manual QCS-SH Issue 1 IMPORTANT NOTICES • Priorclave Pressure Vessels and Autoclaves are manufactured according to BS2646 Part 1 (1993). It is recommended that the user/operator ensures that the autoclave is installed, operated, maintained and tested according to parts 2,3,4 & 5 of this standard for safe and effective use and that an adequate logging record of operation and maintenance be established. Before despatch from our works all Priorclaves are subjected to rigorous electrical safety tests to the appropriate standards. Should you or your contractors carry out further insulation...
Open the catalog to page 5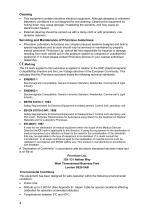
Cleaning • This equipment contains sensitive electrical equipment. Although designed to withstand laboratory conditions it is not designed for wet cleaning. Cleaning this equipment by hosing down may cause damage, invalidating the warranty, and may cause an electrocution hazard. • External cleaning should be carried out with a damp cloth or with proprietary, nonabrasive cleaners. Servicing and Maintenance of Priorclave Autoclaves • Priorclave Laboratory Autoclaves are complex pressure systems designed and built to special regulations and as such should only be serviced or maintained by properly...
Open the catalog to page 6
Priorclave Manual QCS-SH Issue 1 Maximum Relative Humidity of 85% at any temperature between 5oC and 40oC. Mains Supply Voltage Variations not exceeding +/-10% of that shown on the Serial Plate. Electromagnetic Interference This equipment has been designed to comply with the requirements for immunity from electromagnetic interference under normal conditions of use. Care should be taken when siting the equipment however, to avoid interference from potential extreme sources of interference such as MR scanners or x-ray equipment. Hazard Statement Electrical Hazard Stickers When this sticker has...
Open the catalog to page 7
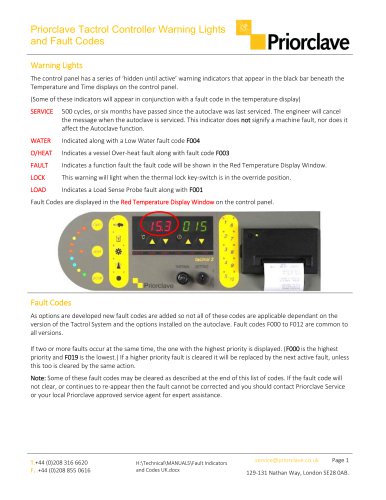
Priorclave Manual QCS-SH Issue 1 LAYOUT DIAGRAM Tactrol Reset Switch Location Entry Port Access Panel Location Locking Handle 12 Cycle Progress Display 1. Door Button & Indicator 2. Vent Button & Indicator 3. Start Button & Indicator 4. Option Setting Buttons & Indicators 5. Temperature Display & Setting Buttons Time Display & Setting Buttons Program Buttons & Indicators (Optional) Printer (Optional) Setting Lock Keyswitch (Optional) Thermal Lock Keyswitch Hidden ‘till lit fault display
Open the catalog to page 9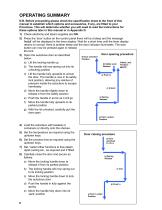
N.B. Before proceeding please check the specification sheet at the front of this manual to establish which options and accessories, if any, are fitted to your Priorclave. This will determine whether you will need to read the instructions for these options later in this manual or in Appendix D. 1) Check electricity and steam supplies are ON. 2) Press the ‘door’ button on the control panel there will be a bleep and the message ‘hoLd’ will be displayed in the timer display. Wait for a short time until the timer display returns to normal, there is another bleep and the door indicator illuminates....
Open the catalog to page 10
Priorclave Manual QCS-SH Issue 1 9) Wait a few seconds for the ‘start’ indicator to illuminate, and press the ‘start’ button to begin the cycle. Cycle Abort and Thermal Lock Override Aborting a cycle To abort the cycle at any stage press the ‘Start Button’ Thermal Lock Override First abort the cycle as above. After checking that there is no pressure within the autoclave turn the thermal lock key to the right hold it there. Press the ‘Door’ button once, keeping the thermal lock key held over. Wait during the ‘hoLd’ display until the ‘Door’ indicator illuminates. Keep the key held and press the...
Open the catalog to page 11
PREPARING YOUR PRIORCLAVE FOR USE FOR THE FIRST TIME Preparing your Priorclave for use Unpack the autoclave and check against the delivery note that all items ordered have been delivered. Any shortages or damage must be reported to Priorclave Limited within 7 days of delivery. Positioning The autoclave may be positioned flush to units, walls etc. on both sides, but a gap of at least 204mm (8”) must be left at the back of the machine to ensure the circulation of air and to provide a space for pipework and electrical connections. Room must be allowed at the side and front to allow the door to open...
Open the catalog to page 12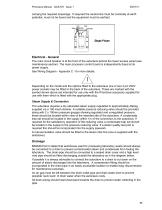
Priorclave Manual QCS-SH Issue 1 carrying the required amperage. If required the neutral line must be nominally at earth potential, must not be fused and the equipment must be earthed. Electrical - General The main circuit breaker is at the front of the autoclave behind the lower access panel (see maintenance section). The main processor control board is independently fused at its power supply. See Wiring Diagram - Appendix C - for more details. Depending on the model and the options fitted to the autoclave one or two 3 pin 230V power sockets may be fitted to the back of the autoclave. These...
Open the catalog to page 13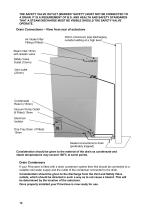
THE SAFETY VALVE OUTLET (MARKED ‘SAFETY’) MUST NOT BE CONNECTED TO A DRAIN. IT IS A REQUIREMENT OF B.S. AND HEALTH AND SAFETY STANDARDS THAT A STEAM DISCHARGE MUST BE VISIBLE SHOULD THE SAFETY VALVE OPERATE. Drain Connections – View from rear of autoclave Air Intake Filter Fitting (if fitted) 30mm (minimum) pipe discharging outside building at a high level Steam Inlet 15mm with isolator valve Safety Valve Outlet (15mm) Vent outlet (22mm) Condensate Return (15mm) Vacuum Pump Outlet (if Fitted) 15mm Electrical Isolator Drip Tray Drain (if fitted) 15mm Sealed connections to drain (preferably trapped)...
Open the catalog to page 14All Priorclave catalogs and technical brochures
 Compact Benchtop
2 Pages
 Autoclave Consumables
2 Pages
 Priorclave Laboratory Autoclaves
16 Pages
 z - Knowledge Bank
38 Pages
 ZQ63 Promo Sheet
1 Page
 ZQCSH Promo Sheet
1 Page
 Top Loading 100 150 & 200L
2 Pages
 Priorclave Autoclave Brochure
16 Pages
 Autoclave Pricelist
12 Pages
 RSV EH230/350 datasheet
2 Pages
 Pass Through Priorclave
1 Page
 QSC Front Loading Datasheet
2 Pages


- Sterilizer
- Steam sterilizer
- Benchtop sterilizer
- Automatic sterilizer
- Stainless steel sterilizer
- Laboratory sterilizer
- Front-loading autoclave
- Top-loading sterilizer
- Programmable sterilizer
- Microprocessor-controlled sterilizer
- Sterilizer with vacuum cycle
- Compact sterilizer
- Electrically heated sterilizer
- Research sterilizer
- High-capacity sterilizer
- Pass-through sterilizer
- Industrial sterilizer