
- Catalogs
- QT Medical
- QT ECG APP USER’S MANUAL

QT ECG APP USER’S MANUAL
QT ECG APP USER’S MANUAL
The QT ECG App is an integral part of the QT ECG system, compatible with most Apple and Android devices. Users should ensure they have the latest app version and verify device compatibility on the QT Medical website. Regular virus scans are advised.
Preparation for Use
Administrators without an account should consult the QT Cloud User Manual for registration. Users must log in with their credentials, and the app will maintain their login status for 15 days.
ECG Recording on Tablet
- Log in: Access the app and input login details.
- Input Patient Profile: Enter patient information or use 'Guest' mode for recording.
- Connect QT ECG Recorder: The app automatically searches for and pairs with available recorders. Users must select the correct recorder if multiple are found.
- Checking Lead-off: The app shows lead status, and users should follow troubleshooting tips if issues occur.
- Recording ECG Data: A live ECG stream is shown. Recordings are uploaded automatically when connected to the internet.
- Detaching the Device: Turn off and detach the recorder after use.
ECG Recording on Phone
The process is similar to tablet operations, with steps for logging in, inputting patient profiles, connecting the recorder, checking lead-off, recording data, and detaching the device.
Troubleshooting
- App Crashes: Ensure the latest app and OS versions are installed. Reboot the device if issues persist.
- Lead-off Warning: Ensure electrodes are properly attached and skin is clean. Adjust or replace electrodes if necessary.
- Low Battery Warning: Charge the recorder using the provided charger and cable.
- Signal Quality Issues: Wait 5-10 seconds before recording. Reset network settings if problems persist.
Customer Service Support
Contact QT Medical for further assistance if troubleshooting steps do not resolve issues.
Catalog excerpts
App Version: Android: V2.2.6 (Singapore) V2.3.2 (Other regions) iOS: V2.3.2 (Singapore) V2.5.7 (Other regions) Update Date: 07/29/2025
Open the catalog to page 1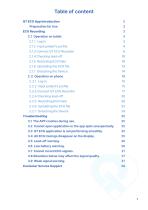
2.1.2 Input patient's profile 4 2.2.2 Input patient's profile 15 3.2 Cannot open application or the app quits unexpectedly. 25 3.3 QT ECG application is not performing smoothly. 25 3.4 All ECG tracings disappear on the display. 25 3.7 Cannot record ECG signals. 27 3.8 Situations below may affect the signal quality. 27 3.9 Weak signal warning. 27 Customer Service Support 28
Open the catalog to page 2
QT ECG App Introduction The QT ECG App is an integral part of the QT ECG system. It works with most Apple and Android-based mobile devices. Note : Always use the latest version of the QT ECG App. Check compatible devices and operating systems on the QT Medical Website. https://www.qtmedical.com/en-gb/compatibility Note : Run a virus scan regularly on your mobile device. Preparation for Use If you are the admin of the facility and you don’t have your account yet, please refer to the QT Cloud User Manual, “Chapter 1: New User Registration” to create the account; otherwise, please contact your facility...
Open the catalog to page 3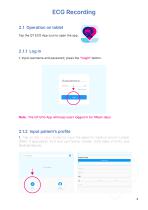
ECG Recording 2.1 Operation on tablet Tap the QT ECG App icon to open the app. 2.1.1 Log in 1. Input username and password, press the “Login” button. Note : The QT ECG App will keep users logged in for fifteen days. 2.1.2 Input patient’s profile 1. Tap on the “+ New ” button to input the p atient’s medic al record number (MRN, if applic able), First and Last Name, Gender, DOB (date of bir th), and Electrode Strip
Open the catalog to page 4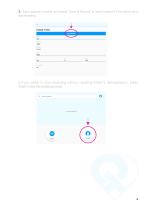
2. Input patient's profile and press "Save & Record" to save patient's information and start recording. 3. I f yo u p re fe r to s t a r t re c o rd i n g w i t h o u t i n p u tt i n g P a t i e n t ’s d e m o g r a p h i c s , p re s s “Guest” to start the recording process.
Open the catalog to page 5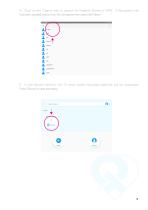
4. Click on the “Search bar” to search for Patient’s Name or MRN. If the patient info has been inputted before, their info will appear then select the Patient. 5. In the Recent section, the 10 most recent recorded p atients will be displayed. Press “Record” to start record
Open the catalog to page 6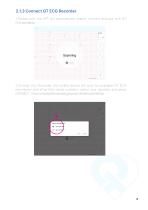
I.Please note, the APP will automatically search, connect and pair with QT ECG recorder(s). 2.Choose Your Recorder, the mobile device will scan for available QT ECG recorder(s) and show their serial numbers, select your recorder and press CONNECT. Once connected the recording process will start automatically.
Open the catalog to page 7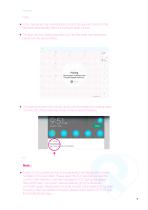
• In the case when only one Recorder is found, the app will connect to the Recorder automatically without showing its serial number. • The app will show pairing requests only if the Recorder has never been paired with the device before. • The pairing request may not pop up but can be revealed by swiping down from the top of the screen (as shown in the screenshot below). • If many ECG recorders are found, the application will display a list of serial numbers of ECG recorders. Please select the ECG recorder you want to connect. After selection, a prompt message for ECG pairing will appear. After...
Open the catalog to page 8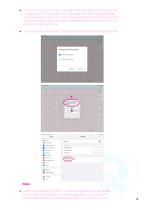
• If only one ECG recorder is found, the app will directly display the pairing prompt message of the ECG recorder. After confirmation, the system will automatically go to the Bluetooth connection page. Please select the serial number of the ECG machine for pairing. After successful connection, please switch back to QT ECG App from the Bluetooth page. • The app's pairing request will only appear when the ECG recorder is paired with • QT ECG has passed IEC 60601-1-2, but serious interference is still needed to be avoided. If the Bluetooth connection keeps failing, it may be due to environmental...
Open the catalog to page 9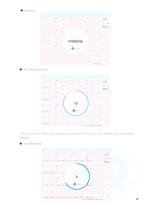
3.If you press “Redo” during the countdown from 10, it will restar t the recording process. New Recording
Open the catalog to page 10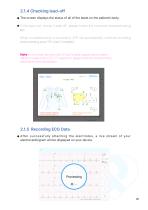
• The screen displays the status of all of the leads on the patient's body. • If the lead icon shows "Lead-off”, please follow the onscreen troubleshooting tips. When troubleshooting is successful, APP will automatically continue recording and processing, press "OK” when Completed. Note : In the Lead view, both the iOS and Android support users to select different modes (AHA or IEC). For layperson, please check the corresponding electrode for lead-off indication. • After successfully attaching the electrodes, a live stream of your electrocardiogram will be displayed on your device.
Open the catalog to page 11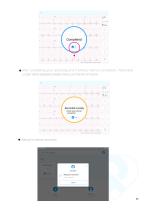
• After completing your recording and if without internet connection, "Recorded Locally” will be displayed, please check your internet connection. Recorded Locally Check your Internet connection • Waiting for internet connection
Open the catalog to page 12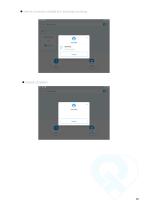
• Internet connection established. Uploading recordings. • Upload completed.
Open the catalog to page 13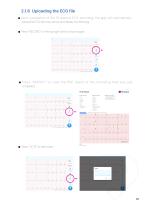
• Upon completion of the 10-second ECG recording, the app will automatically upload the ECG file to the server and display the following. • Press "RECORD” on the top right hand to record again. • Press "REPORT” to view the PDF report of the recording that was just completed. • Press "NOTE” to add notes.
Open the catalog to page 14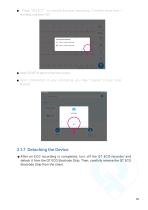
Press “SELECT” to choose the best recording, if there’s more than 1 recording, and press “OK”. Press “DONE” to return to the home screen. U p o n c o m p l e t i o n o f yo u r re c o rd i n g , yo u m ay “ L o g o u t ” o f yo u r U s e r Account. 2.1.7 Detaching the Device After an ECG recording is completed, turn off the QT ECG recorder and detach it from the QT ECG Electrode Strip. Then, carefully remove the QT ECG Electrode Strip from
Open the catalog to page 15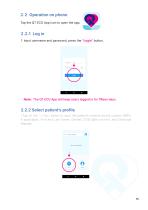
2.2 Operation on phone Tap the QT ECG App icon to open the app. 2.2.1 Log in 1. Input username and password, press the “Login” button. Note : The QT ECG App will keep users logged in for fifteen days. 2.2.2 Select patient’s profile 1.Tap on the “+ New” button to input the patient’s medical record number (MRN, if applicable), First and Last Name, Gender, DOB (date of bir th), and Electrode Strip
Open the catalog to page 16All QT Medical catalogs and technical brochures
 QT ECG RECORDER USER’S MANUAL
42 Pages
 QT ECG
2 Pages
 QT ECG RECORDER USER’S MANUAL
42 Pages
 QT ECG Troubleshooting
29 Pages


- ECG cable
- EKG
- Digital electrocardiograph
- 12-channel electrocardiograph
- Monitoring ECG electrode
- Wireless electrocardiograph
- Mobile application
- Disposable ECG electrode
- Pad ECG electrode
- Medical ECG cable
- 10-wire ECG cable
- Smartphone mobile application
- Chest ECG electrode
- Reusable ECG cable
- IOS mobile application
- Android mobile application
- Bluetooth electrocardiograph
- Tablet-based electrocardiograph
- Upper limb ECG electrode