


- Company
- Products
- Catalogs
- News & Trends
- Exhibitions
Stridalyzer INSIGHT Quick Guide

Stridalyzer INSIGHT Quick Guide
- Download the Stridalyzer INSIGHT app from the iOS app store.
- Register or log in to your account.
- Charge the insoles for 2-3 hours; a red LED indicates charging.
- Solid Blue LED: Device is idle and ready to connect.
- Blinking Green LED: Device is connected to the app.
- Blinking Red LED: Battery is below 30%; cannot connect if below 15%.
- No LED: Device is off.
- Solid Red LED: Device is charging.
- Reset insoles upon first use by pressing the marked area.
- Start the app and pair insoles via Bluetooth.
- For future use, the app will automatically connect to paired insoles.
- Insert insoles into shoes and enter user information in the app.
- Access live analysis by selecting the activity type and tapping 'Analyse'.
- Stop analysis with the 'STOP' button; data is saved to the cloud.
- View analysis reports and remove unwanted segments.
- Contact support if you encounter a 'NO CREDITS' message.
- Access detailed analysis on the web portal.
For help, contact [email protected] or use the app's 'Feedback' page.
Catalog excerpts

Stridaliizer INSIGHT Insoles Quick-Start Guide One Time Set Up l. Download the Stridalyzer INSIGHT app on your iOS device from the app store. 3.Charge Insoles for 2-3 hours and disconnect charging cables carefully. The red LED will glow indicating that the device is getting charged. 1. [First Time Usage] When you receive the insoles, please RESET the insoles by pressing hard on the area marked with a WHITE spot or ■■RESET". This helps restore LED functionality, which is turned off to save power while the product is in transit. 3. [First-Time Usage] Pair your insoles to the App: a. Tap insoles to turn the insole Bluetooth pairing process on. b. If insole does not start pairing (Blue light on the front does not turn on), just press the "Manual Pairing" button, c. Touch corresponding insole icon on app, to pair. Repeat for the other foot. 4. [Future Usage] Once paired, the app will look for those specific insoles, tap the insoles and get connected automatically. 5. The insole should now be connected to the apf and the battery level should be displayed on top. Insert insoles into your shoes now. 6. Go to the User Information page by clicking "Continue with devices" button. User need to enter all the required information.
Open the catalog to page 1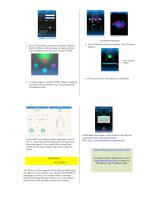
. 7. Go to live analysis screen by tapping “Analyse” button. Before starting analysis, select activity type. By default activity type will be STAND. 9. Go to Analysis report by tapping “View Analysis” button. View Analysis Button 10. The summary of the analysis is displayed. 8. To stop analysis, tap the “STOP” button. Analysis summary will be saved to our cloud back-end for future access. If you don’t care about certain segments, tap on the “X” mark next to the segment to remove that from the report. If you would like to email the report to the client/patient, tap “Send report to Client”. 11.Detailed...
Open the catalog to page 2All ReTiSense catalogs and technical brochures
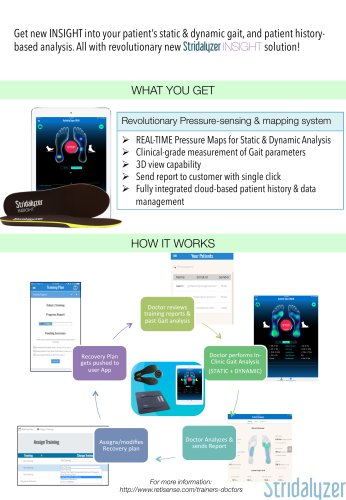
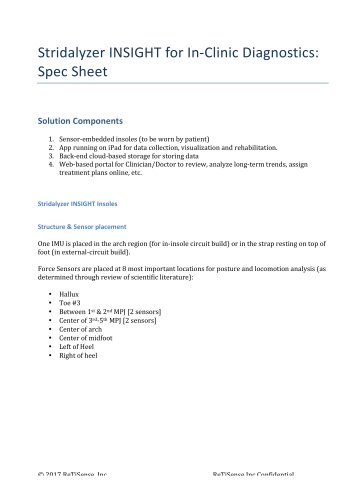
 Stridalyzer INSIGHT Brochure
5 Pages

- 3D scanner
- STL 3D scanner
- Physical capacity evaluation system
- Baropodometry plateform
- PLY 3D scanner
- Portable baropodometry plateform
- Posture evaluation system
- Structured light 3D scanner
- Hand-held 3D scanner
- Medical industry 3D scanner
- Gait evaluation system
- Wearable physical capacity evaluation system
- Barometric analysis physical capacity evaluation system
- IOS 3D scanner
- Orthoses manufacturing 3D scanner