
- Catalogs
- Rifton Equipment LLC
- TRAM Quick Reference Guide

TRAM Quick Reference Guide
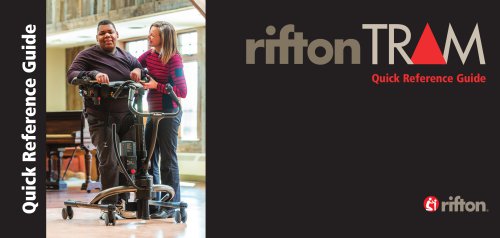
TRAM Quick Reference Guide
The Rifton TRAM is a versatile transfer and mobility device designed to reduce caregiver lifting, minimize back strain, and enhance client safety and dignity. This guide provides essential operating guidelines and techniques, supplementing the Product Manual, which must be read and understood by all caregivers before use.
Importance of Proper Positioning
Proper positioning of thigh straps and other components is crucial for client comfort and security during transfers. Initial transfers should be done slowly to adjust straps and supports for future ease and safety.
Key Components of the TRAM
The TRAM includes body support pads with color-coded clips, an expansion handle, arm supports, thigh straps, a swivel lock, a scale, and an up/down switch. A third thigh strap can be used as a seat strap for additional support.
Seated Transfer Procedure
1. Prepare the wheelchair and adjust the TRAM's base frame.
2. Adjust body support straps according to the client's size.
3. Attach thigh straps to the body support.
4. Position the TRAM around the client's rib cage.
5. Secure buckles and tighten straps.
6. Slide thigh straps under the client's legs.
7. Adjust straps to form a 90° angle with the client's trunk.
8. Unlock brakes and raise the client.
9. Move the client to the destination.
10. Lower the client gently and remove straps.
11. Release buckles and move the TRAM away.
Toileting with the TRAM
Various methods are available for toileting with the TRAM, with specific strap configurations for different client sizes.
Sit-to-Stand or Walking
1. Adjust pelvic support straps to full length.
2. Position the pelvic support under the client.
3. Lower the client onto the pelvic support and remove thigh straps.
4. Attach pelvic support rings to body support clips.
5. Tighten straps and raise the client.
6. Adjust supports for comfortable walking.
Arm Supports
Arm supports are adjustable for height, pad position, and handhold position to accommodate various needs. They provide additional support during transfers and ambulation.
Scale and Gait Tracker
The TRAM scale measures client weight and weight-bearing during ambulation. The Gait Tracker app displays weight data and tracks weight-bearing capability over time.
Caster Swivel Locks
Swivel locks control TRAM movement by preventing casters from swiveling, aiding in stability and directional control during transfers and gait training.
Conclusion
The Rifton TRAM enhances client mobility and dignity. Understanding and implementing its functions can significantly impact clients' lives.
Catalog excerpts

Quick Reference Guide riftonTR M Quick Reference Guide
Open the catalog to page 1
Page The Rifton TitleTRAM Quick Reference Guide Importance of Proper Positioning Seated Transfer Toileting with the TRAM The Rifton TRAM is a simple and versatile transfer and mobility device. With proper use it can eliminate caregiver lifting, reduce back strain and workplace injuries, and give dignity and safety to the client. This Quick Reference Guide provides basic operating guidelines, focusing on core functionality and key techniques. It is a supplement to the Product Manual, not a replacement. Before operating the TRAM, all caregivers must read and understand the Product Manual. TIP:...
Open the catalog to page 2
The Importance of Proper Positioning How to get it right the first time Go slow the first time. Explain to your client that in the course of the transfer some adjustments may be needed to find the best configuration of the straps and supports, and that this will make future transfers quick, easy and safe. Try to win the client’s trust before beginning your first transfer. Sometimes it may soothe an anxious client to watch a caregiver or someone else being transferred in the TRAM first. The key to success is the proper positioning of thigh straps and other components to help the client feel balanced,...
Open the catalog to page 3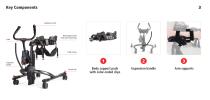
Up/down switch Body support pads with color-coded clips Thigh straps Expansion handle Swivel lock Body support pads with color-coded clips Expansion handle
Open the catalog to page 4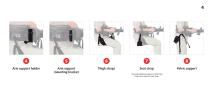
Arm support mounting bracket Thigh straps Seat strap Pelvic support To provide additional support a third thigh strap can be used as a seat strap.
Open the catalog to page 5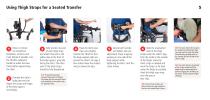
Using Thigh Straps for a Seated Transfer Move or remove the wheelchair footplates, armrests and trunk laterals if possible. Use the TRAM’s expansion handle to widen the base frame before approaching the client. Evaluate the client’s body type and size. Adjust the straps and height of the body support accordingly. Fully shorten one end of each thigh strap and attach that end to the yellow clips at the front of the body support, gray side facing the client. The other ends of the thigh straps should be fully lengthened. outward movement of thighs, the straps can be crossed in front and attached...
Open the catalog to page 6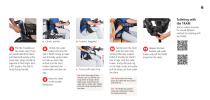
6 Toileting with the TRAM See our online resources for several different methods for toileting with the TRAM: a. Correct position Pull the T-handles on the straps snug. If you can stand behind the client, pull them both evenly at the same time. Straps should be adjusted so that thighs form a 90° angle to the client’s trunk during transfer. Unlock the caster brakes and raise the client. Watch closely to make sure the body support does not ride up under their armpits and the client remains balanced and comfortable and does not sag. Gently lower the client onto the chair. Stop lowering the body...
Open the catalog to page 7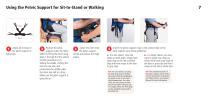
©Adjust all 4 straps of the pelvic support to full length. support under the client, either by lifting the client using steps 1 through 8 of the seated transfer procedure or by folding the saddle, shifting the client to one side, and positioning the saddle under the client one half at a time. Make sure the pelvic support is gray side up. ©Lower the client onto the pelvic support. Unclip and remove the thigh straps. ©Attach the pelvic support ri body support using these g a. For slim clients, cross the straps on both sides. Attach back strap rings to the red or yellow clips and front straps to...
Open the catalog to page 8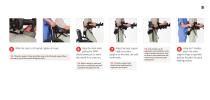
While the client is still seated, tighten all straps. TIP: The pelvic support straps should be snug so that the body support does not ride up on the torso when lifting the client. TIP: Arm prompts can be adjusted to accommodate a wide range of positioning needs. Here we show a client positioned with arms forward to promote good walking form. ©Raise the client while pulling the TRAM slowly toward you to mimic the natural sit-to-stand arc. TIP: Watch closely to make sure the client is comfortable and well supported throughout the lift. ©Adjust the body support height and other supports so the client...
Open the catalog to page 9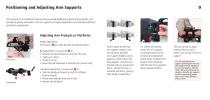
Arm prompts or arm platforms may be used to provide additional support during transfer, and positioning during ambulation. The arm supports are highly adjustable to accommodate different positioning requirements. Adjusting Arm Prompts or Platforms Height Adjustment: Press button 3and slide the post to desired position Pad adjustment: Loosen knob 3to: • Slide the arm pad toward or away from the user • Move the pad backward or forward (arm prompt only) Handhold adjustment: Loosen knob 3to: • Slide the handhold forward or back for different forearm lengths • Rotate the handhold from side to side...
Open the catalog to page 10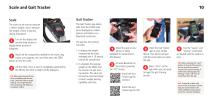
Scale and Gait Tracker ©Attach all the components needed for the client, (leg straps, arm supports, etc.) and then press the ZERO button to zero the scale. ©Lift the client. Once a client is completely supported by the TRAM, the client's weight will be displayed. Scale The scale can be used to measure a client's weight, and to measure the weight a client is bearing during ambulation. OTurn on the display and use the lb/kg button to display either pounds or kilograms. TIP: When gait training, lift the client completely and zero the scale. Lower the client to begin walking. The weight that the...
Open the catalog to page 11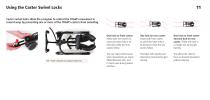
Using the Caster Swivel Locks Caster swivel locks allow the caregiver to control the TRAM’s movement in several ways by preventing one or more of the TRAM’s casters from swiveling. TIP: “Front” indicates the caregiver handle end. One lock on front caster: allows both rear casters to swivel and steer fully in all directions while the front casters follow. One lock on rear caster: allows both front casters to swivel and steer fully in all directions while the rear casters follow. One lock on front caster and one lock on rear caster: TRAM will track in a straight line during gait training. This...
Open the catalog to page 12
You will make a difference. The Rifton TRAM is designed to give clients the gift of mobility and restore their personal dignity. By understanding and implementing the basic functions outlined in this guide, you will now make this possible – and you may change someone’s life.
Open the catalog to page 13All Rifton Equipment LLC catalogs and technical brochures
 Adaptive Tricycle Brochure
8 Pages
 HTS Quick Reference Guide
5 Pages
 Adaptive Desk Brochure
6 Pages
- Chair with armrests
- Shower chair
- Medical chair
- Patient chair
- Shower chair with backrest
- Reclining patient chair
- Grab bar
- Walking aid
- Manual medical chair
- Commode chair
- Manual patient chair
- Patient chair on casters
- Shower chair with footrest
- Height-adjustable mobility walker
- Rectangular desk
- Height-adjustable shower chair
- Patient chair with adjustable backrest
- Handisport
- Stander
- Commode chair with bucket