- Catalogs
- RISystem AG
- RatFix
- Company
- Products
- Catalogs
- News & Trends
- Exhibitions
RatFix
1 /15Pages
RatFix
1 /15Pages
Catalog excerpts

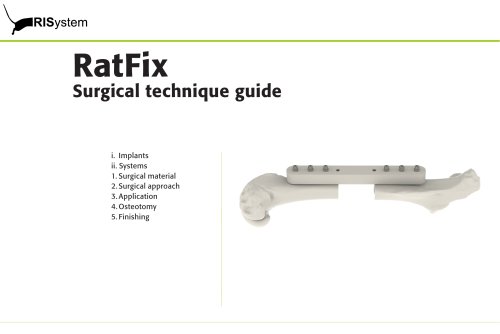
Surgical technique guide i. Implants ii. Systems 1. Surgical material 2. Surgical approach 3. Application 4. Osteotomy 5. Finishing
Open the catalog to page 1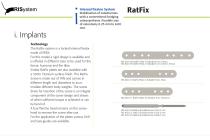
Internal fixaton System Stabilisation of osteotomies with a conventional bridging osteosynthesis. Possible size of osteotomy 0.25 mm to 6.00 mm. i. Implants Technology The RatFix system is a locked internal fixator made of PEEK. For this model a rigid design is available and is offered in different sizes to be used for the femur, humerus and the tibia. Similar RatFix plates are also available with a 50nm Titanium surface finish. The RatFix Screw is made out of TAN and comes in different length and diameters to accomodate different body weights. The screw driver for insertion of the screw is an...
Open the catalog to page 2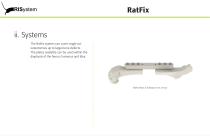
RatFix ii. Systems The RatFix system can cover single cut osteotomies up to large bone defects. The plates available can be used within the diaphysis of the femur, humerus and tibia. RatFix Plate, 8 hole@23 mm, Femur
Open the catalog to page 3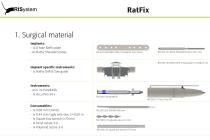
RatFix 1. Surgical material Implants: - 1x 8 hole RatFix plate - 6x RatFix ShoulderScrews RIS.602.100 RatFix Plate, 8 hole@23 mm, Femur RIS.302.106 RatFix Drill- & Saw guide 6 mm@23 mm Implant specific instruments: - 1x RatFix Drill-& Saw guide Instruments: - min. 2x HandDrills - 1x Accu Pen 6V+ Consumables: - 1x 0.68 mm Drill bit - 1x 0.44 mm Gigly wire saw, L= 0.50 m - 1x Square box wrench 0.70 mm - 1x Vicryl suture 3-0 - 1x Polyamid suture 3-0
Open the catalog to page 4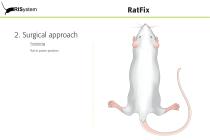
RatFix 2. Surgical approach Positioning Rat in prone position.
Open the catalog to page 5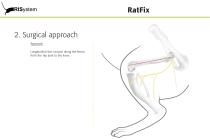
RatFix 2. Surgical approach Approach Longitudinal skin incision along the femur from the hip joint to the knee.
Open the catalog to page 6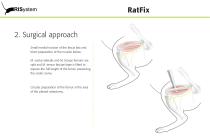
RatFix 2. Surgical approach Small medial incision of the fascia lata and blunt preparation of the muscle below. M. vastus lateralis and M. biceps femoris are split and M. tensor fasciae latae is lifted to expose the full length of the femur preserving the sciatic nerve. Circular preparation of the femur at the area of the planed osteotomy.
Open the catalog to page 7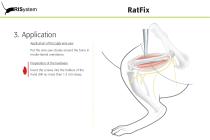
RatFix 3. Application Application of the Gigly wire saw Put the wire saw closely around the bone in medio-lateral orientation. Preparation of the hardware Insert the screws into the holders of the hand drill no more than 1-2 mm deep.
Open the catalog to page 8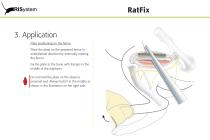
RatFix 3. Application Plate positioning on the femur Place the plate on the prepared femur in anterolateral direction by externally rotating the femur. Fix the plate to the bone with forceps in the middle of the diaphysis. Do not hold the plate on the distal or proximal end. Always hold it in the middle as shown in the illustration on the right side.
Open the catalog to page 9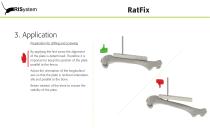
RatFix 3. Application Preparation for drilling and screwing By applying the first screw the alignment of the plate is determined. Therefore it is important to keep the position of the plate parallel to the femur. Adjust the orientation of the longitudinal axis so that the plate is reclined anterolaterally and parallel to the bone. Retain rotation of the bone to ensure the stability of the plate.
Open the catalog to page 10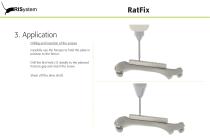
RatFix 3. Application Drilling and insertion of the screws Carefully use the forceps to hold the plate in position to the femur. Drill the first hole (1) distally to the planned fracture gap and insert the screw. Shear off the drive shaft.
Open the catalog to page 11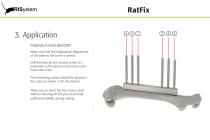
RatFix 3. Application Sequence of screw placement Make sure that the longitudinal allignement of the plate to the bone is correct. Drill the hole for the second screw (2) proximally to the planned osteotomy and insert the screw. The remaining screws should be placed in the order as shown in the illustration. Make sure to insert the last screws (5,6) without shearing off the pins to provide additional stability during sawing.
Open the catalog to page 12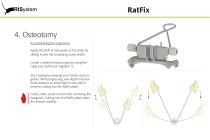
RatFix 4. Osteotomy Accomplishing the osteotomy Apply the Drill- & Saw guide to the plate by sliding it over the remaining screw shafts. Create a defined fracture gap by using the Gigly saw (sufficient irrigation !). Start sawing by keeping your hands close together. With progressing saw depth increase hand distance to avoid high forces and to prevent cutting into the RatFix plate. Finish under visual control after removing the sawguide. Cutting into the RatFix plate alters the fixation stability.
Open the catalog to page 13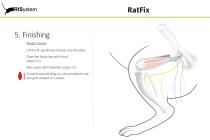
RatFix 5. Finishing Wound closure Lift the M. quadriceps loosely over the plate. Close the fascia lata with Vicryl suture 3-0. Skin suture with Polyamid suture 3-0. To avoid wound biting it is also possible to use skin glue instead of a suture.
Open the catalog to page 14
RatFix Hazards and legal restrictions Scientific editor: Illustrations: Design and layout: In collaboration with: Hazards Katharina Schmidt-Bleek, Germany Agnes Ellinghaus, Germany Sandra Wissing, Switzerland Romano Matthys, Switzerland Julius Wolff Institut and Center for Musculoskeletal Surgery Charité-Universitätsmedizin Berlin, Germany Great care has been taken to maintain the accuracy of the information contained in this publication. However, the publisher, and/or the distributor, and/or the editors, and/or the authors cannot be held responsible for errors or any consequences arising from...
Open the catalog to page 15All RISystem AG catalogs and technical brochures
 MouseNail
27 Pages
 MouseScrew
16 Pages
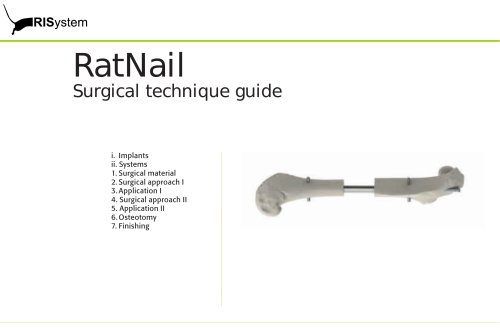 RatNail
25 Pages
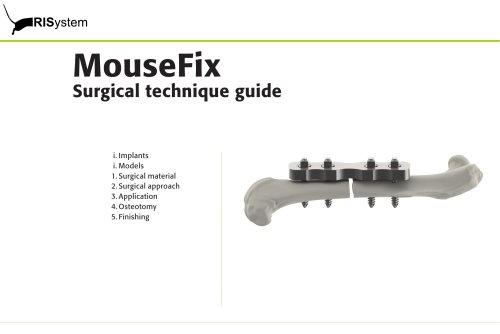 MouseFix
17 Pages
- Veterinary instrument kit
- Compression veterinary orthopedic screw
- Veterinary bone plate
- Orthopedic surgery veterinary instrument kit
- Tibia veterinary bone plate
- Mice veterinary bone plate
- Rat veterinary bone plate
- Small animal veterinary instrument kit
- Veterinary intramedullary nail
- Femur veterinary intramedullary nail
- Femur veterinary bone plate
- Humerus veterinary bone plate
- Veterinary external fixator
- Femur veterinary external fixator