
- Catalogs
- RWD Life Science
- RWD How To Handle Caenorhabditis Elegans Microinjection Don’t Miss The Step-by Step Details!


- Company
- Products
- Catalogs
- News & Trends
- Exhibitions
RWD How To Handle Caenorhabditis Elegans Microinjection Don’t Miss The Step-by Step Details!

RWD How To Handle Caenorhabditis Elegans Microinjection Don’t Miss The Step-by Step Details!
Caenorhabditis elegans (C. elegans) is a widely used model organism in genetic, ontogeny, and ethology studies. Microinjection is a core technique for introducing nucleic acids into the worm's gonad, facilitating studies on gene expression and function.
Microinjection Workflow
The process involves several key steps: preparation of agar plates, needle preparation, DNA preparation, needle breaking, worm mounting, microinjection, and worm recovery.
Step-by-Step Protocol
- Preparation of Agar Plates: Use a 2% hot agarose solution to create a flat agar surface on a glass coverslip. Allow it to dry overnight or bake at 80℃ for an hour.
- Preparation of Needles: Utilize an RWD micropipette puller to create needles with a tip diameter of 1μm and a cone length of 5-7mm.
- DNA Preparation: Choose appropriate substances for the stock solution, ensuring high purity to enhance injection efficiency. Fill the needle-loading pipette carefully to avoid air bubbles.
- Breaking the Needle: Break the needle tip by pressing it against the edge of a glass slide, allowing easy penetration into the worm.
- Mounting Worms: Select young gravid worms, position them on the agar plate, and cover with halocarbon oil.
- Microinjection: Use a microscope to focus on the gonad and insert the needle using an RWD Micromanipulator. Start the injection with an RWD Nanoliter Microinjection Pump.
- Worm Recovery: Add buffer solution to the injected worm and observe for activity resumption before transferring back to culture plates.
Precautions
- Agar Plates: Ensure the correct moisture level to prevent worm death or improper adhesion.
- Substances for Injection: Maintain DNA concentration below 200mg/L to avoid toxicity and gene overexpression.
- Injection Orientation: Position the needle at a sharp angle to the gonad for optimal results.
- Sample Health: Ensure worms are well-fed and healthy before injection.
- High Death Rate: Adjust needle size or injection technique if recovery time is abnormal or no transgenic worms are produced.
References
Key references include works by Matthias Rieckher and Nektarios Tavernarakis (2017) and Krishna S. Ghanta et al. (2021) on C. elegans microinjection techniques.
Catalog excerpts
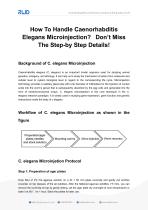
How To Handle Caenorhabditis Elegans Microinjection? Don’t Miss The Step-by Step Details! Background of C. elegans Microinjection Caenorhabditis elegans (C. elegans) is an important model organism used for studying animal genetics, ontogeny, and ethology. It can help us to study the mechanism of action from molecular and cellular level to system biological level in regard to the corresponding life cycle. Microinjection technology provides a capillary glass tube with a tip diameter of millimeters for the injection of nucleic acids into the worm’s gonad that is subsequently absorbed by the egg cells and generated into the form of extrachromosomal arrays. C. elegans microinjection is the core technique in the C. elegans research paradigm. It is widely used in studying gene expression, gene function and genetic interactions inside the body of c elegans. Workflow of C. elegans Microinjection as shown in the figure C. elegans Microinjetion Protocol Step 1: Preparation of agar plates Drop 50ul of 2% hot agarose solution on a 24 × 60 mm glass coverslip and gently put another coverslip on top (beware of the air bubbles). After the flattened agarose solidifies (~5 min), you can remove the coverslip on top by gently sliding. Let the agar plate dry overnight at room temperature or bake it at 80℃ for 1 hour. Stack the plates for later use.
Open the catalog to page 1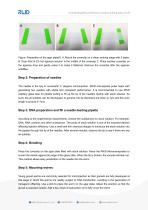
Figure: Preparation of the agar plate[1]. A. Mount the coverslip on a clean working stage with 2 tapes. B. Drop 50ul of 2% hot agarose solution in the middle of the coverslip C. Place another coverslip on the agarose drop and gently press it to make it flattened. Remove the coverslip after the agarose solidifies. Step 2: Preparation of needles The needle is the key to successful C. elegans microinjection. RWD micropipette puller helps with generating two needles with stable and consistent performance. It is recommended to use RWD capillary glass tube for pipette pulling to fill up the tip of...
Open the catalog to page 2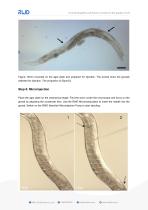
Figure: Worm mounted on the agar plate and prepared for injection. The arrows show the gonads selected for injection. The proportion is 50μm[1]. Step 6: Microinjection Place the agar plate on the mechanical stage. Find the worm under the microscope and focus on the gonad by adjusting the condenser lens. Use the RWD Micromanipulator to insert the needle into the gonad. Switch on the RWD Nanoliter Microinjection Pump to start injecting.
Open the catalog to page 3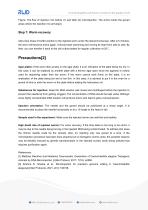
Figure: The flow of injection mix before (1) and after (2) microinjection. The arrow marks the gonad areas where the injection mix arrives[2]. Step 7: Worm recovery Add a few drops of buffer solution to the injected worm under the stereomicroscope. After 2-5 minutes, the worm will become active again. It should start swimming and moving its head from side to side. By then, you can transfer it back to the cell culture plates for regular cultivation at 20℃. Precautions[2] Agar plates: If the worm dies quickly on the agar plate, it is an indication of the plate being too dry. In this case, it can...
Open the catalog to page 4Archived catalogs
 RWD Surgical Instruments
18 Pages
 RWD Infusion imager RFLSI Ⅲ
2 Pages
 RWD Rotating impactor 68099Ⅱ
2 Pages
 RWD Syringe Pump R462
1 Page
 Rotary Microtomes S710
2 Pages
 RWD Veterinary medical equipment
32 Pages
 RWD Microcentrifuge M1324R
2 Pages
 RWD Osmotic infusion Pump
2 Pages
 RWD Gradient Thermal Cycler
2 Pages
 2015 Product Catalogue
44 Pages
 PRODUCT CATALOGUE 2017
51 Pages



- Medical dolly
- Detection kit
- Logistics trolley
- RWD surgery forceps
- RWD grasping forceps
- Laboratory incubator
- Medical kit
- Cannula
- Laboratory centrifuge
- Compound microscope
- Benchtop centrifuge
- Patient monitor
- Stainless steel forceps
- Laboratory microscope
- Dental treatment unit
- RWD straight forceps
- Cytology reagent
- Desktop microscope
- Blood centrifuge