
Catalog excerpts

Scanning Probe Microscope
Open the catalog to page 1
Scanning Probe Microscope SPM-9700HT Making the Unknown Visible Scanning probe microscope (SPM) is a generic term for microscopes that scan sample surfaces with an extremely sharp probe to observe their three-dimensional image or local properties at high magnifications. The SPM-9700HT takes high-throughput observations to the next level.
Open the catalog to page 2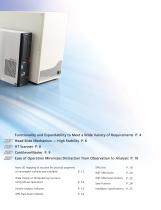
Functionality and Expandability to Meet a Wide Variety of Requirements P. 4 Head-Slide Mechanism — High Stability P. 6 HT Scanner P. 8 CantileverMaster P. 9 Ease of Operation Minimizes Distraction from Observation to Analysis P. 10 Nano 3D mapping to visualize the physical properties of nanoregion surfaces and interfaces SPM Unit WET-SPM Series WET-SPM Series Options Wide Variety of 3D Rendering Functions Using Mouse Operations Particle Analysis Software Installation Specifications SPM Data Room Website
Open the catalog to page 3
Functionality and Expandability to Meet a Wide Range of Requirements ■ indicates standard specification. □ indicates optional specification. Other special orders are also accepted. For more information, contact your Shimadzu representative. ■Contact Mode ■Dynamic Mode ■Phase Mode ■Lateral Force (LFM) Mode ■Force Modulation Mode □Surface Potential (KFM) Mode □Magnetic Force (MFM) Mode ■Force Curve □Nano 3D Mapping □Vector Scanning (special ord
Open the catalog to page 4
□Mid-range scanner (30μm Scanner) □Petri Dish Type Solution Cell (Special order) □High Magnification Optical Microscope Unit □Particle Analysis Software □Narrow Range Scanner Unit (2.5μm Scanner) □Electrochemical Solution Cell □Optical Microscope Unit with CCD □Desk-Type Air-Spring Vibration Damper □Deep-Type Scanner Unit (55μm Scanner) □Wide Range Scanner Unit (125μm Scanner) □Optical Microscope Unit □Active Vibration Damper □Active Vibration Damper with a Stand □Fiber Light □Cantilever mounting jig □Static Eliminator □Environment Controlled Chamber CH-II (without TMP) □Environment...
Open the catalog to page 5
Head-Slide Mechanism — High Stability Allows Sliding the Entire Optical Lever System as a Single Unit, While Maintaining High Rigidity. ・The laser remains stable and irradiates the cantilever even while replacing samples. ・Design is resistant to vibration, noise, wind, and other external disturbances, so a specialized enclosure is not necessary. ・The main unit includes a built-in vibration isolator. Right Side View (actual size) Secret to the High Stability of the SPM-9700HT Remarkable Mechanism Maintains High Performance —Comparison of Stability for Different Laser Irradiation— SPM-9700HT...
Open the catalog to page 7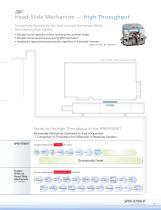
Head-Slide Mechanism — High Throughput Successfully Opened Up the Area Around the Sample While Maintaining High Rigidity ・Samples can be replaced without removing the cantilever holder. ・Samples can be accessed even during SPM observation. ・Samples are approached automatically, regardless of thesample thickness. (Japanese Patent No. 2833491) Left Side View (actual size) Secret to the High Throughput of the SPM-9700HT Remarkable Mechanism Optimized for Ease of Operation —Comparison of Throughput for Differences in Replacing Samples— SPM-9700HT Samples Replaced by Slide head Slide head back...
Open the catalog to page 8
High-Throughput Scanner Shortens Observation Times Due to the new deveopled HT scanner that achieves a high-speed response and optimizing softwares and the design of control system, aquisition of the image data is now available at a speed of conventional than 5 times or more (our ratio). HT scanner Maximum scanning range (X, Y, Z): 10 µm × 10 µm × 1 µm Existing model The scanner can easily be replaced so existing scanners can be used. The HT scanner can also be added to an existing SPM-9700 unit to enable high-throughput observation. Analysis Example ・Surface Roughness Analysis of a...
Open the catalog to page 9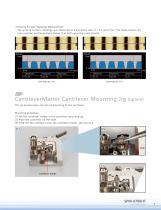
・Grating Surface Topology Measurement The grating surface topology was observed at a scanning rate of 1 Hz and 5 Hz. The measurement by cross-section profile analysis shows that both give the same results. CantileverMaster Cantilever Mounting Jig This jig ensures easy and secure mounting of the cantilever. Mounting procedure: (1) Set the cantilever holder in the cantilever mounting jig. (2) Place the cantilever on the slide. (3) Slide the the cantilever onto the cantilever holder, and secure it. SPM-9700HT Scanning Probe Microscope
Open the catalog to page 10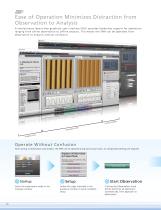
Ease of Operation Minimizes Distraction from Observation to Analysis A re v o l u t i o n a r y l a y o u t - f re e g r a p h i c a l u s e r i n t e r f a c e ( G U I ) p ro v i d e s b o rd e r l e s s s u p p o r t f o r o p e r a t i o n s r a n g i n g f ro m o n l i n e o b s e r v a t i o n t o o ff l i n e a n a l y s i s . T h i s m e a n s t h e S P M c a n b e o p e r a t e d f ro m observation to analysis without confusion. Operate Without Confusion From startup to observation and analysis, the SPM can be operated using only mouse clicks; no complicated settings are required 1...
Open the catalog to page 11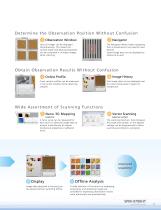
Determine the Observation Position Without Confusion 1 Observation Window Up to 8 images can be displayed simultaneously. This means the surface shape and physical properties can be compared in multiple images, while scanning. 2 Navigator The Navigator allows freely navigating from a broad area to any specific area desired. Saved image data can be displayed as reference as well. Obtain Observation Results Without Confusion 4 Image History 3 Online Profile Cross-section profiles can be measured in the online window while observing samples. Past image data can be displayed next to current...
Open the catalog to page 12
Visualizing the Physical Properties of Nano-Regions on Surface or Interface T h e p h y s i c a l p ro p e r t i e s o f e x t e r n a l o r b o u n d a r y s u r f a c e s c a n b e e v a l u a t e d b y m e a s u r i n g t h e f o rc e a c t i n g o n a s c a n n i n g p ro b e m i c ro s c o p e c a n t i l e v e r p ro b e a s i t s d i s t a n c e f ro m t h e s a m p l e i s v a r i e d ( f o rc e c u r v e m e a s u re m e n t ) . The adhesive force and Young's modulus can be evaluated at a specific target location by measuring the force curve at that point (point analysis). By...
Open the catalog to page 13All Shimadzu catalogs and technical brochures
-
RADspeed Pro EDGE
5 Pages
-
UV-1900i
4 Pages
-
LCMS-9030
12 Pages
-
LCMS-8050
20 Pages
-
LCMS-8045
12 Pages
-
XRD-6100
32 Pages
-
EDX-LE
16 Pages
-
PDA-8000
16 Pages
-
AA-6200
12 Pages
-
UV-3600i Plus
20 Pages
-
SALD-2300
20 Pages
-
IG-1000 Plus
16 Pages
-
DSC-60 Plus Series
8 Pages
-
TOC process analysis
16 Pages
-
MB140
4 Pages
-
GC Column Guidebook
48 Pages
-
ATX/ATY Series
6 Pages
-
MOC63u
2 Pages
-
MOC-120H
4 Pages
-
MOC63u
8 Pages
-
UW/UX Series
4 Pages
-
Application Handbook Clinical
140 Pages
-
New products 1
1 Pages
-
New products
1 Pages
-
BL series
2 Pages
-
BW-K/BX-K
2 Pages
-
TX/TXB/TXC Series
8 Pages
-
HMV- 2 brochure
8 Pages
-
AutographA G - XSeries
20 Pages
-
Solutions Brochure
24 Pages
-
PSSM - 8 System
8 Pages
-
MOC-120H
4 Pages
-
AUW-D / AUW / AUX / AUY
8 Pages
Archived catalogs
-
MOC63U Flyer
2 Pages
-
ATX/ATY Series_2013
4 Pages
-
UW/UX Series
4 Pages
-
SALD-7101
16 Pages
-
MOC63U
6 Pages


