6Runner 10

6Runner 10
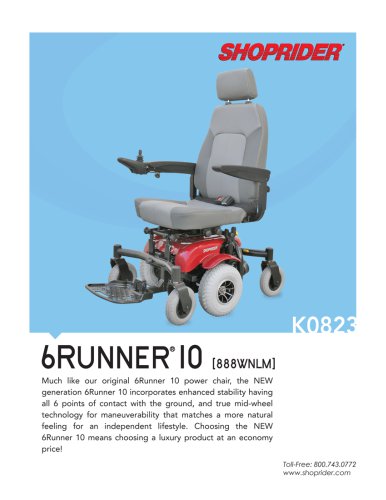
The 6Runner 10 Powerchair by Shoprider is designed for style and comfort, featuring articulating double frames for better maneuverability, a programmable joystick controller, and a deluxe reclining captain seat. This manual provides essential safety and operational instructions.
Electromagnetic interference (EMI) from sources like radio and TV stations can affect the powerchair's operation, potentially causing unintended movement or brake release. Users should avoid operating hand-held transceivers near the powerchair and report any incidents of unintended movement.
Key safety guidelines include reading the manual before use, avoiding erratic joystick movements on inclines, not exceeding weight limits, and ensuring the powerchair is not used in freewheel mode. Users should also avoid wet conditions and ensure batteries are fully charged before use.
The powerchair includes adjustable headrests and armrests, a VR2 or Shark joystick, a deluxe reclining seat, and easy battery access. The joystick controller features buttons for power, speed adjustment, and a horn, along with a battery gauge and charging port.
The joystick controls speed and direction, with additional features like a locking mechanism to prevent unauthorized use and a sleep mode for energy conservation.
Specifications include dimensions, weight capacity, and battery requirements. The 6Runner 10 has dimensions of 42” x 23” x 46.4”, a maximum user weight of 300 lbs, and a range of 16.3-17.5 miles. It features a turning radius of 21.5 inches and a ground clearance of 2 inches.
Regular maintenance includes battery charging and inspection of bolts and screws. Troubleshooting tips are provided for common issues, with tables offering flash codes for diagnosing faults with VR2 and Shark joysticks.
The 6Runner 10 Powerchair is designed for independent mobility, with a focus on safety and ease of use. Users are encouraged to follow all guidelines to ensure optimal performance and safety.
The Shark joystick can be locked to prevent unauthorized use by holding the Power button for 4 seconds while the power is on. To unlock, press the Power button, wait for LED flashes, and press the Horn button twice within 10 seconds.
The Powerchair will not operate in freewheel mode. Both sides must be in drive mode for operation. The levers are located at the rear and must be pushed in to engage drive mode.
The Powerchair can handle low to medium gradients. Avoid rough, wet, or slippery surfaces, approach inclines head-on, and maintain a comfortable speed. Keep the seat upright on inclines.
Charge batteries fully before first use. Regularly inspect for loose bolts and clean axles and assemblies. Charge batteries after each use to extend life.
The Powerchair uses 2 x 35/36 Ah sealed lead acid batteries. Charge after using more than 30% capacity. Use only the supplied off-board charger and follow safety guidelines.
Quarterly inspections by an authorized dealer are recommended for safety and performance. Maintenance records should be kept.
The document emphasizes that the Powerchair is not suitable for individuals with physical limitations that could impede safe operation. SHOPRIDER® disclaims liability for injuries or property damage resulting from improper use. Mechanical or electrical defects are addressed on a contingency basis.
The warranty is valid only when genuine SHOPRIDER® parts are used. Unauthorized modifications invalidate the warranty. The standard warranty does not cover consumable items or extend to users other than the original purchaser.
The document includes guidelines to ensure safe operation of the Powerchair. Users are advised to contact an authorized SHOPRIDER® provider for any operational queries.
SHOPRIDER MOBILITY PRODUCTS, INC is located at 21184 S. Figueroa St, Carson, CA 90745. For assistance, users can contact 800-743-0772.
Catalog excerpts

Mid-Wheel Powerchair USER MANUAL
Open the catalog to page 1
INTRODUCTION Congratulations on insisting on the best. Shoprider Powerchairs are the ultimate combination of style and comfort. The 6Runner 10 features support easy maneuverability and smooth control for today’s active lifestyle. The innovative design of the 6Runner 10 includes articulating double frames that move in any direction. This intelligent feature keeps all 6 wheels on the ground at all times, even when driving on uneven terrain, hence the name 6Runner 10. Combine this with the programmable joystick controller, adjustable arm assemblies, flat-free tires, deluxe reclining captain seat,...
Open the catalog to page 3
EMI WARNING Electromagnetic Interference (EMI) from Radio Wave Sources Powered electric chairs may be susceptible to electromagnetic interference, which is a kind of interfering electromagnetic energy (EM) emitted from sources such as radio stations, TV stations, amateur radio (HAM) transmitters, two-way radios and cellular phones. The interference (from radio wave sources) can cause the power chairs to release its brakes, move by itself or move in unintended directions. It can also permanently damage the powered chair’s control system. The sources of radiated EMI can be broadly classified into...
Open the catalog to page 4
Power Chair Electromagnetic Interference (EMI) Because EM energy rapidly becomes more intense the closer one moves to the transmitting antenna (source), the EM fields from hand-held radio sources (transceivers) are of special concern. It is possible to unintentionally bring high levels of EM energy very close to the Powerchair’s control system while using these devices. This can affect the Powerchair’s movement and braking. Therefore, the warnings listed below are recommended to prevent possible interference with the control system of the Powerchair. WARNINGS The following warnings listed below...
Open the catalog to page 5
Safety Instructions Please use your Powerchair often and let it expand your horizons. The more mobility your Powerchair brings, the happier you will be! But, with all things, observing a few rules will ensure safe maneuvering. So please… (1) Do not drive the Powerchair without reading this instruction manual. (2) Do not use the joystick in an erratic manner when going up or down an incline. (3) Do not carry passengers or exceed the maximum user weight (Table 3). (4) Do not turn off the joystick controller by switching the On / Off Button when moving at speed. This will bring the electromagnetic...
Open the catalog to page 6
(19) Always charge the Powerchair in a well ventilated area. (20) Whenever a center bolt of the wheel assembly has been loosened, please replace with a specified new bolt from authorized providers and secure with a torque of 240 ± 5 kg-cm together with Loc-tite 271 adhesive (or equivalent). (21) When proceeding up any incline, please move the seat to the most forward position or if you have the deluxe seat, make sure that it is in the 90 degree (upright) position. (22) Do not adjust the programmer or modify the controller and cables without prior written approval from the manufacturer. Otherwise...
Open the catalog to page 7
(1) Headrest (adjustable with selected height) (2) Armrest (adjustable with selected width, angle and height) (3) (4) (5) (6) (7) (8) (9) (Flips Up for Easy Sideways Transfer) VR2 or Shark Joystick (mounted onto the armrest) & Main Controller (mounted onto the frame) Charging Port Deluxe Reclining Captain Seat Footrest Front Castor Assembly (7”) Main Drive Wheel (10”) Rear Castor Assembly (7”)
Open the catalog to page 8
Getting to Know Your Shoprider Powerchair The Seat and Arm Assemblies The seat is built for comfort, style, and stability. Your seat comes with a reclining back for comfort. The flip-up arm-rests are especially built for easy side access for getting in and out of your 6Runner 10, with the greatest of ease. The arm-rests have a built in height adjustment knob, that adjusts the arm pad to a comfortable level for the driver. The seat is covered in a durable long lasting gray vinyl for comfort and style. Flip up armrest Armrest height adjustment Seat recline lever Armrest Width Adjustments Beneath...
Open the catalog to page 9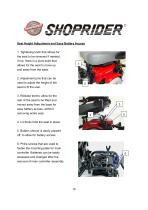
Seat Height Adjustment and Easy Battery Access 1. Tightening knob that allows for the seat to be removed if needed, if not, there is a pivot point that allows for the seat to move up and away from the base. 2. Adjustment pins that can be used to adjust the height of the seat to fit the user. 3. Release levers; allow for the rear of the seat to be lifted and 3 moved away from the base for easy battery access, without removing entire seat. 4. U-Hooks hold the seat in place. 5. Bottom shroud is easily popped off, to allow for battery access. 6. Philip screws that are used to fasten the mounting...
Open the catalog to page 10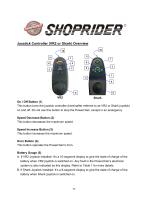
Joystick Controller (VR2 or Shark) Overview 10 On / Off Button (1) This button turns the joystick controller (hereinafter referred to as VR2 or Shark joystick) on and off. Do not use this button to stop the Powerchair, except in an emergency. Speed Decrease Button (2) This button decreases the maximum speed. Speed Increase Button (3) This button increases the maximum speed. Horn Button (4) This button operates the Powerchair’s horn. Battery Gauge (5) A. If VR2 Joystick installed: It’s a 10-segment display to give the state of charge of the battery when VR2 joystick is switched on. Any fault in...
Open the catalog to page 11
Maximum Speed Indicator (6) This is a 5-segment display, which indicates the maximum speed setting selected. Attendant Control LED (7) for Shark Joystick When the Attendant Remote is activated, the ACU LED will light up and remain lit until the attendant switches back to user mode. Service Indicator LED (8) for Shark Joystick The amber Service Indicator LED is dedicated to displaying joystick Flash Codes. For a list of Flash Codes and what faults they indicate. Refer to Table 2 for more details. Joystick (9) This controls the speed and direction of the Powerchair. Push the joystick in the direction...
Open the catalog to page 12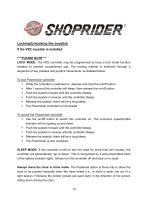
Locking/Unlocking the Joystick If the VR2 Joystick is installed: ****PLEASE NOTE**** LOCK MODE: The VR2 controller may be programmed to have a lock mode function enabled to prevent unauthorized use. The locking method is achieved through a sequence of key presses and joystick movements, as detailed below. To lock Powerchair controller: While the controller is switched on, depress and hold the on/off button. After 1 second the controller will bleep. Now release the on/off button. Push the joystick forward until the controller bleeps. Push the joystick in reverse until the controller bleeps. Release...
Open the catalog to page 13All Shoprider catalogs and technical brochures
 6Runner 10 Rehab
1 Page
 Shoprider HD
2 Pages
 Streamer Sport Rehab
2 Pages
 Streamer Sport
2 Pages
 Smartie
2 Pages
 Jimmie
2 Pages
 FPC
FPC2 Pages
 FeatherLite
2 Pages
 6 Runner 14
2 Pages
 6 Runner 10 REHAB
2 Pages
 6Runner 10 DLX
2 Pages
 Sprinter XL 4
20 Pages
 Sunrunner 3
20 Pages
 Compact Scooters
18 Pages
 Start 3
20 Pages
 Flagship
16 Pages
 Ez Chopper
18 Pages
 Echo 3
20 Pages
 Dasher 9
18 Pages
 Dasher 4
20 Pages
 Cooper
20 Pages
 ECHO
ECHO2 Pages
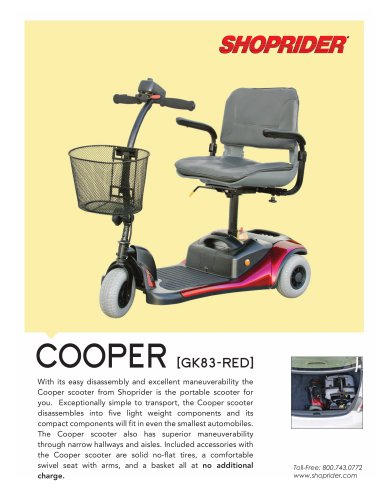 COOPER
2 Pages
 DASHER 9
2 Pages
 6 Runner 10
2 Pages
Archived catalogs
 DASHER 4 - 2014
2 Pages
- Wheelchair
- Outdoor wheelchair
- Indoor wheelchair
- Wheelchair with legrest
- Folding wheelchair
- Mobility scooter
- Electric mobility scooter
- Black wheelchair
- Electric wheelchair
- 4-wheel mobility scooter
- Height-adjustable wheelchair
- Mobility scooter with basket
- Reclining wheelchair
- Wheelchair with headrest
- 3-wheel mobility scooter
- Gray wheelchair
- Blue wheelchair
- Red wheelchair
- Folding mobility scooter
- Mobility scooter with cab