- Catalogs
- Smith & Nephew
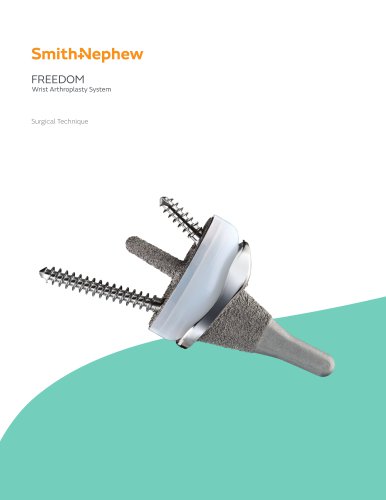
- FREEDOM
- Products
- Catalogs
- News & Trends
- Exhibitions
FREEDOM
1 /16Pages
FREEDOM
1 /16Pages
Catalog excerpts

Surgical Technique
Open the catalog to page 1
FREEDOM Wrist Arthroplasty System Surgical Technique
Open the catalog to page 2
Surgical Technique Description The system consists of components to replace the articulation of the distal radius and proximal row of carpal bones of the wrist joint and corresponding instrumentation. The components are intended to be implanted together as a system, not individually as ˆˆ-arthroplasty components. The radial component is made of Cobalt Chrome Molybdenum Alloy (CrCoMo) and has a concave articulating surface and is fixed by means of a stem which is inserted and cemented into the radial intramedullary canal. The carpal implant is an assembly consisting of a titanium carpal plate,...
Open the catalog to page 3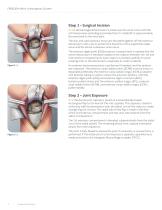
FREEDOM Wrist Arthroplasty System Step 1 • Surgical Incision 1-1 A dorsal longitudinal incision is made over the wrist in line with the 3rd metacarpal, extending proximally from its midshaft to approximately 8cm proximal to the wrist joint. The skin and subcutaneous tissue are elevated together off the extensor retinaculum, with care to protect the branches of the superficial radial nerve and the dorsal cutaneous ulnar nerve. The extensor digiti quinti (EDQ) extensor compartment is opened and the entire retinaculum is elevated radially to the septum between the 1st and 2nd extensor compartments....
Open the catalog to page 4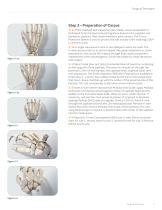
Surgical Technique Step 3 • Preparation of Carpus 3-1a If the scaphoid and triquetrum are mobile, carpus preparation is facilitated by first temporarily pinning these bones to the capitate and hamate in positions that create maximum joint contact. The Tissue Protective Sleeve is used to protect the soft tissues when inserting 0.054 (1.4mm) K-wires. 3-1b A single transverse K-wire or two oblique K-wires are used. The K-wires are inserted so as not to impede the carpal osteotomy or screw placements, and can be left in place through final carpal component implantation when advantageous. Excise the...
Open the catalog to page 5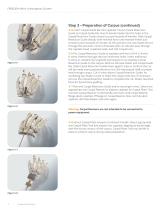
FREEDOM Wrist Arthroplasty System Step 3 • Preparation of Carpus (continued) 3-5 Insert Carpal Guide Bar into capitate. Mount Carpal Resection Guide on Carpal Guide Bar. Insert Hamate Feeler into the holes in the Carpal Resection Guide closest to proximal pole of hamate. Slide Carpal Resection Guide distally with minimal force until Hamate Feeler just contacts proximal pole of hamate. At this position, the saw blade will cut through the proximal 1.5mm of hamate (the cut will also pass through the capitate head, scaphoid waist, and mid-triquetrum). 3-6 Pin Carpal Resection Guide to capitate with...
Open the catalog to page 6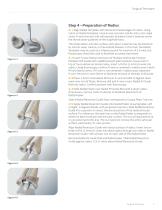
Surgical Technique Step 4 • Preparation of Radius 4-1 Align Radial Template with dorsal and radial edges of radius. Using notch on Radial Template, mark K-wire insertion site for entry into radial canal. K-wire insertion site will typically be below Lister’s tubercle and in the dorsal/ulnar quadrant of the scaphoid fossa. The distal radius’ articular surface and Lister’s tubercle may be distorted by chronic wear, trauma, or rheumatoid disease. In this case, the Radial Template may be used as a reference point for insertion of a K-wire, but fluoroscopy should be used to facilitate accurate placement....
Open the catalog to page 7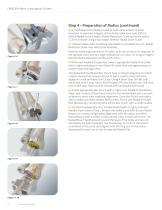
FREEDOM Wrist Arthroplasty System Step 4 • Preparation of Radius (continued) 4-6 The Radial Score Guide is used to mark ulnar extent of radial resection to maintain integrity of the distal radial ulnar joint (DRUJ). Attach Radial Score Guide to Radial Resection Guide and score radius 1-2mm in depth using a saw blade. Remove Radial Score Guide. 4-7 Resect radius with oscillating saw blade. To complete the cut, Radial Resection Guide may need to be removed. Figure 4-6 Remove remaining prominence of radius at its dorsal ulnar rim adjacent to the sigmoid notch and any large osteophytes on volar rim...
Open the catalog to page 8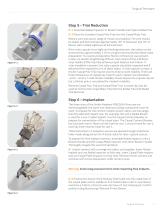
Surgical Technique Step 5 • Trial Reduction 5-1 Assemble Radial Impactor to Broach Handle and impact Radial Trial. 5-2 Place the standard Carpal Poly Trial over the Carpal Plate Trial. Reduce joint and assess range of motion and stability. The joint should be stable and demonstrate approximately 35° of extension and 35° of flexion with modest tightness at full extension. If the volar capsule is too tight and limiting extension, the radius can be shortened by approximately 1.5mm using the previously described radial preparation. If a severe preoperative flexion contracture was present, a step-cut...
Open the catalog to page 9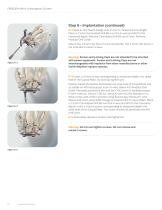
FREEDOM Wrist Arthroplasty System Step 6 • Implantation (continued) 6-3 Slide K-wire Depth Gauge over K-wire to measure screw length. Place a 2.5mm Cannulated Drill Bit over the K-wire and drill to the measured depth. Remove Cannulated Drill Bit and K-wire. Remove Modular Drill Guide. Attach the 2.5mm Hex Driver to the AO Handle. The 2.5mm Hex Driver is not intended to retain screws. Warning: Screws and Locking Caps are not intended to be inserted with power equipment. Screws and Locking Caps are not interchangeable with implants from other manufacturers or other Smith+Nephew implant systems....
Open the catalog to page 10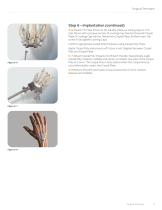
Surgical Technique Step 6 • Implantation (continued) 6-6 Attach T15 Star Driver to AO Handle. Place a Locking Cap on T15 Star Driver with concave portion of Locking Cap directed towards Carpal Plate. If Locking Cap will not thread into Carpal Plate, further insert the screw. Fully tighten Locking Caps. Confirm appropriate Carpal Poly thickness using Carpal Poly Trials. Apply Carpal Poly and ensure soft tissue is not trapped between Carpal Poly and Carpal Plate. 6-7 Attach Carpal Poly Impactor to Broach Handle. Sequentially angle Carpal Poly Impactor radially and ulnarly to impact one side of...
Open the catalog to page 11
FREEDOM Wrist Arthroplasty System Bone Grafting and Closure Perform an intercarpal fusion to stabilize the carpus. The dorsal half of each intercarpal articular surface between the triquetrum, hamate, capitate, scaphoid and trapezoid are removed using a curette or burr (avoid the Carpal Plate stem and screws). Cancellous chips from previously resected bone are packed into the interspaces. The dorsal capsule is reattached to the distal margin of the radius using the previously placed sutures. The medial and lateral aspects of the capsule are also closed. If the capsule is insufficient for closure...
Open the catalog to page 12All Smith & Nephew catalogs and technical brochures
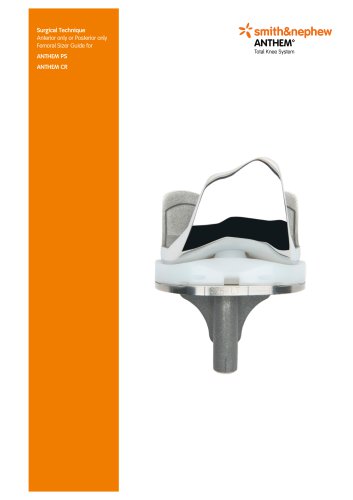 ANTHEM 2024
40 Pages
 BIRMINGHAM HIP
32 Pages
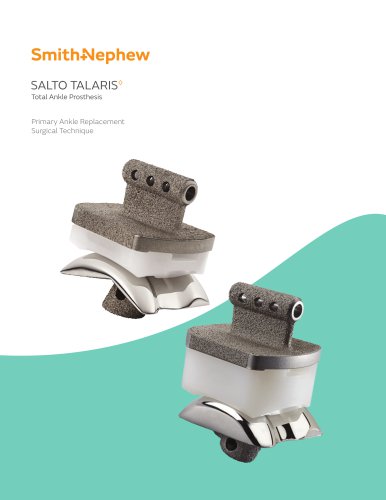 SALTO TALARIS
48 Pages
 polarstem
28 Pages
Archived catalogs
 Locking Large Fragment Overview
32 Pages
 Locking Small Fragment Overview
68 Pages
 Rediscover normal
4 Pages
 TWINFIX ULTRA HA and PK
2 Pages
 TRIGEN™ INTERTAN
12 Pages
 EVOS SMALL Resources
12 Pages
 NAVIO Message Brochure
8 Pages
 Small footprint, big impact
8 Pages
 TAYLOR SPATIAL FRAME◊
8 Pages
 Recertification Program
8 Pages
 anthem
4 Pages
 Ordering information
1 Page
 BST-CarGel ®
20 Pages
 RAPID RHINO™ NASASTENT™
6 Pages
 clancy anatomic cruiciate
2 Pages
 Electrosurgery
20 Pages
 Powered Instruments
11 Pages
 Shaver Systems
7 Pages
 Knee
Knee73 Pages
 HIP
HIP21 Pages


- Bone plate
- Compression plate
- Metallic compression plate
- Locking compression plate
- Wound care
- Medical kit
- Surgery electrode
- Electrosurgical electrode
- Surgical system
- Reusable electrode
- Cutting electrosurgical system
- Coagulation electrosurgical unit
- Endoscopy forceps
- Monopolar electrode
- Wound dressing
- Sealing forceps
- Straight electrode
- Bandage
- Proximal compression plate
- Coagulation electrode