- Catalogs
- Smith & Nephew
- polarstem
- Products
- Catalogs
- News & Trends
- Exhibitions
polarstem
1 /28Pages

polarstem
1 /28Pages
Catalog excerpts

Surgical Technique
Open the catalog to page 1
Nota Bene The surgical technique described in this brochure is the procedure suggested by the authors for uncomplicated surgery. The surgeon must, however, decide which procedure is the most suitable and effective for each individual patient. e-IFU homepage:ifu.smith-nephew.com The following technique is for informational and educational purposes only. It is not intended to serve as medical advice. It is the responsibility of treating physicians to determine and utilize the appropriate products and techniques according to their own clinical judgment for each of their patients. For more information...
Open the catalog to page 3
Introduction The POLARSTEM™ has been clinically used since 2002 with excellent clinical results for over 10 years and is based on a philosophy that has yielded excellent clinical results in the last +25 years.1,2 The simple surgical technique helps to achieve reproducible results and allows implantation using both conventional and minimally invasive techniques.3-6 The POLARSTEM can be used for all standard femoral morphologies. The range of stems allows the implant to be matched to all bone sizes, thereby reproducing the natural hip architecture.6 The cementless POLARSTEM range includes 13 standard...
Open the catalog to page 4
Precautions regarding Surgical Technique Reliable fit of femoral ball heads on stem tapers The taper connection can only be reliably and firmly seated if the surface of the ball head cone and the surface and structure of the hip stem taper are completely intact.The disposable plastic cap protecting the stem taper from damage shall not be removed until the trial ball is attached. To ensure that the ball head performs as required, it is essential to take great care when attaching it to the stem taper: Clean and dry the neck taper with a clean, sterile cloth. Place the prosthetic femoral head on...
Open the catalog to page 5
Case Studies Preoperative Female, 72 years of age, cox arthritis Combination of POLARCUP™ and cementless POLARSTEM™ Male, 70 years of age, cox arthritis Combination of POLARCUP and cementless POLARSTEM 3 Surgical Technique - POLARSTEM™ Cementless and Cemented Stem
Open the catalog to page 6
Preoperative Planning Preoperative planning is essential for determining the size of the femoral and acetabular components. HA Limit / Implantation Depth Resection Plane Preoperative planning requires: • X-rays • Templates for the acetabular component and the stem or • Digital templates for the acetabular component and the stem Templating should define the reaming required for the restoration of the cup’s center of rotation, while the height and angle of the neck resection determine the optimal length and offset. Standardized AP and lateral X-rays are essential to ensure accurate planning. The...
Open the catalog to page 7
Surgical Technique The same instruments can be used for implanting cementless and cemented stems. Position of the patient and approach For the purpose of this description a lateral approach is chosen. Surgery is performed with the patient in an extended supine lateral position. Whether an anterolateral, lateral, posterolateral or posterior approach is used is at the surgeon’s discretion. The skin incision and muscle detachment depend on the selected approach. All implants and instruments also suit a minimally invasive approach. Removing the femoral head Laterally, the osteotomy commences at the...
Open the catalog to page 8
The instrument is supplied with a thin rod, allowing easy removal of extracted bone. The femoral reamer is then introduced in the medullary canal. The canal axis is located using the endosteum. Compacting Note After introduction, we recommend turning the reamer counter clockwise to compact the cancellous bone. To advance the reamer deeper into the bone it then can be turned clockwise to penetrate further. Remove any (excess) bone material. Starting with the smallest size 01 of the detachable rasp, continue using the next size rasp each time, until the appropriate rasp is fully seated Note POLARSTEM™...
Open the catalog to page 9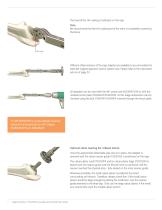
The level of the HA coating is indicated on the rasp. Note We recommend that the HA-coated part of the stem is completely covered by the femur. Different offset versions of the rasp adapter are available to accommodate the selected surgical approach and/or patient size. Please refer to the instrument sets as of page 20. All adapters can be used with the IMT power tool WOODPECKER or with the modular knock plate (75000642/21000378). At this stage anteversion can be checked using the bolt (75001747/1060909) inserted through the knock plate. The WOODPECKER is a pneumatically powered device for hip...
Open the catalog to page 10
Press button to release Trial reposition Once the appropriate detachable rasp size is in place, the adapter is removed and the trial neck (Standard, Lateral or Valgus) is positioned on the rasp. Note Rasp sizes 01 and 0 require separate Standard trial necks. Rasp sizes 1–11 correspond with the same trial neck. For collared implants, specific trial necks can be used, which show the position of the collar at the final implant. Important There is a little gap of about 1mm between planer calcar bone and bottom side of the collar. This is by purpose to avoid that the implant rests on the collar before...
Open the catalog to page 11
Stem insertion We recommend that the plastic protective cover on the taper is not removed until the stem is in its final position and the ball head is ready to be attached to the cone. Cementless stem The femoral component is inserted using the stem impactor (75023369/21000644). The edge of the HA coating indicates the required penetration level of the stem. Alternatively, the stem impactor curved (75000675/21000438) can be used. Important note for collared stems The POLARSTEM™ follows the self-locking principle with a triple-tapered design. To avoid that the implant rests on the collar before...
Open the catalog to page 12
Options for stem anchorage Option 1 To perform an implantation according to the self-locking principle, a stem of the same size as the last rasp used is selected. Option 2 To obtain a complete cement mantle, a stem of one to two sizes smaller than the last rasp used is selected. Before insertion, the anterior thread of the stem inserter (75004650/21000300) is put into the extraction hole of the stem (position the wings on either side of the stem taper). The metal wheel at the back is then turned to fix the inserter to the stem. Please review the Assembly & Cleaning Instruction Lit. No. 21365....
Open the catalog to page 13All Smith & Nephew catalogs and technical brochures
 ANTHEM 2024
40 Pages
 BIRMINGHAM HIP
32 Pages
 FREEDOM
16 Pages
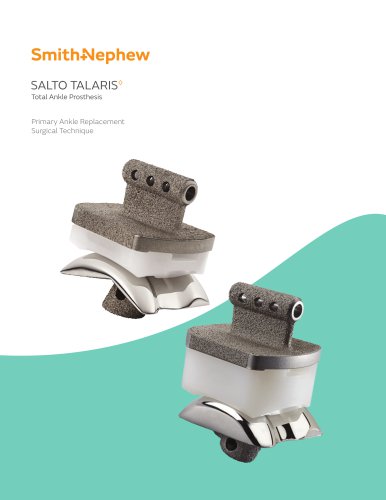 SALTO TALARIS
48 Pages
Archived catalogs
 Locking Large Fragment Overview
32 Pages
 Locking Small Fragment Overview
68 Pages
 Rediscover normal
4 Pages
 TWINFIX ULTRA HA and PK
2 Pages
 TRIGEN™ INTERTAN
12 Pages
 EVOS SMALL Resources
12 Pages
 NAVIO Message Brochure
8 Pages
 Small footprint, big impact
8 Pages
 TAYLOR SPATIAL FRAME◊
8 Pages
 Recertification Program
8 Pages
 anthem
4 Pages
 Ordering information
1 Page
 BST-CarGel ®
20 Pages
 RAPID RHINO™ NASASTENT™
6 Pages
 clancy anatomic cruiciate
2 Pages
 Electrosurgery
20 Pages
 Powered Instruments
11 Pages
 Shaver Systems
7 Pages
 Knee
Knee73 Pages
 HIP
HIP21 Pages


- Bone plate
- Compression plate
- Metallic compression plate
- Locking compression plate
- Wound care
- Medical kit
- Surgery electrode
- Electrosurgical electrode
- Surgical system
- Reusable electrode
- Cutting electrosurgical system
- Coagulation electrosurgical unit
- Endoscopy forceps
- Monopolar electrode
- Wound dressing
- Sealing forceps
- Straight electrode
- Bandage
- Proximal compression plate
- Coagulation electrode